Arduino - codificador rotatorio - servomotor
En este tutorial, vamos a aprender cómo programar Arduino para hacer girar un servomotor según el valor de salida del codificador rotatorio.
Hardware Requerido
Or you can buy the following kits:
| 1 | × | DIYables STEM V3 Starter Kit (Arduino included) | |
| 1 | × | DIYables Sensor Kit (30 sensors/displays) | |
| 1 | × | DIYables Sensor Kit (18 sensors/displays) |
Divulgación: Algunos de los enlaces proporcionados en esta sección son enlaces de afiliado de Amazon. Podemos recibir una comisión por las compras realizadas a través de estos enlaces sin costo adicional para usted. Apreciamos su apoyo.
Acerca del servomotor y del codificador rotatorio
Si no sabes sobre el servomotor y el codificador rotatorio (disposición de pines, cómo funciona, cómo programarlo...), aprende sobre ellos en los siguientes tutoriales:
Diagrama de Cableado
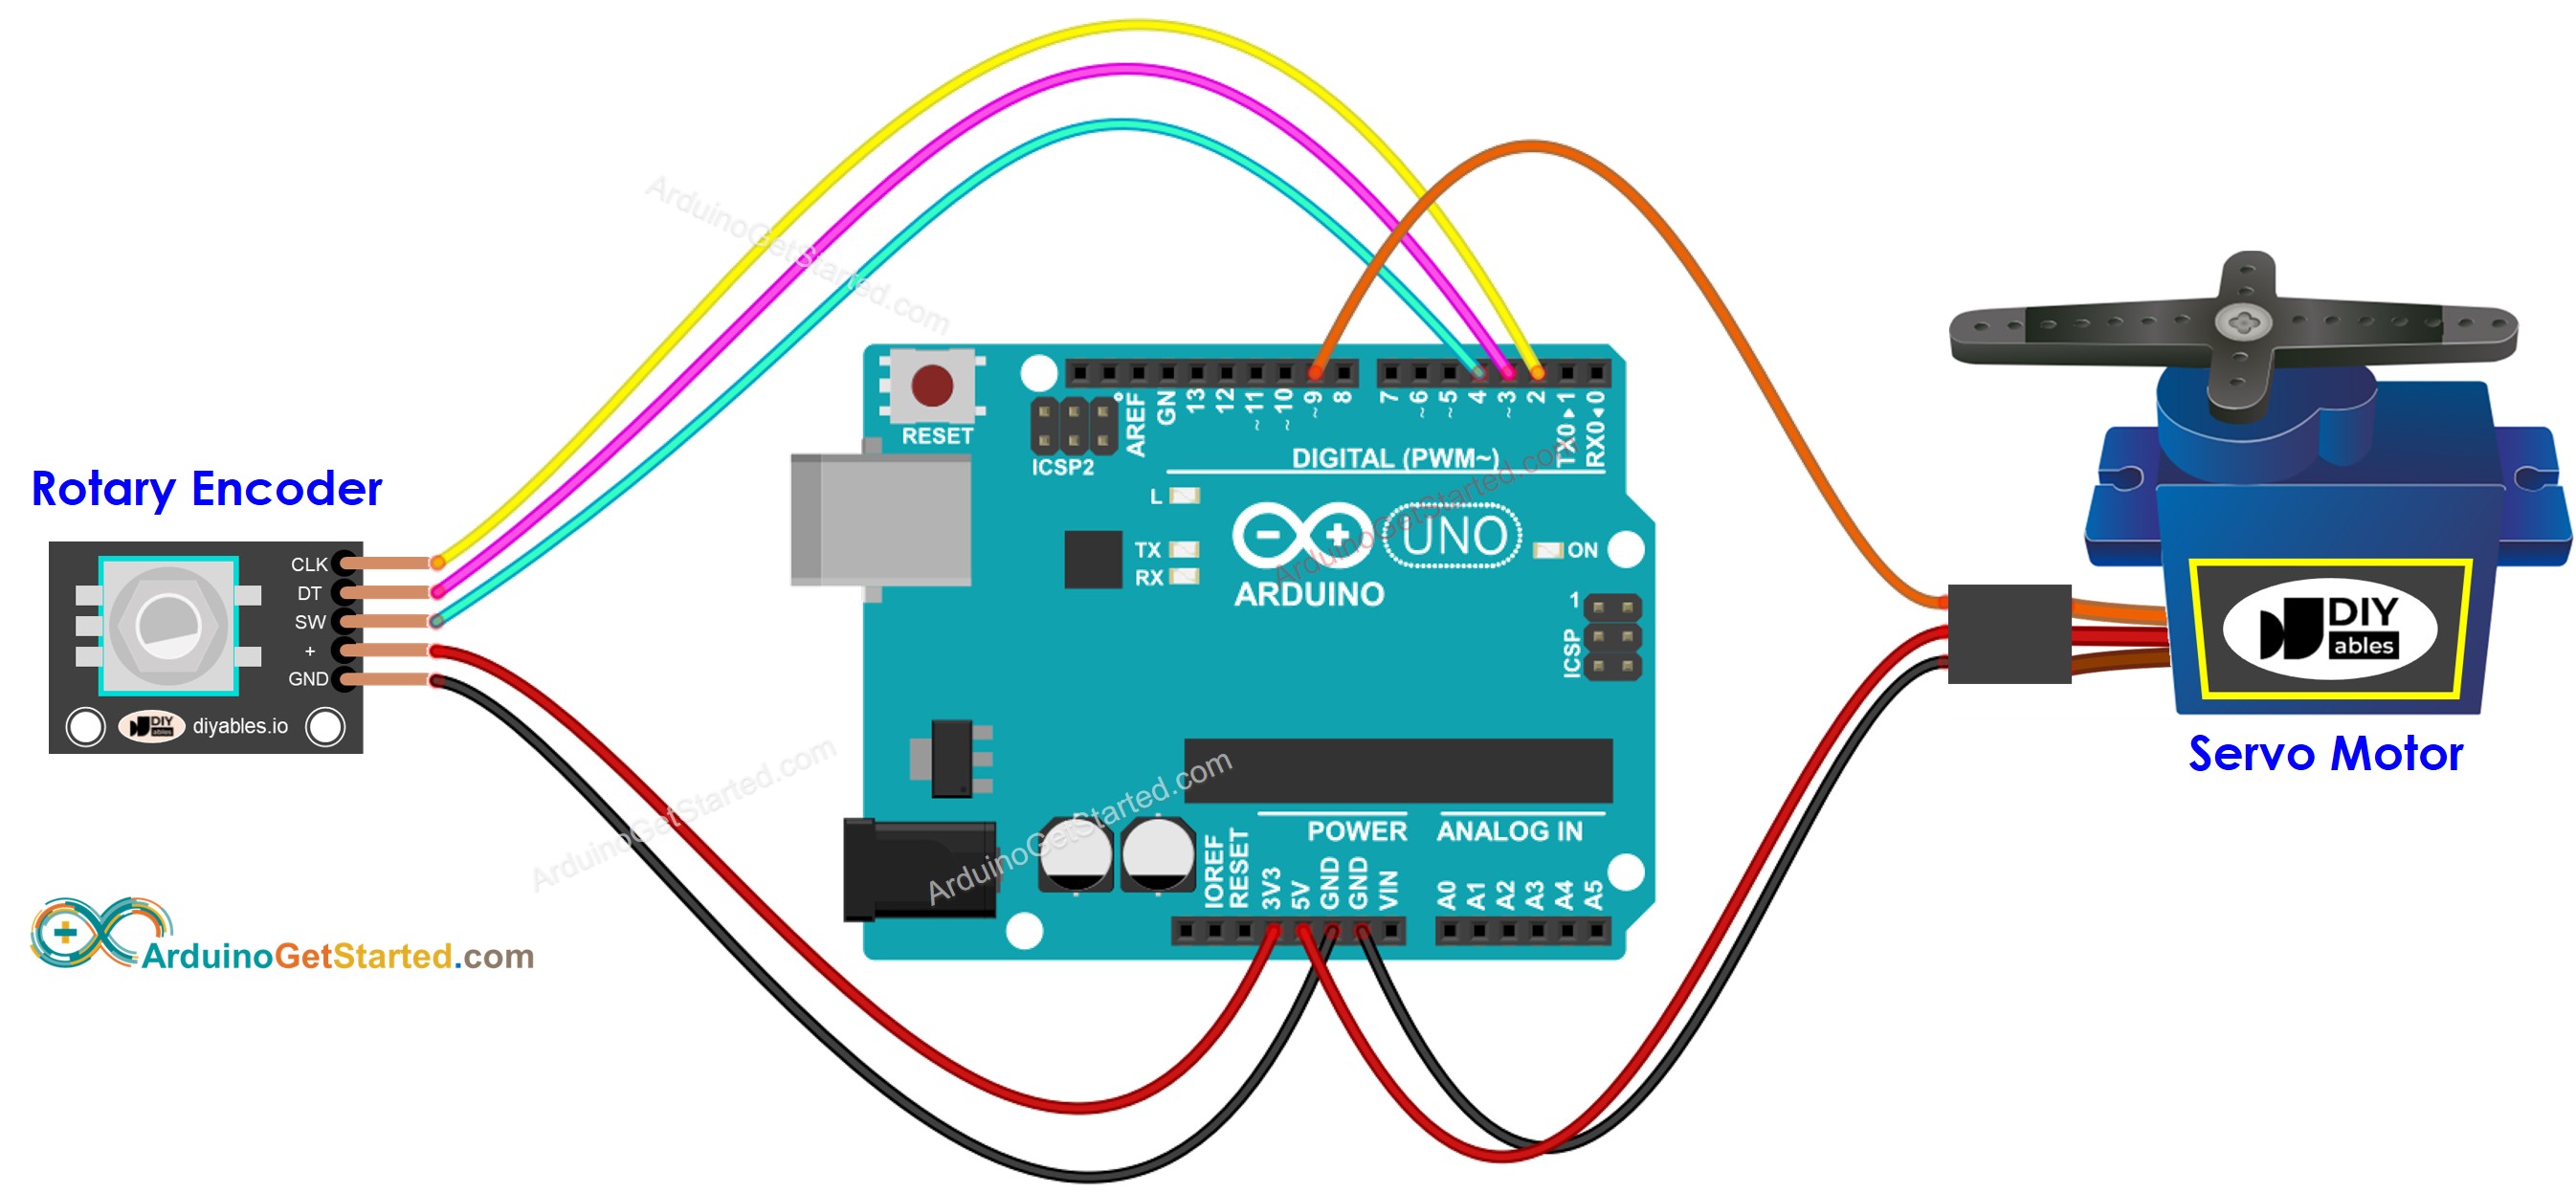
This image is created using Fritzing. Click to enlarge image
Código de Arduino
/*
* Este código de Arduino fue desarrollado por es.newbiely.com
* Este código de Arduino se proporciona al público sin ninguna restricción.
* Para tutoriales completos y diagramas de cableado, visite:
* https://es.newbiely.com/tutorials/arduino/arduino-rotary-encoder-servo-motor
*/
#include <Servo.h>
#define CLK_PIN 2
#define DT_PIN 3
#define SW_PIN 4
#define SERVO_PIN 9
#define DIRECTION_CW 0 // clockwise direction
#define DIRECTION_CCW 1 // counter-clockwise direction
int counter = 0;
int direction = DIRECTION_CW;
int CLK_state;
int prev_CLK_state;
Servo servo; // create servo object to control a servo
void setup() {
Serial.begin(9600);
// configure encoder pins as inputs
pinMode(CLK_PIN, INPUT);
pinMode(DT_PIN, INPUT);
// read the initial state of the rotary encoder's CLK pin
prev_CLK_state = digitalRead(CLK_PIN);
servo.attach(SERVO_PIN); // attaches the servo on pin 9 to the servo object
servo.write(0);
}
void loop() {
// read the current state of the rotary encoder's CLK pin
CLK_state = digitalRead(CLK_PIN);
// If the state of CLK is changed, then pulse occurred
// React to only the rising edge (from LOW to HIGH) to avoid double count
if (CLK_state != prev_CLK_state && CLK_state == HIGH) {
// if the DT state is HIGH
// the encoder is rotating in counter-clockwise direction => decrease the counter
if (digitalRead(DT_PIN) == HIGH) {
counter--;
direction = DIRECTION_CCW;
} else {
// the encoder is rotating in clockwise direction => increase the counter
counter++;
direction = DIRECTION_CW;
}
Serial.print("DIRECTION: ");
if (direction == DIRECTION_CW)
Serial.print("Clockwise");
else
Serial.print("Counter-clockwise");
Serial.print(" | COUNTER: ");
Serial.println(counter);
if (counter < 0)
counter = 0;
else if (counter > 180)
counter = 180;
// sets the servo angle according to the counter
servo.write(counter);
}
// save last CLK state
prev_CLK_state = CLK_state;
}
Pasos R\u00e1pidos
- Conectar Arduino a la PC mediante un cable USB
- Abrir Arduino IDE, seleccionar la placa y el puerto correctos
- Copiar el código anterior y abrirlo con Arduino IDE
- Hacer clic en el botón Subir en Arduino IDE para subir el código al Arduino
- Abrir el Monitor Serial
- Girar el codificador giratorio
- Ver la rotación del servomotor
- Ver el resultado en el Monitor Serial
COM6
DIRECTION: Clockwise | COUNTER/ANGLE: 19
DIRECTION: Clockwise | COUNTER/ANGLE: 26
DIRECTION: Clockwise | COUNTER/ANGLE: 34
DIRECTION: Clockwise | COUNTER/ANGLE: 46
DIRECTION: Clockwise | COUNTER/ANGLE: 53
DIRECTION: Counter-clockwise | COUNTER/ANGLE: 46
DIRECTION: Counter-clockwise | COUNTER/ANGLE: 34
DIRECTION: Counter-clockwise | COUNTER/ANGLE: 26
DIRECTION: Counter-clockwise | COUNTER/ANGLE: 16
DIRECTION: Counter-clockwise | COUNTER/ANGLE: 06
Autoscroll
Clear output
9600 baud
Newline
Explicación del código
¡Lee la explicación línea por línea en las líneas de comentario del código fuente!
Video Tutorial
Estamos considerando crear tutoriales en video. Si considera que los tutoriales en video son importantes, suscríbase a nuestro canal de YouTube para motivarnos a crear los videos.