Arduino - LED - Parpadeo sin retardo

Vamos a imaginar que Arduino tiene que realizar dos tareas: parpadear un LED y comprobar el estado del botón, que puede pulsarse en cualquier momento. Si usamos la función delay() (descrita en un tutorial anterior), Arduino puede perder algunos de los eventos de pulsación.

En este tutorial, aprenderemos cómo Arduino parpadea un LED y verifica el estado del botón sin perder ningún evento de pulsación.

Vamos a revisar tres ejemplos que se muestran a continuación y compararemos las diferencias entre ellos.

※ Nota:

  • Este método no es solo para parpadear un LED y verificar el estado del botón. En general, este método permite a Arduino realizar varias tareas al mismo tiempo sin bloquearse entre sí.
  • Este tutorial ofrece conocimientos detallados que te ayudan a entender el principio de funcionamiento. Para facilitarlo, puedes usar Arduino - LED library.

Hardware Requerido

1×Arduino Uno R3
1×Cable USB 2.0 tipo A/B (para PC USB-A)
1×Cable USB 2.0 tipo C/B (para PC USB-C)
1×LED Kit
1×LED (red)
1×LED Module
1×220Ω Resistor
1×Botón para Protoboard con Tapa
1×Kit de Botón para Protoboard
1×Botón Pulsador de Panel
1×Módulo de Botón Pulsador
1×Protoboard
1×Cables Puente
1×(Recomendado) Shield de Bloque de Terminales de Tornillo para Arduino Uno
1×(Recomendado) Shield de Protoboard para Arduino Uno
1×(Recomendado) Carcasa para Arduino Uno
1×(Recomendado) Placa Base de Prototipado y Kit de Protoboard para Arduino Uno

Or you can buy the following kits:

1×DIYables STEM V3 Starter Kit (Arduino included)
1×DIYables Sensor Kit (30 sensors/displays)
1×DIYables Sensor Kit (18 sensors/displays)
Divulgación: Algunos de los enlaces proporcionados en esta sección son enlaces de afiliado de Amazon. Podemos recibir una comisión por las compras realizadas a través de estos enlaces sin costo adicional para usted. Apreciamos su apoyo.

Buy Note: Use the LED Module for easier wiring. It includes an integrated resistor.

Acerca de LED y Botón

Si no conoces LED y un botón (pinout, cómo funciona, cómo programar ...), aprende sobre ellos en los siguientes tutoriales:

Diagrama de Cableado

Diagrama de cableado de LED de Arduino

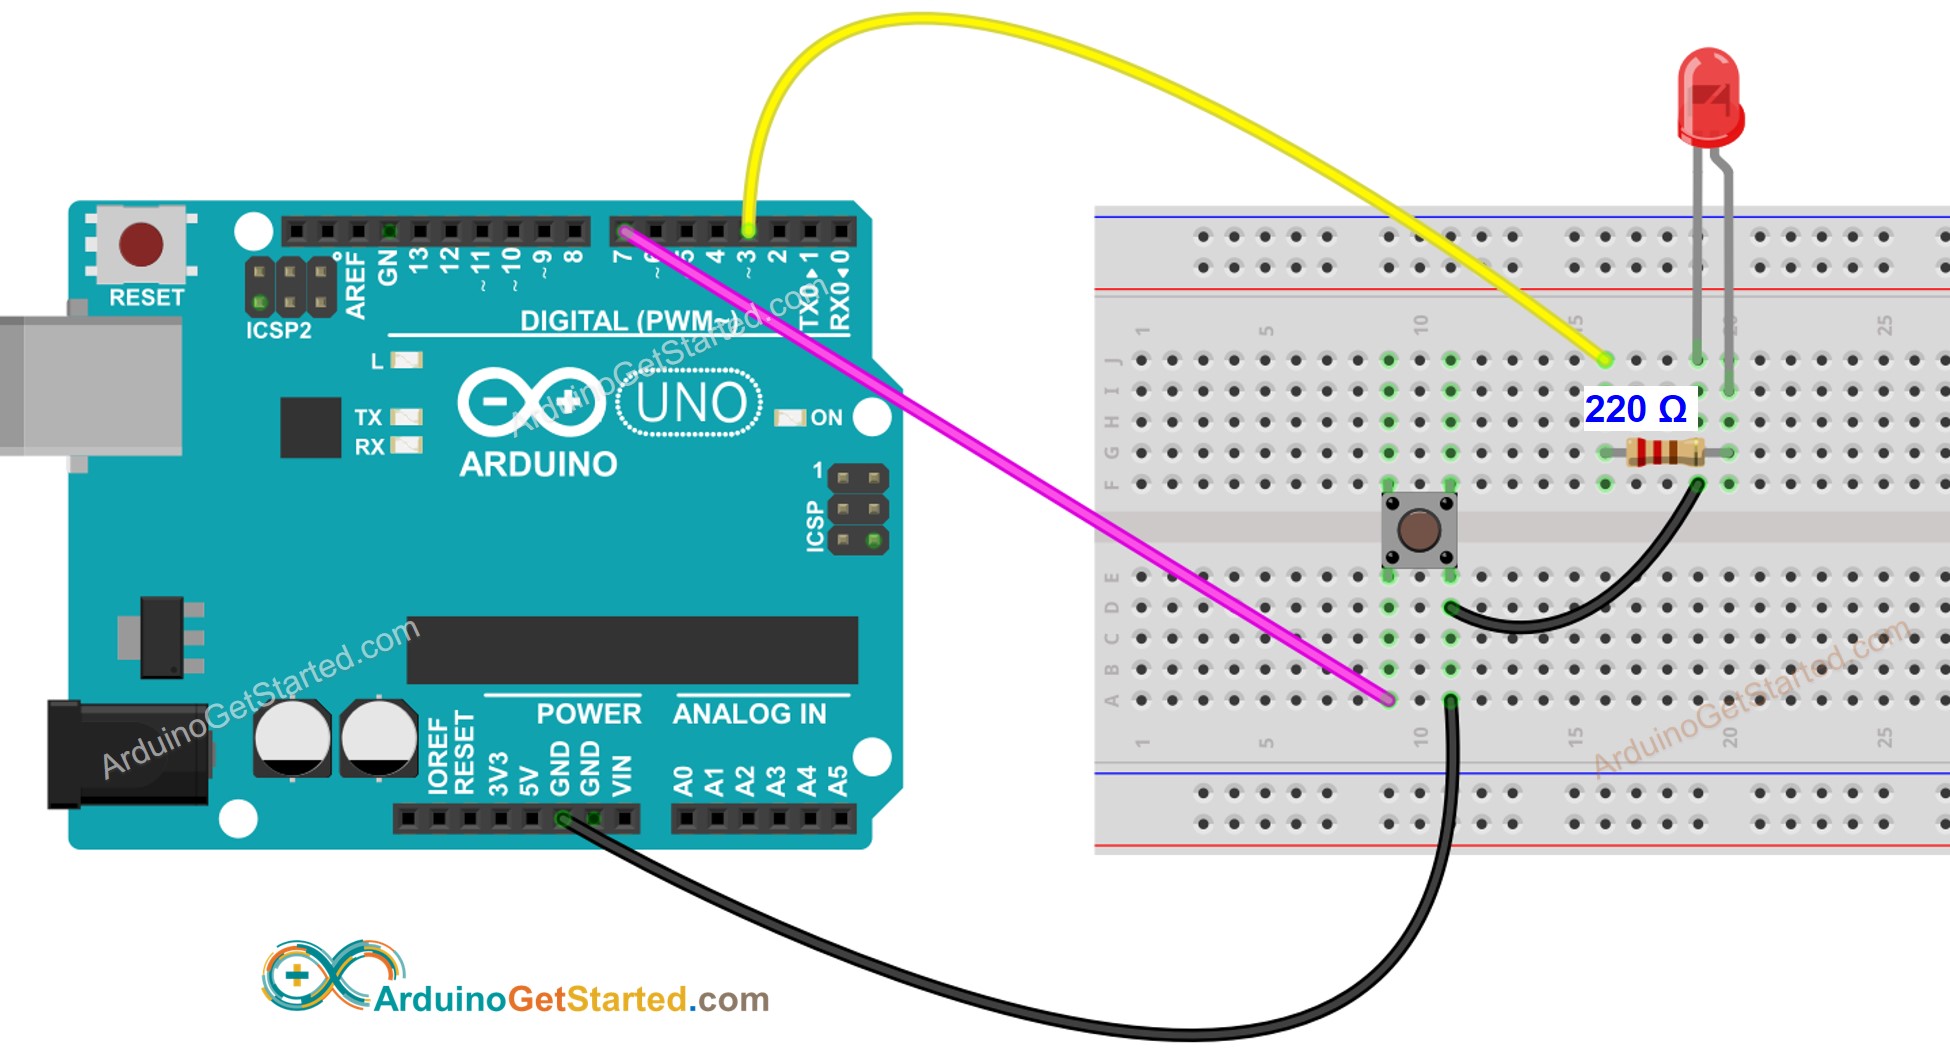
This image is created using Fritzing. Click to enlarge image

Código de Arduino - con retardo

/* * Este código de Arduino fue desarrollado por es.newbiely.com * Este código de Arduino se proporciona al público sin ninguna restricción. * Para tutoriales completos y diagramas de cableado, visite: * https://es.newbiely.com/tutorials/arduino/arduino-led-blink-without-delay */ // constants won't change: const int LED_PIN = 3; // the number of the LED pin const int BUTTON_PIN = 7; // the number of the button pin const long BLINK_INTERVAL = 1000; // interval at which to blink LED (milliseconds) // Variables will change: int ledState = LOW; // ledState used to set the LED int previousButtonState = LOW; // will store last time button was updated void setup() { Serial.begin(9600); // set the digital pin as output: pinMode(LED_PIN, OUTPUT); // set the digital pin as an input: pinMode(BUTTON_PIN, INPUT); } void loop() { // if the LED is off turn it on and vice-versa: ledState = (ledState == LOW) ? HIGH : LOW; // set the LED with the ledState of the variable: digitalWrite(LED_PIN, ledState); delay(BLINK_INTERVAL); // If button is pressed during this time, Arduino CANNOT detect int currentButtonState = digitalRead(BUTTON_PIN); if(currentButtonState != previousButtonState) { // print out the state of the button: Serial.println(currentButtonState); // save the last state of button previousButtonState = currentButtonState; } // DO OTHER WORKS HERE }

Pasos R\u00e1pidos

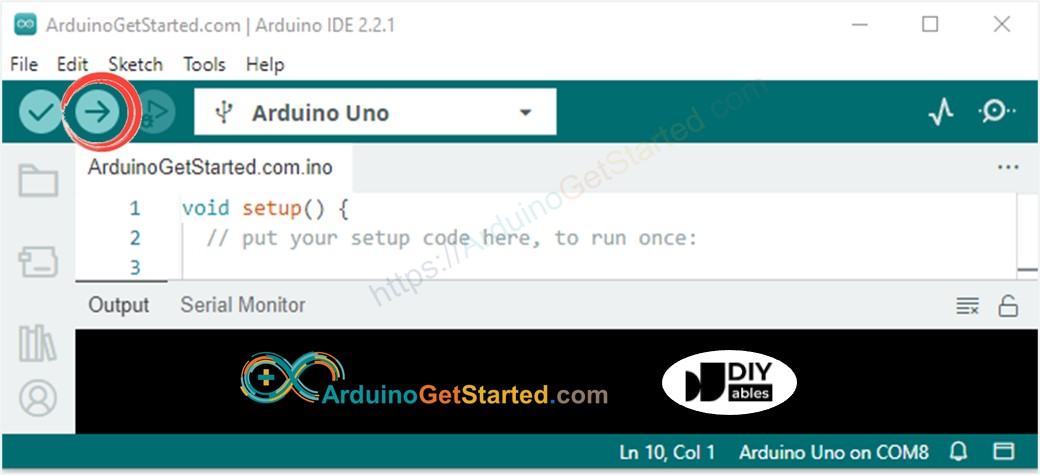
  • Conecta Arduino a la PC mediante un cable USB
  • Abre Arduino IDE, selecciona la placa y el puerto correctos
  • Copia el código anterior y ábrelo con Arduino IDE
  • Haz clic en el botón Subir en Arduino IDE para subir el código a Arduino
Arduino IDE - Cómo subir código
  • Abrir el Monitor Serial
  • Presiona el botón 4 veces
  • Observa el LED: el LED alterna entre encendido y apagado cada segundo
  • Ver la salida en el Monitor Serial
COM6
Send
1 0
Autoscroll Show timestamp
Clear output
9600 baud  
Newline  
  • En el Monitor Serial, se perdieron algunas pulsaciones. Eso se debe a que, durante el tiempo de retardo, Arduino no puede hacer nada. Por lo tanto, no puede detectar el evento de pulsación.

Código de Arduino - Sin Retardo

/* * Este código de Arduino fue desarrollado por es.newbiely.com * Este código de Arduino se proporciona al público sin ninguna restricción. * Para tutoriales completos y diagramas de cableado, visite: * https://es.newbiely.com/tutorials/arduino/arduino-led-blink-without-delay */ // constants won't change: const int LED_PIN = 3; // the number of the LED pin const int BUTTON_PIN = 7; // the number of the button pin const long BLINK_INTERVAL = 1000; // interval at which to blink LED (milliseconds) // Variables will change: int ledState = LOW; // ledState used to set the LED int previousButtonState = LOW; // will store last time button was updated unsigned long previousMillis = 0; // will store last time LED was updated void setup() { Serial.begin(9600); // set the digital pin as output: pinMode(LED_PIN, OUTPUT); // set the digital pin as an input: pinMode(BUTTON_PIN, INPUT); } void loop() { // check to see if it's time to blink the LED; that is, if the difference // between the current time and last time you blinked the LED is bigger than // the interval at which you want to blink the LED. unsigned long currentMillis = millis(); if (currentMillis - previousMillis >= BLINK_INTERVAL) { // if the LED is off turn it on and vice-versa: ledState = (ledState == LOW) ? HIGH : LOW; // set the LED with the ledState of the variable: digitalWrite(LED_PIN, ledState); // save the last time you blinked the LED previousMillis = currentMillis; } // check button state's change int currentButtonState = digitalRead(BUTTON_PIN); if(currentButtonState != previousButtonState) { // print out the state of the button: Serial.println(currentButtonState); // save the last state of button previousButtonState = currentButtonState; } // DO OTHER WORKS HERE }

Pasos R\u00e1pidos

  • Ejecuta el código anterior y presiona el botón 4 veces
  • Observa el LED: el LED alterna entre encendido y apagado periódicamente cada segundo
  • Consulta la salida en el Monitor Serial
COM6
Send
1 0 1 0 1 0 1 0
Autoscroll Show timestamp
Clear output
9600 baud  
Newline  
  • Todos los eventos de presión fueron detectados.

Explicación del código

Puede encontrar la explicación en la línea de comentarios del código Arduino anterior.

Añadir más tareas

El código de abajo parpadea dos LEDs con intervalos diferentes y verifica el estado del botón.

/* * Este código de Arduino fue desarrollado por es.newbiely.com * Este código de Arduino se proporciona al público sin ninguna restricción. * Para tutoriales completos y diagramas de cableado, visite: * https://es.newbiely.com/tutorials/arduino/arduino-led-blink-without-delay */ // constants won't change: const int LED_PIN_1 = 3; // the number of the LED 1 pin const int LED_PIN_2 = LED_BUILTIN; // the number of the LED 2 pin const int BUTTON_PIN = 7; // the number of the button pin const long BLINK_INTERVAL_1 = 1000; // interval at which to blink LED 1 (milliseconds) const long BLINK_INTERVAL_2 = 500; // interval at which to blink LED 2 (milliseconds) // Variables will change: int ledState_1 = LOW; // ledState used to set the LED 1 int ledState_2 = LOW; // ledState used to set the LED 2 int previousButtonState = LOW; // will store last time button was updated unsigned long previousMillis_1 = 0; // will store last time LED 1 was updated unsigned long previousMillis_2 = 0; // will store last time LED 2 was updated void setup() { Serial.begin(9600); // set the digital pin as output: pinMode(LED_PIN_1, OUTPUT); pinMode(LED_PIN_2, OUTPUT); // set the digital pin as an input: pinMode(BUTTON_PIN, INPUT); } void loop() { unsigned long currentMillis = millis(); // check to see if it's time to blink the LED 1 if (currentMillis - previousMillis_1 >= BLINK_INTERVAL_1) { // if the LED is off turn it on and vice-versa: ledState_1 = (ledState_1 == LOW) ? HIGH : LOW; // set the LED with the ledState of the variable: digitalWrite(LED_PIN_1, ledState_1); // save the last time you blinked the LED previousMillis_1 = currentMillis; } // check to see if it's time to blink the LED 2 if (currentMillis - previousMillis_2 >= BLINK_INTERVAL_2) { // if the LED is off turn it on and vice-versa: ledState_2 = (ledState_2 == LOW) ? HIGH : LOW; // set the LED with the ledState of the variable: digitalWrite(LED_PIN_2, ledState_2); // save the last time you blinked the LED previousMillis_2 = currentMillis; } // check button state's change int currentButtonState = digitalRead(BUTTON_PIN); if(currentButtonState != previousButtonState) { // print out the state of the button: Serial.println(currentButtonState); // save the last state of button previousButtonState = currentButtonState; } // DO OTHER WORKS HERE }

Video Tutorial

Estamos considerando crear tutoriales en video. Si considera que los tutoriales en video son importantes, suscríbase a nuestro canal de YouTube para motivarnos a crear los videos.

Extensibilidad

Este método se puede usar para permitir que Arduino realice varias tareas al mismo tiempo sin bloquearse entre sí. Por ejemplo, enviar una solicitud a Internet y esperar la respuesta; mientras se espera la respuesta, se parpadean algunos indicadores LED y se comprueba el botón de cancelación.

※ NUESTROS MENSAJES

  • No dude en compartir el enlace de este tutorial. Sin embargo, por favor no use nuestro contenido en otros sitios web. Hemos invertido mucho esfuerzo y tiempo en crear el contenido, ¡por favor respete nuestro trabajo!