Arduino - Botón - servomotor

Aprenderemos:

Ese proceso se repite.

El tutorial incluye dos partes principales:

Acerca del servomotor y del botón

Si no sabes sobre el servomotor y el botón (conexión de pines, cómo funciona, cómo programarlo ...), aprende sobre ellos en los siguientes tutoriales:

Diagrama de Cableado

Diagrama de cableado de Arduino para botón y motor servo

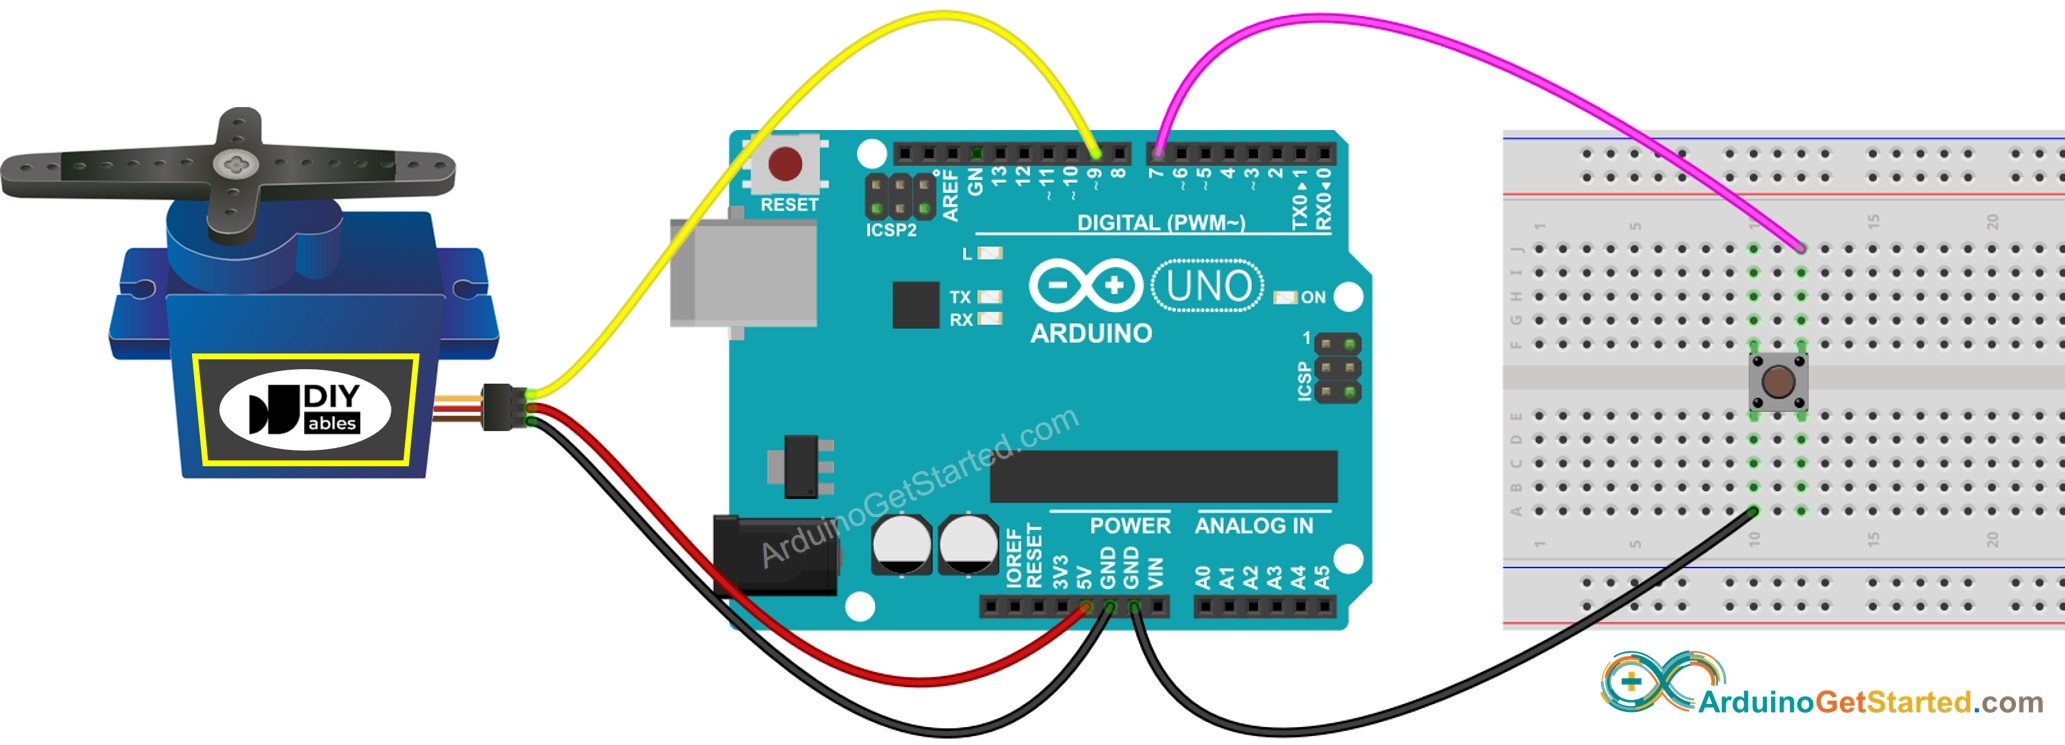
This image is created using Fritzing. Click to enlarge image

Código de Arduino - Botón que controla el servomotor sin rebote

/* * Este código de Arduino fue desarrollado por es.newbiely.com * Este código de Arduino se proporciona al público sin ninguna restricción. * Para tutoriales completos y diagramas de cableado, visite: * https://es.newbiely.com/tutorials/arduino/arduino-button-servo-motor */ #include <Servo.h> // constants won't change const int BUTTON_PIN = 7; // Arduino pin connected to button's pin const int SERVO_PIN = 9; // Arduino pin connected to servo motor's pin Servo servo; // create servo object to control a servo // variables will change: int angle = 0; // the current angle of servo motor int lastButtonState; // the previous state of button int currentButtonState; // the current state of button void setup() { Serial.begin(9600); // initialize serial pinMode(BUTTON_PIN, INPUT_PULLUP); // set arduino pin to input pull-up mode servo.attach(SERVO_PIN); // attaches the servo on pin 9 to the servo object servo.write(angle); currentButtonState = digitalRead(BUTTON_PIN); } void loop() { lastButtonState = currentButtonState; // save the last state currentButtonState = digitalRead(BUTTON_PIN); // read new state if(lastButtonState == HIGH && currentButtonState == LOW) { Serial.println("The button is pressed"); // change angle of servo motor if(angle == 0) angle = 90; else if(angle == 90) angle = 0; // control servo motor arccoding to the angle servo.write(angle); } }

Pasos R\u00e1pidos

  • Conecta Arduino al PC mediante un cable USB
  • Abre el IDE de Arduino y selecciona la placa y el puerto correctos
  • Copia el código anterior y ábrelo con el IDE de Arduino
  • Haz clic en el botón Subir en el IDE de Arduino para cargar el código en Arduino
  • Presiona el botón varias veces.
  • Observa el cambio del servomotor

※ Nota:

En la práctica, el código anterior a veces no funciona correctamente. Para que funcione siempre correctamente, necesitamos debounce para el botón. El debounce para el botón no es fácil para los principiantes. Afortunadamente, gracias a la biblioteca ezButton, Podemos hacerlo fácilmente.

Código de Arduino - El botón controla el servomotor con antirrebote

¿Por qué necesitamos el antirrebote? ⇒ ver Arduino - Tutorial de anti-rebote de botón

/* * Este código de Arduino fue desarrollado por es.newbiely.com * Este código de Arduino se proporciona al público sin ninguna restricción. * Para tutoriales completos y diagramas de cableado, visite: * https://es.newbiely.com/tutorials/arduino/arduino-button-servo-motor */ #include <Servo.h> #include <ezButton.h> // constants won't change const int BUTTON_PIN = 7; // Arduino pin connected to button's pin const int SERVO_PIN = 9; // Arduino pin connected to servo motor's pin ezButton button(BUTTON_PIN); // create ezButton object that attach to pin 7; Servo servo; // create servo object to control a servo // variables will change: int angle = 0; // the current angle of servo motor void setup() { Serial.begin(9600); // initialize serial button.setDebounceTime(50); // set debounce time to 50 milliseconds servo.attach(SERVO_PIN); // attaches the servo on pin 9 to the servo object servo.write(angle); } void loop() { button.loop(); // MUST call the loop() function first if(button.isPressed()) { Serial.println("The button is pressed"); // change angle of servo motor if(angle == 0) angle = 90; else if(angle == 90) angle = 0; // control servo motor arccoding to the angle servo.write(angle); } }

Pasos R\u00e1pidos

  • Instala la biblioteca ezButton. Ver Cómo hacerlo
  • Copia el código anterior y ábrelo con el IDE de Arduino
  • Haz clic en el botón Subir en el IDE de Arduino para subir el código al Arduino
  • Presiona el botón varias veces
  • Observa el cambio en el servomotor

Video Tutorial

Estamos considerando crear tutoriales en video. Si considera que los tutoriales en video son importantes, suscríbase a nuestro canal de YouTube para motivarnos a crear los videos.

※ NUESTROS MENSAJES

  • No dude en compartir el enlace de este tutorial. Sin embargo, por favor no use nuestro contenido en otros sitios web. Hemos invertido mucho esfuerzo y tiempo en crear el contenido, ¡por favor respete nuestro trabajo!