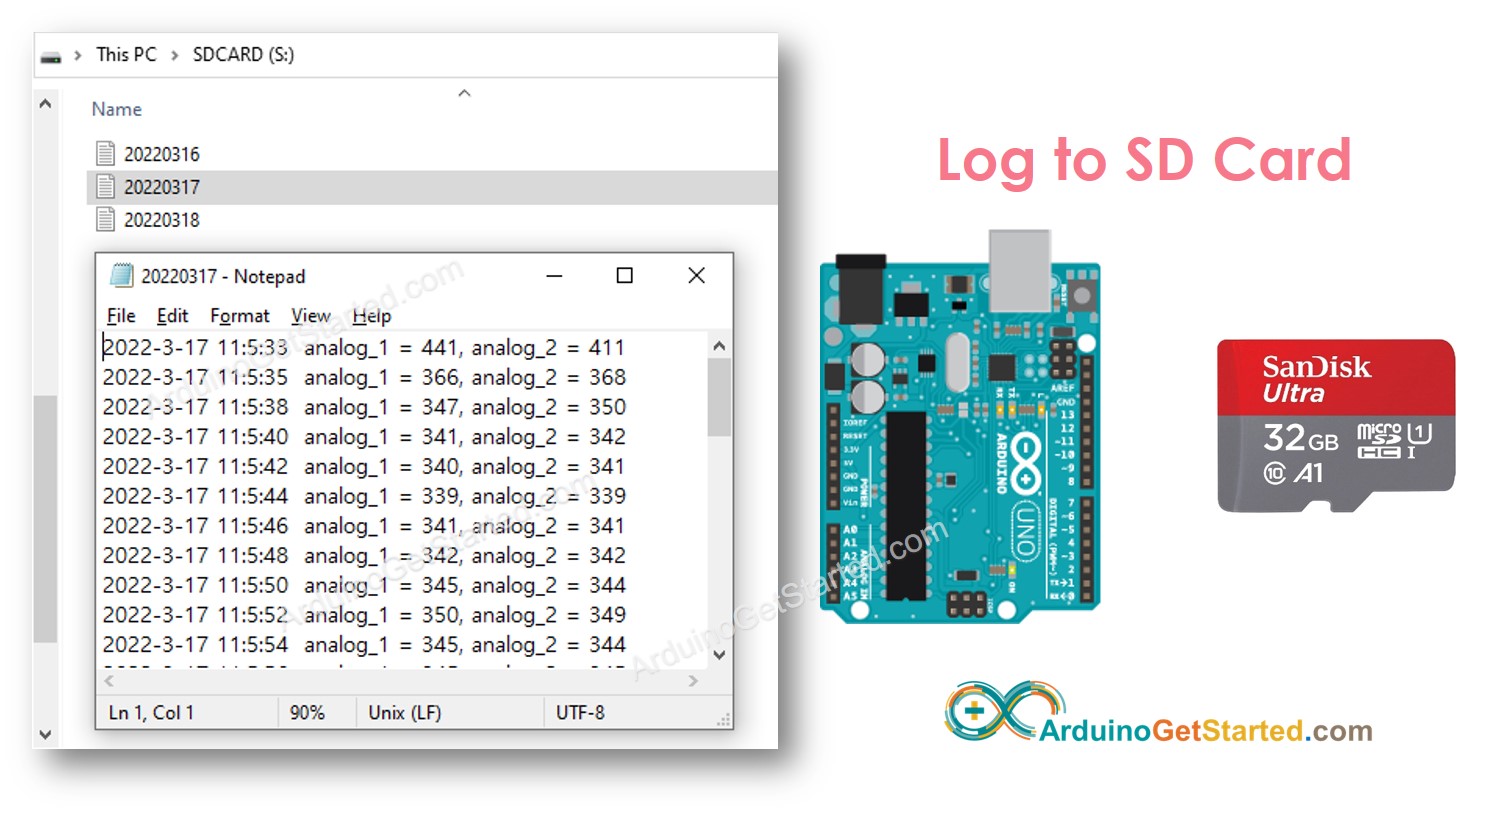
Arduino - Registrar datos con marca de tiempo en la tarjeta SD
En este tutorial, vamos a aprender cómo escribir un registro con marca de tiempo en la tarjeta microSD usando Arduino. En detalle, aprenderemos:
Arduino - Cómo registrar datos con marca de tiempo en un archivo en la tarjeta microSD
Arduino - Cómo registrar datos con marca de tiempo en varios archivos en la tarjeta microSD, un archivo por día
La información de la hora se obtiene de un módulo RTC y se escribe en la tarjeta microSD junto con los datos.
Los datos que se registran en la tarjeta microSD pueden ser de cualquier tipo. Por ejemplo:
Para simplificar, este tutorial lee valores de dos pines analógicos como ejemplo de datos. Puedes adaptar fácilmente el código a cualquier tipo de dato.
Or you can buy the following kits:
Divulgación: Algunos de los enlaces proporcionados en esta sección son enlaces de afiliado de Amazon. Podemos recibir una comisión por las compras realizadas a través de estos enlaces sin costo adicional para usted. Apreciamos su apoyo.
Si no conoces el módulo de tarjeta microSD y el módulo RTC (configuración de pines, cómo funciona, cómo programar...), aprende sobre ellos en los siguientes tutoriales:
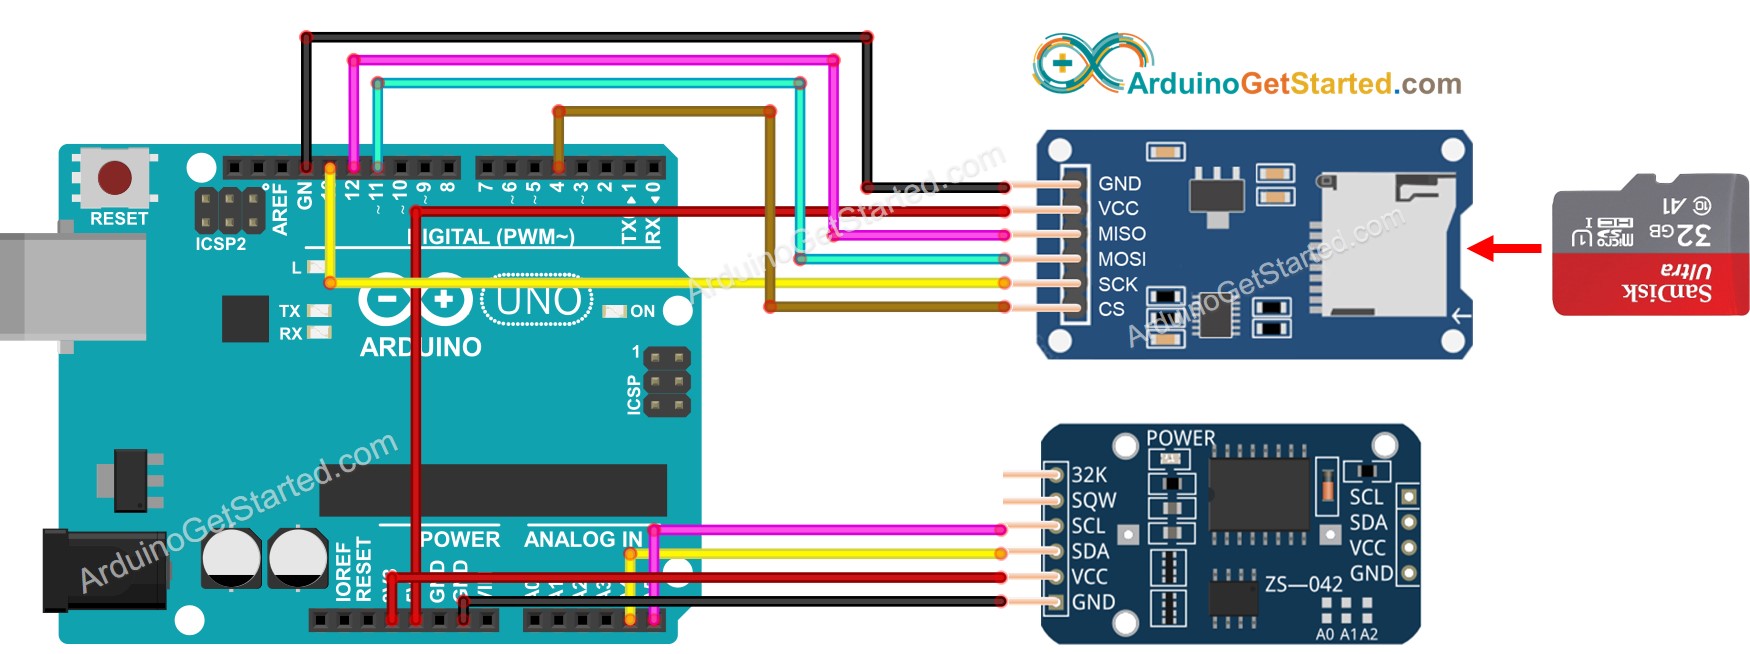
This image is created using Fritzing. Click to enlarge image
※ Nota:
Si usas un escudo Ethernet o cualquier escudo que tenga un soporte para tarjeta microSD, no necesitas usar el módulo de tarjeta microSD. Solo necesitas insertar la tarjeta microSD en el soporte para tarjeta microSD del escudo.
#include <SD.h>
#include <RTClib.h>
#define PIN_SPI_CS 4
#define FILE_NAME "log.txt"
RTC_DS3231 rtc;
File myFile;
void setup() {
Serial.begin(9600);
if (!rtc.begin()) {
Serial.println(F("Couldn't find RTC"));
while (1);
}
if (!SD.begin(PIN_SPI_CS)) {
Serial.println(F("SD CARD FAILED, OR NOT PRESENT!"));
while (1);
}
Serial.println(F("SD CARD INITIALIZED."));
Serial.println(F("--------------------"));
}
void loop() {
myFile = SD.open(FILE_NAME, FILE_WRITE);
if (myFile) {
Serial.println(F("Writing log to SD Card"));
DateTime now = rtc.now();
myFile.print(now.year(), DEC);
myFile.print('-');
myFile.print(now.month(), DEC);
myFile.print('-');
myFile.print(now.day(), DEC);
myFile.print(' ');
myFile.print(now.hour(), DEC);
myFile.print(':');
myFile.print(now.minute(), DEC);
myFile.print(':');
myFile.print(now.second(), DEC);
myFile.print(" ");
int analog_1 = analogRead(A0);
int analog_2 = analogRead(A1);
myFile.print("analog_1 = ");
myFile.print(analog_1);
myFile.print(", ");
myFile.print("analog_2 = ");
myFile.print(analog_2);
myFile.write("\n");
myFile.close();
} else {
Serial.print(F("SD Card: error on opening file "));
Serial.println(FILE_NAME);
}
delay(2000);
}
Asegúrate de que la tarjeta microSD esté formateada en FAT16 o FAT32 (búscala en Google)
Copia el código anterior y ábrelo con el IDE de Arduino
Haz clic en el botón Subir del IDE de Arduino para subir el código a Arduino
Consulta el resultado en el Monitor Serial
SD CARD INITIALIZED.
--------------------
Writing log to SD Card
Writing log to SD Card
Writing log to SD Card
Writing log to SD Card
Writing log to SD Card
Writing log to SD Card
Writing log to SD Card
Desconecte la tarjeta micro SD del módulo de la tarjeta micro SD
Inserte la tarjeta micro SD en un lector de tarjetas SD USB
Conecte el lector USB de tarjetas SD a la PC
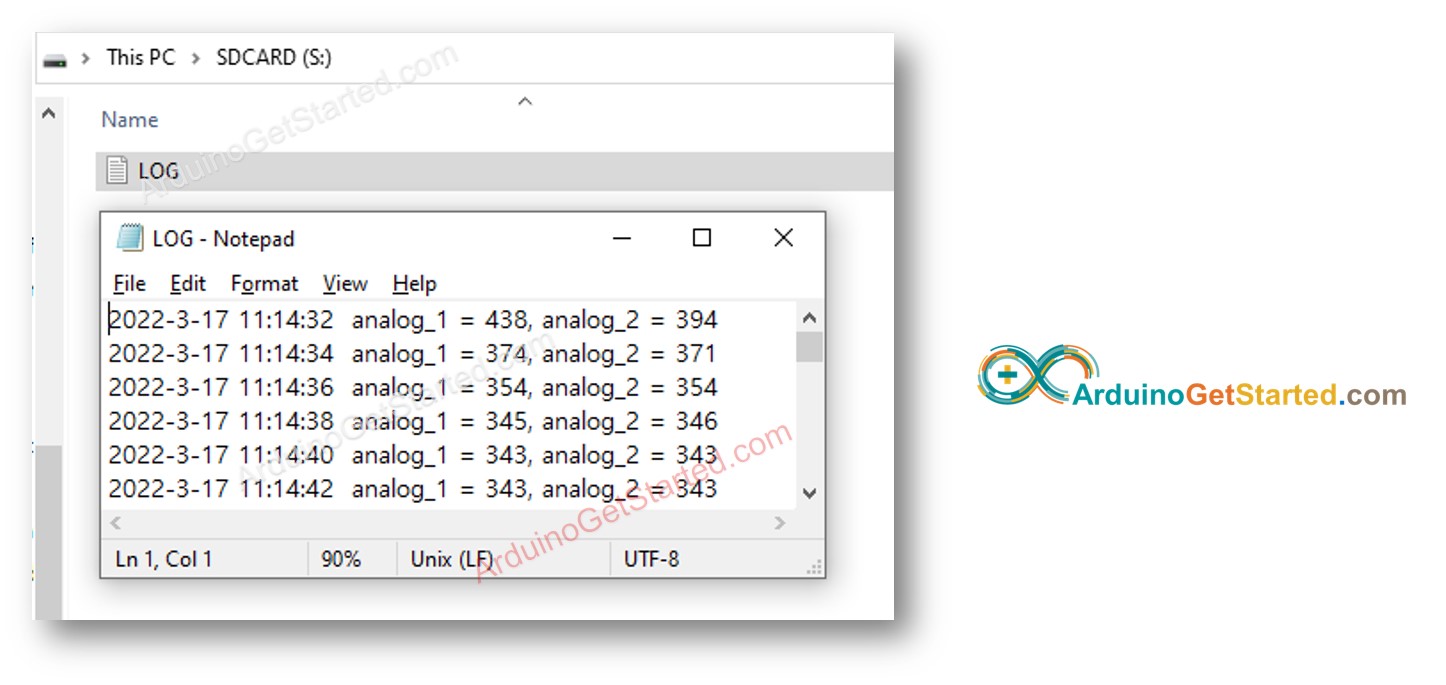
Abra el archivo log.txt en su PC; se muestra a continuación
Si no tienes un lector de tarjetas SD USB, puedes verificar el contenido del archivo de registro ejecutando el siguiente código de Arduino.
#include <SD.h>
#define PIN_SPI_CS 4
#define FILE_NAME "log.txt"
File myFile;
void setup() {
Serial.begin(9600);
if (!SD.begin(PIN_SPI_CS)) {
Serial.println(F("SD CARD FAILED, OR NOT PRESENT!"));
while (1);
}
Serial.println(F("SD CARD INITIALIZED."));
myFile = SD.open(FILE_NAME, FILE_READ);
if (myFile) {
while (myFile.available()) {
char ch = myFile.read();
Serial.print(ch);
}
myFile.close();
} else {
Serial.print(F("SD Card: error on opening file "));
Serial.println(FILE_NAME);
}
}
void loop() {
}
Escribir el registro en un solo archivo da como resultado un tamaño de archivo grande con el tiempo y dificulta su revisión. El código a continuación escribirá el archivo de registro en múltiples archivos:
#include <SD.h>
#include <RTClib.h>
#define PIN_SPI_CS 4
RTC_DS3231 rtc;
File myFile;
char filename[] = "yyyymmdd.txt";
void setup() {
Serial.begin(9600);
if (!rtc.begin()) {
Serial.println(F("Couldn't find RTC"));
while (1);
}
if (!SD.begin(PIN_SPI_CS)) {
Serial.println(F("SD CARD FAILED, OR NOT PRESENT!"));
while (1);
}
Serial.println(F("SD CARD INITIALIZED."));
Serial.println(F("--------------------"));
}
void loop() {
DateTime now = rtc.now();
int year = now.year();
int month = now.month();
int day = now.day();
filename[0] = (year / 1000) + '0';
filename[1] = ((year % 1000) / 100) + '0';
filename[2] = ((year % 100) / 10) + '0';
filename[3] = (year % 10) + '0';
filename[4] = (month / 10) + '0';
filename[5] = (month % 10) + '0';
filename[6] = (day / 10) + '0';
filename[7] = (day % 10) + '0';
myFile = SD.open(filename, FILE_WRITE);
if (myFile) {
Serial.println(F("Writing log to SD Card"));
myFile.print(now.year(), DEC);
myFile.print('-');
myFile.print(now.month(), DEC);
myFile.print('-');
myFile.print(now.day(), DEC);
myFile.print(' ');
myFile.print(now.hour(), DEC);
myFile.print(':');
myFile.print(now.minute(), DEC);
myFile.print(':');
myFile.print(now.second(), DEC);
myFile.print(" ");
int analog_1 = analogRead(A0);
int analog_2 = analogRead(A1);
myFile.print("analog_1 = ");
myFile.print(analog_1);
myFile.print(", ");
myFile.print("analog_2 = ");
myFile.print(analog_2);
myFile.write("\n");
myFile.close();
} else {
Serial.print(F("SD Card: error on opening file "));
Serial.println(filename);
}
delay(2000);
}
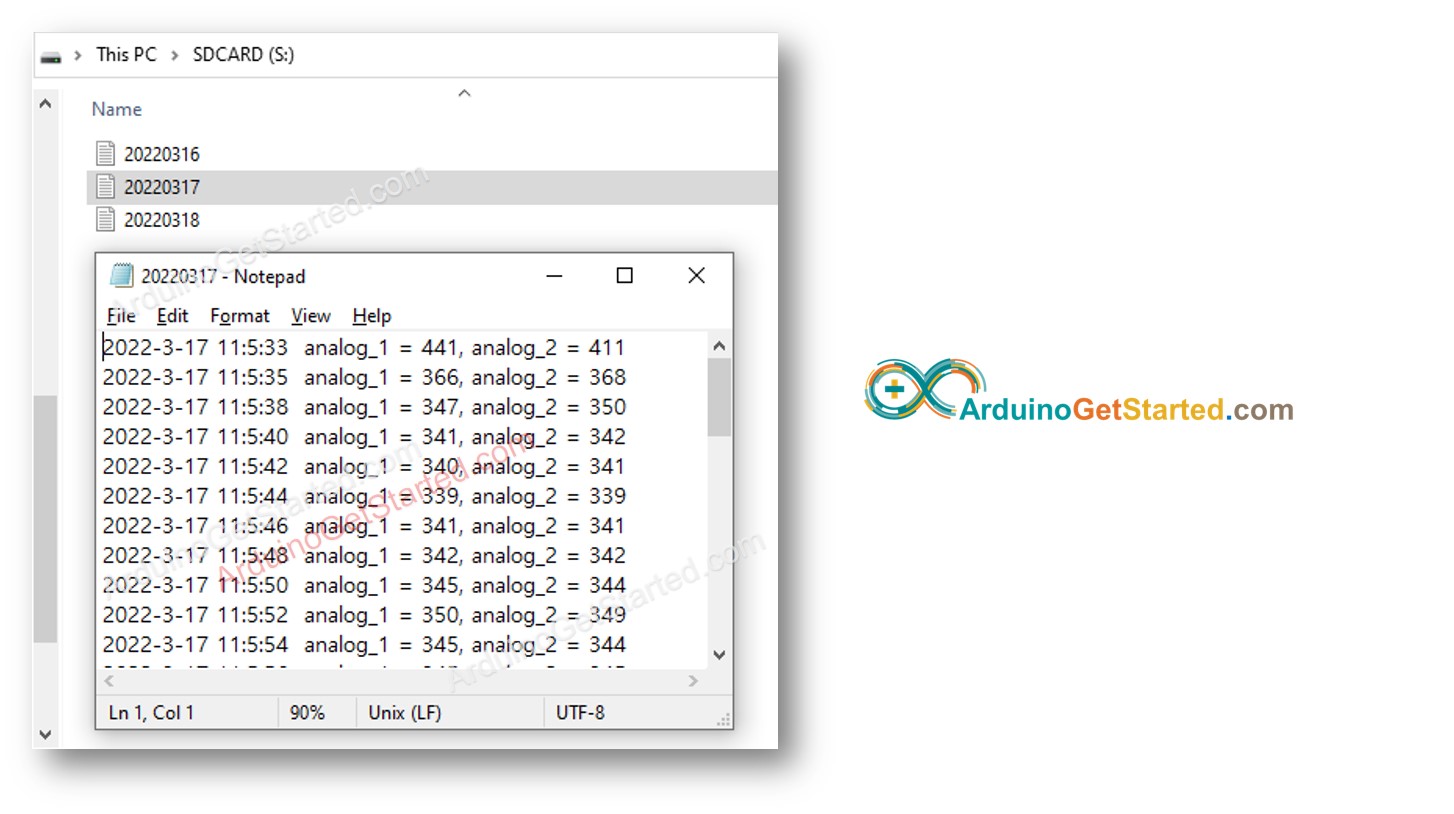
Después de una larga carrera, si tú:
Desconecta la tarjeta microSD del módulo microSD
Inserta la tarjeta microSD en un lector USB de tarjetas SD
Conecta el lector USB de tarjetas SD al PC
Verás los archivos como se muestran a continuación:
Estamos considerando crear tutoriales en video. Si considera que los tutoriales en video son importantes, suscríbase a nuestro canal de YouTube para motivarnos a crear los videos.
※ NUESTROS MENSAJES
No dude en compartir el enlace de este tutorial. Sin embargo, por favor no use nuestro contenido en otros sitios web. Hemos invertido mucho esfuerzo y tiempo en crear el contenido, ¡por favor respete nuestro trabajo!