Arduino - Reproductor MP3
En este tutorial, aprenderemos cómo hacer un reproductor MP3 utilizando Arduino, un módulo reproductor MP3, una tarjeta microSD y un altavoz. Los archivos MP3 (música o audio grabado) se almacenan en la tarjeta microSD. Luego, Arduino puede controlar el módulo reproductor MP3 para leer una canción seleccionada de la tarjeta SD, convertirla en una señal de audio y enviar la señal al altavoz. En detalle, aprenderemos:
- Cómo funciona
- Cómo conectar el altavoz y los módulos reproductores MP3 al Arduino
- Cómo programar Arduino para reproducir una canción almacenada en la tarjeta micro SD
- Cómo añadir los botones de reproducir/pausar/siguiente/anterior
Luego, puedes modificar el código para añadir un potenciómetro o un codificador giratorio para cambiar el volumen.
Hardware Requerido
Or you can buy the following kits:
| 1 | × | DIYables STEM V3 Starter Kit (Arduino included) | |
| 1 | × | DIYables Sensor Kit (30 sensors/displays) | |
| 1 | × | DIYables Sensor Kit (18 sensors/displays) |
Acerca del módulo reproductor MP3 en serie y del altavoz
Pinout del módulo de reproductor MP3 en serie
Un módulo reproductor de MP3 en serie tiene tres interfaces:
- La interfaz hacia Arduino incluye 4 pines:
- Pin RX: pin de datos, necesita conectarse a un pin TX de Arduino (Serial Hardware o Software)
- Pin TX: pin de datos, necesita conectarse a un pin RX de Arduino (Serial Hardware o Software)
- Pin VCC: pin de alimentación, necesita conectarse a VCC (5V)
- Pin GND: pin de alimentación, necesita conectarse a GND (0V)
- La interfaz hacia el altavoz es un conector hembra de salida auxiliar de 3,5 mm.
- La interfaz hacia la tarjeta Micro SD es un zócalo para tarjeta Micro SD en la parte trasera del módulo.
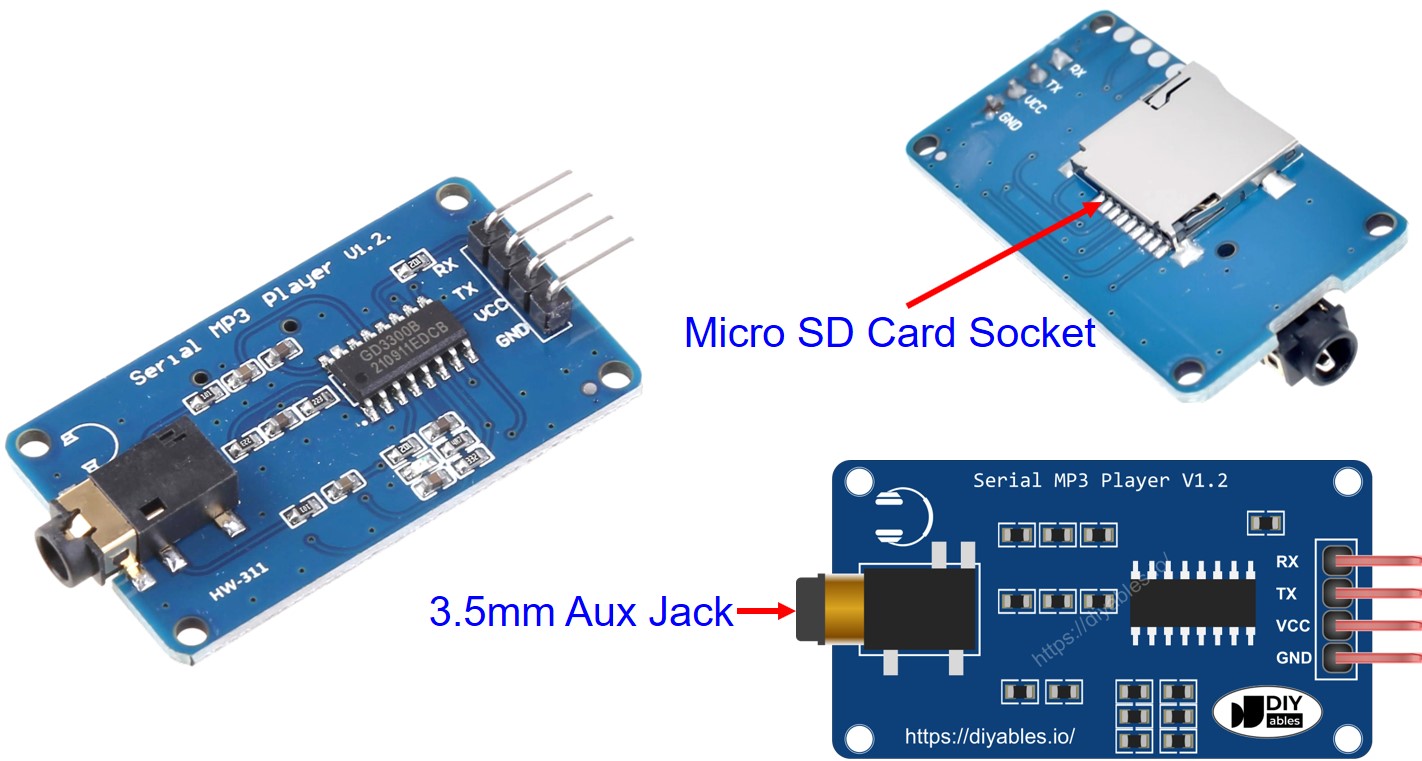
Pinout del altavoz
Un altavoz suele tener dos interfaces:
- Interfaz de señal de audio: es un conector macho AUX de 3,5 mm que se conecta al módulo reproductor de MP3
- Interfaz de alimentación: puede ser USB, un adaptador de corriente de 5 V o cualquier otra interfaz de alimentación
Cómo funciona
Lo que necesitamos preparar:
- Almacenar previamente una lista de canciones o audio grabado que queremos reproducir en la tarjeta microSD.
- Inserte la tarjeta microSD en el módulo reproductor de MP3.
- Conecte el módulo reproductor de MP3 al Arduino.
- Conecte el altavoz al módulo reproductor de MP3 a
- Conecte el altavoz a una fuente de alimentación.
Cada archivo MP3 almacenado en la tarjeta microSD tendrá un índice. El índice es el orden de las canciones almacenadas, empezando desde 0.
Luego podemos programar Arduino para enviar comandos al módulo reproductor de MP3. Admite los siguientes comandos:
- Reproducir
- Pausar
- Reproducir siguiente
- Reproducir anterior
- Ajustar volumen
Cuando el módulo reproductor de MP3 lee el archivo MP3 desde la tarjeta microSD, lo convierte en una señal de audio y la envía al altavoz a través de la interfaz auxiliar de 3,5 mm.
Diagrama de Cableado
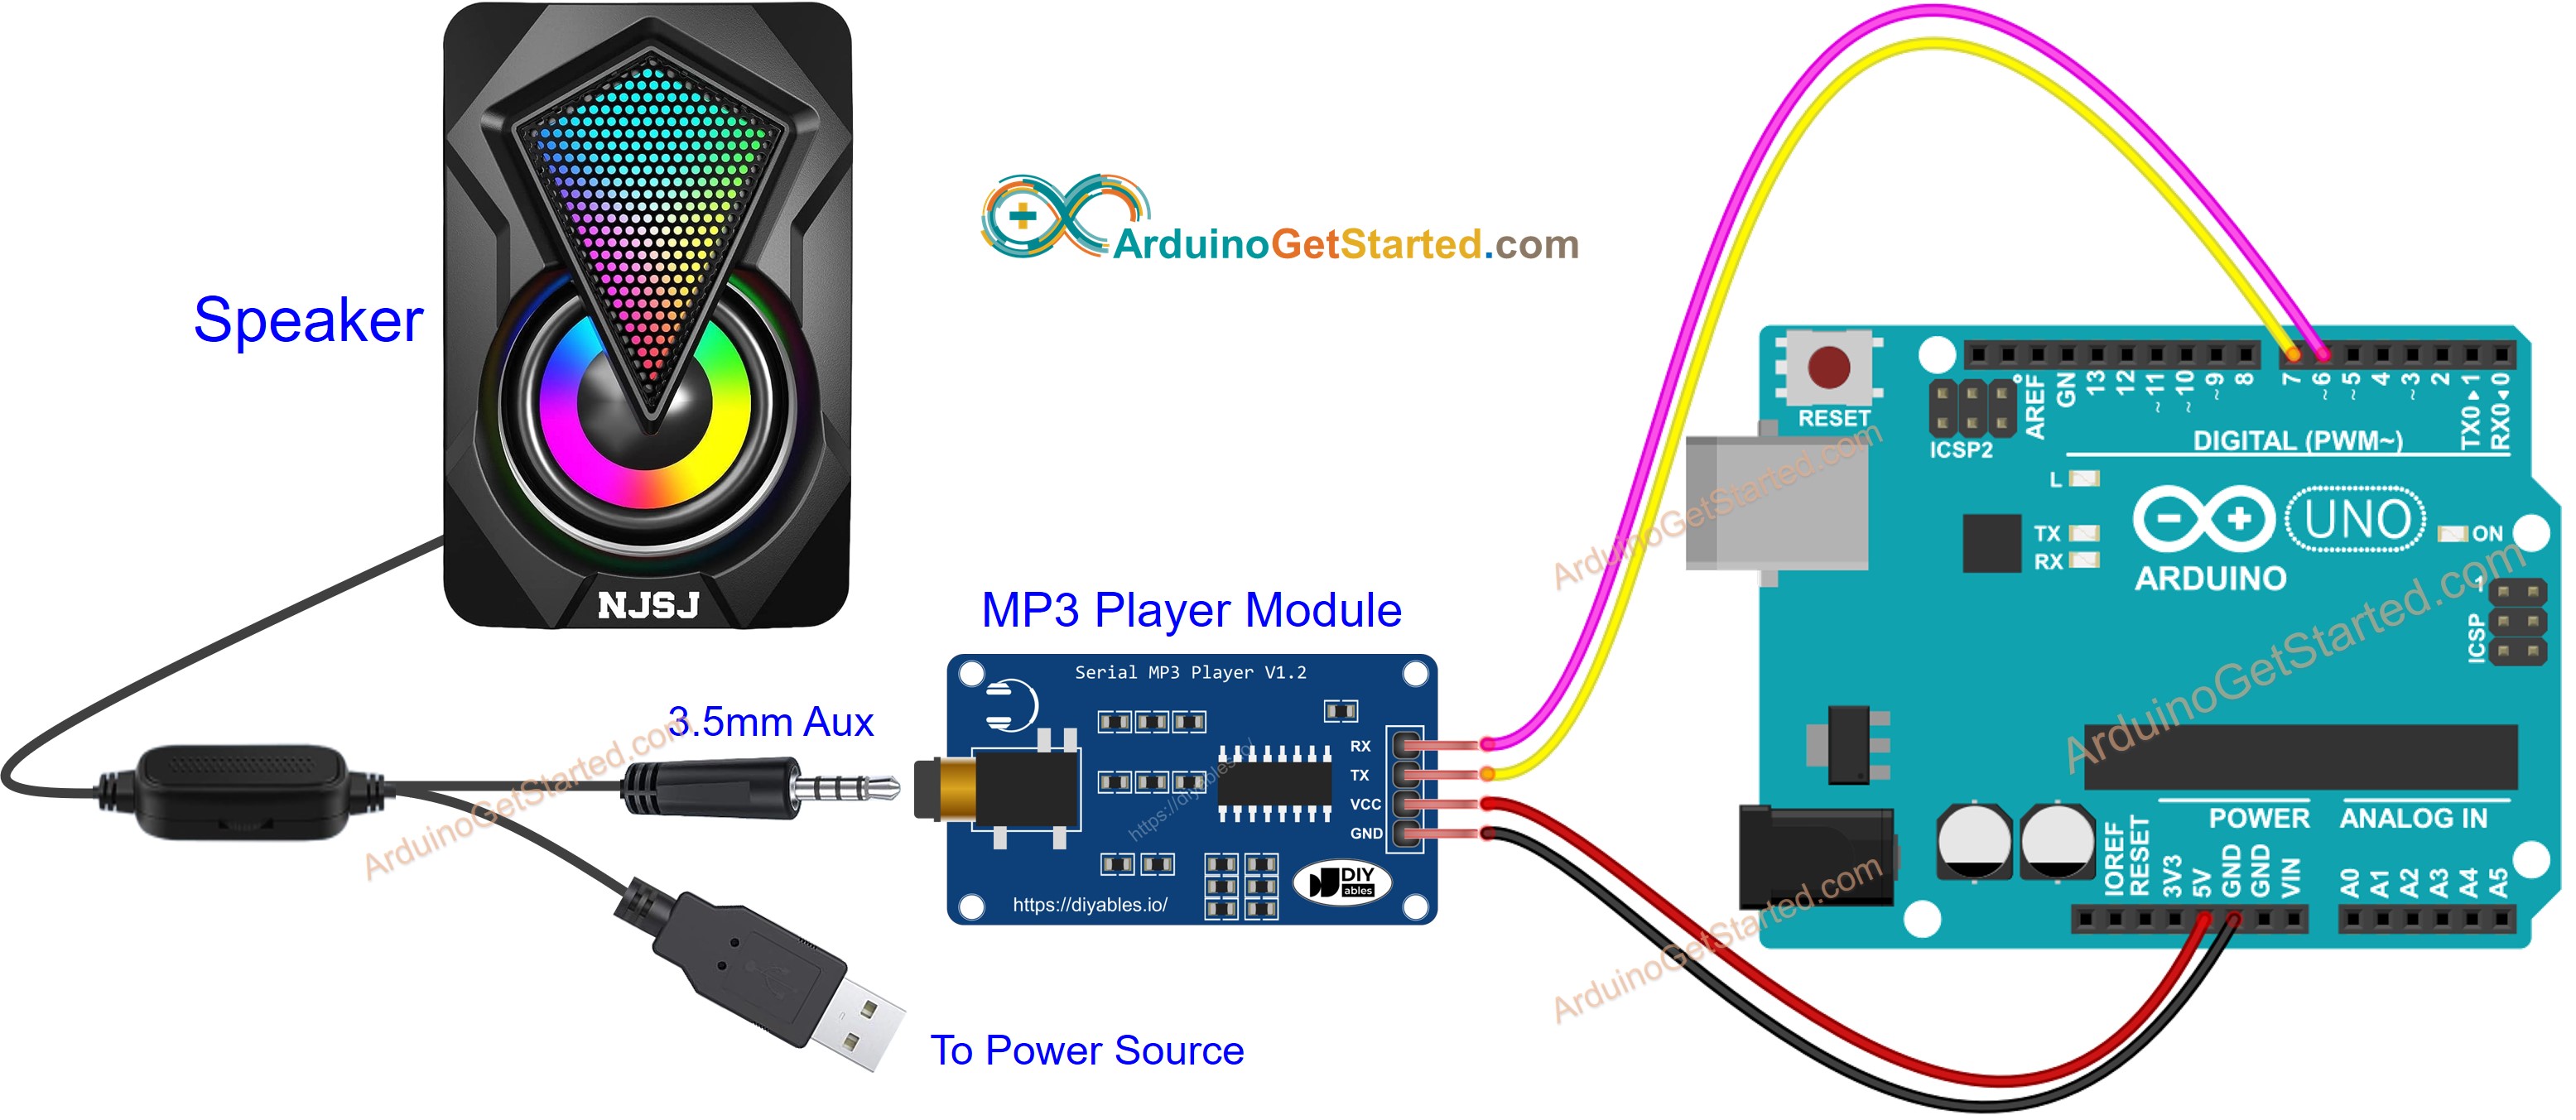
This image is created using Fritzing. Click to enlarge image
Código de Arduino - Reproducir música
El código siguiente reproduce la primera canción almacenada en la tarjeta microSD.
Pasos R\u00e1pidos
- Siga las instrucciones en Cómo Funciona
- Copie el código anterior y ábralo con Arduino IDE
- Haga clic en el botón Subir en Arduino IDE para cargar el código en Arduino
- Disfrute de la música
Código de Arduino: Reproducir música con botones de control
El código a continuación es una mejora del código anterior. Añade cuatro botones para que puedas interactuar con el reproductor de MP3.
El diagrama de cableado para el código anterior:
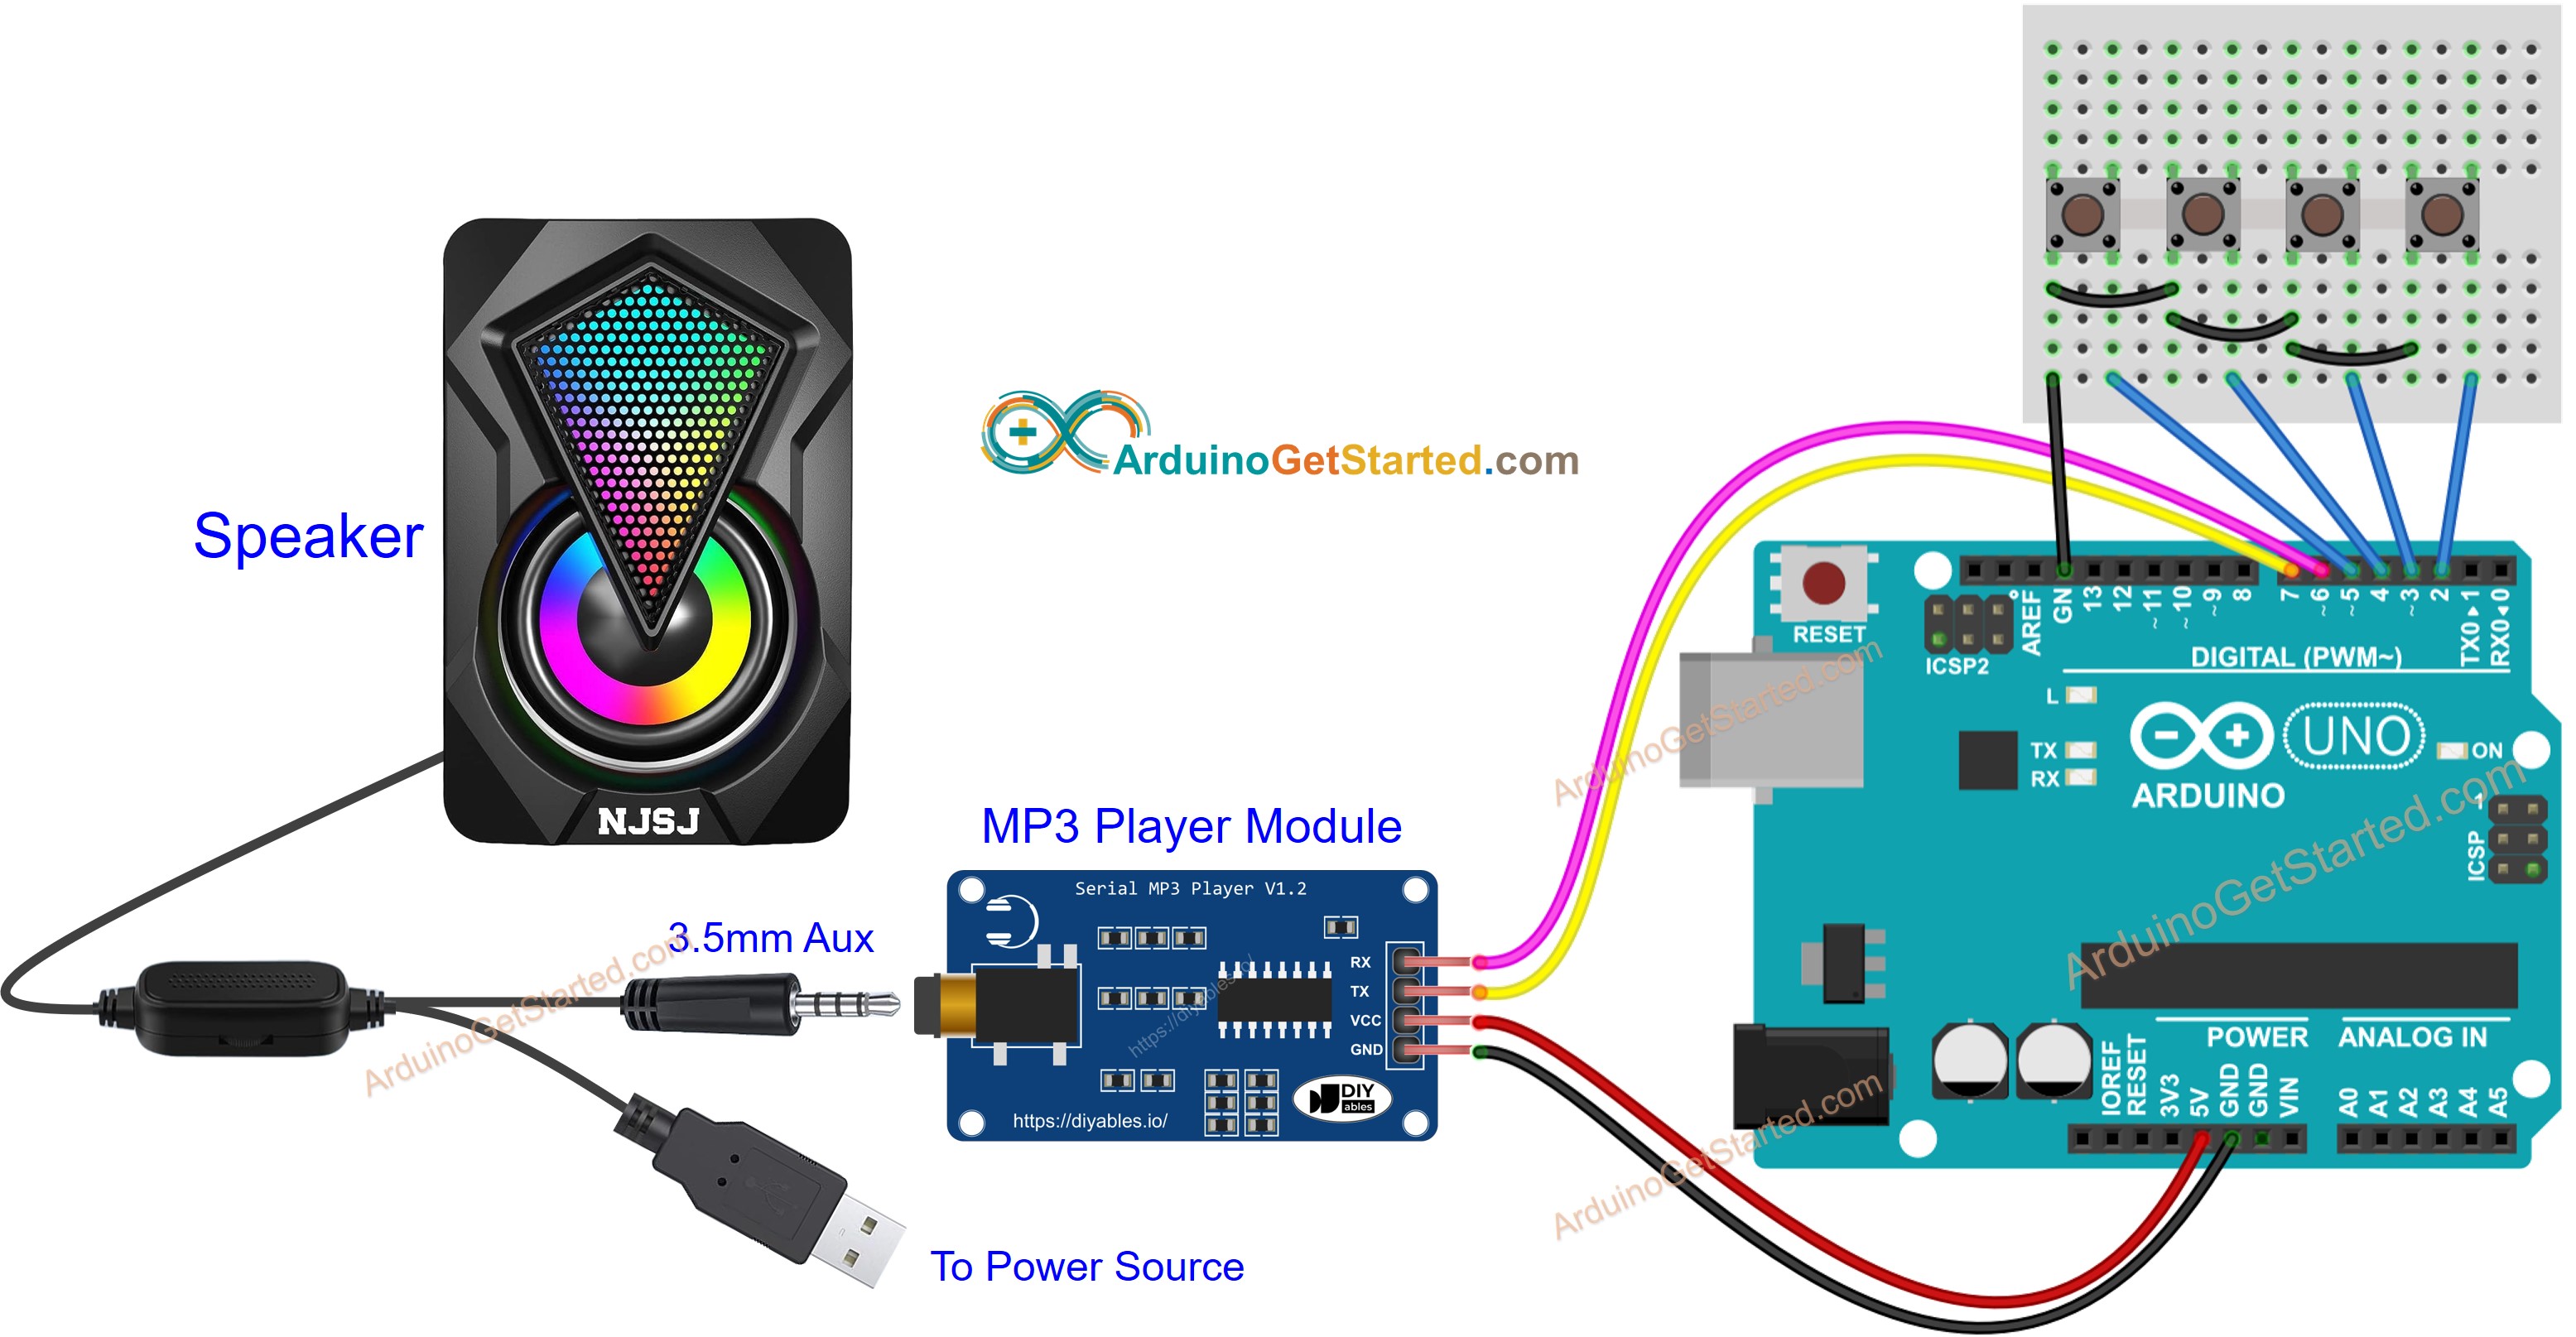
This image is created using Fritzing. Click to enlarge image
Ahora puedes modificar los proyectos para añadir más funciones, por ejemplo:
- Añade un potenciómetro para controlar el volumen, consulta el tutorial Arduino Potenciómetro tutorial
- Añade un control remoto IR, consulta el tutorial Arduino Control Remoto IR tutorial
- Añade un lector y una tarjeta RFID para hacer un reproductor MP3 RFID, consulta el tutorial Arduino RFID tutorial
Video Tutorial
Estamos considerando crear tutoriales en video. Si considera que los tutoriales en video son importantes, suscríbase a nuestro canal de YouTube para motivarnos a crear los videos.