Arduino - Sensor de Movimiento - Servomotor
Aprenderemos:
- Si se detecta movimiento, gira el servomotor a 90 grados
- Si no se detecta movimiento, regresa el servomotor a 0 grados
Hardware Requerido
Or you can buy the following kits:
| 1 | × | DIYables STEM V3 Starter Kit (Arduino included) | |
| 1 | × | DIYables Sensor Kit (30 sensors/displays) | |
| 1 | × | DIYables Sensor Kit (18 sensors/displays) |
Divulgación: Algunos de los enlaces proporcionados en esta sección son enlaces de afiliado de Amazon. Podemos recibir una comisión por las compras realizadas a través de estos enlaces sin costo adicional para usted. Apreciamos su apoyo.
Acerca del servomotor y del sensor de movimiento
Si no sabes sobre el servomotor y el sensor de movimiento (conexiones de pines, cómo funciona, cómo programarlo...), aprende sobre ellos en los siguientes tutoriales:
Diagrama de Cableado
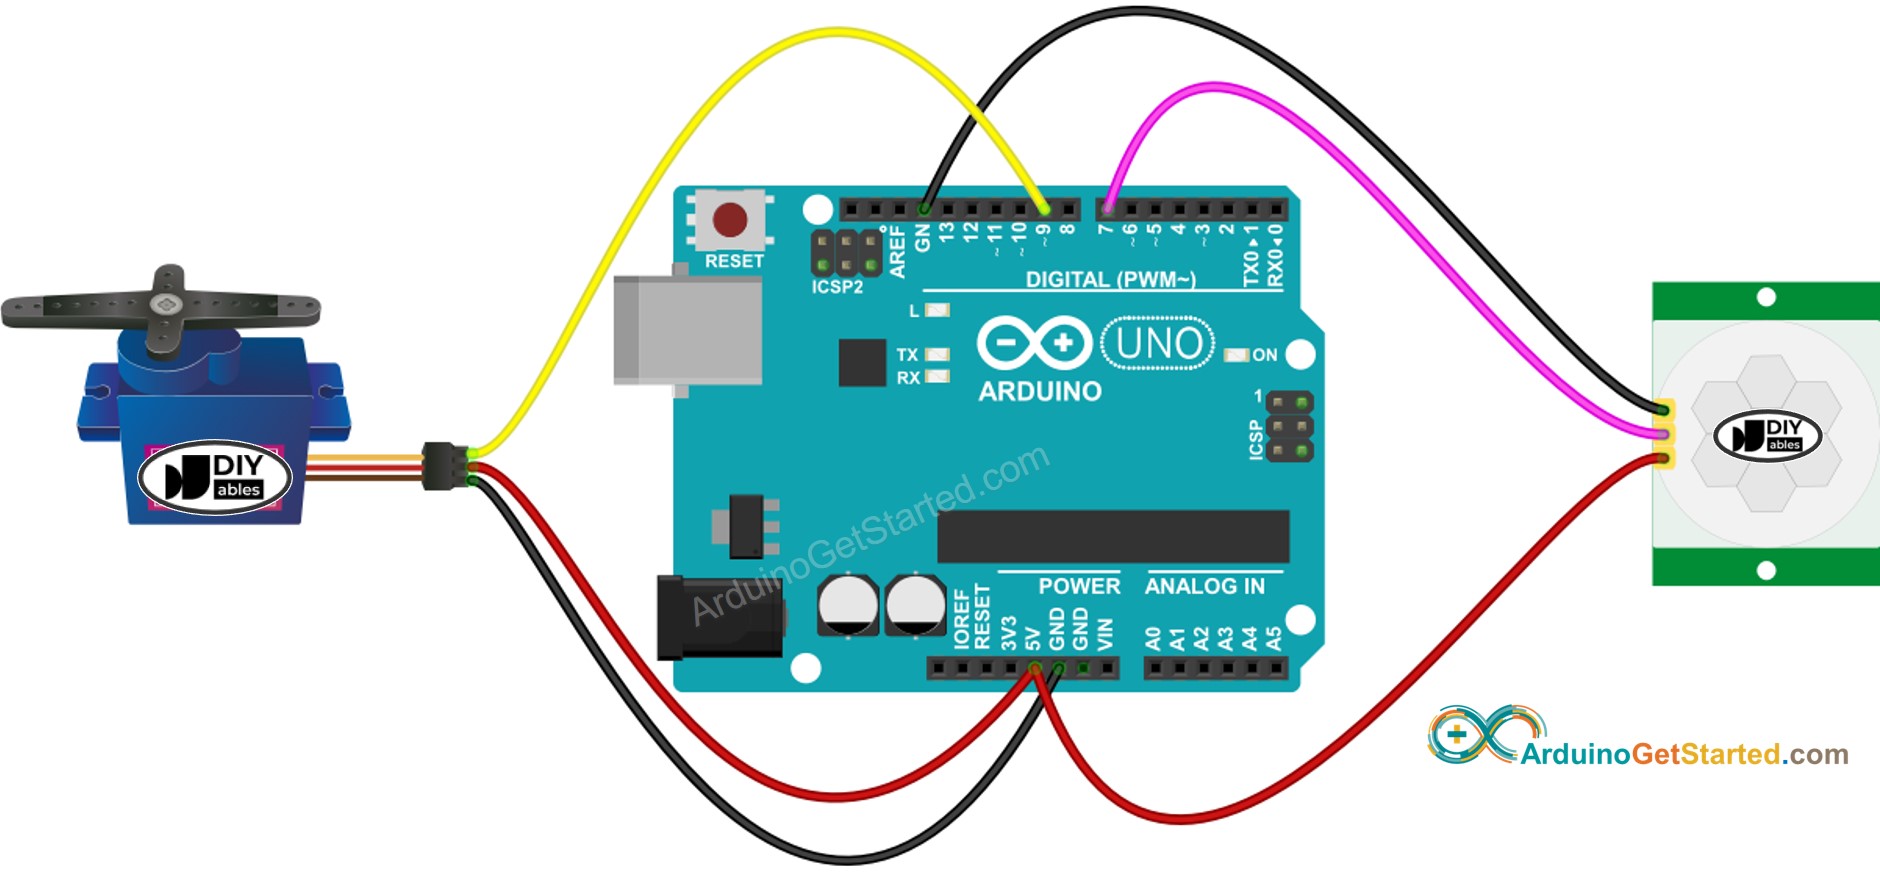
This image is created using Fritzing. Click to enlarge image
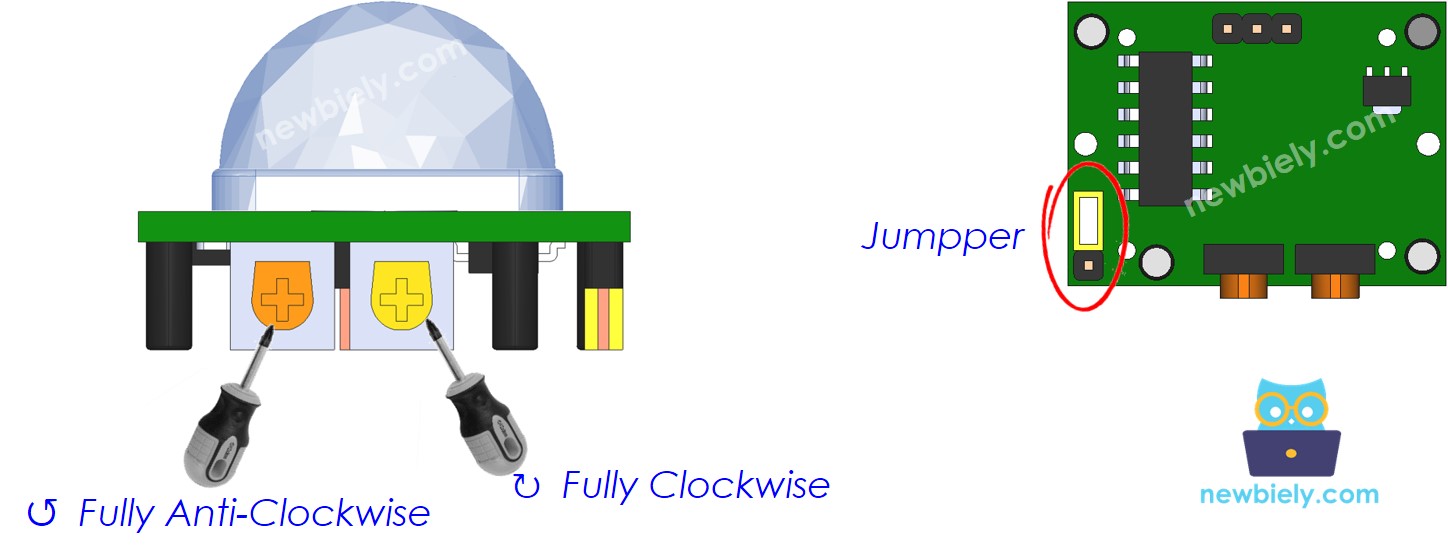
Configuración inicial
| Time Delay Adjuster | Screw it in anti-clockwise direction fully. |
| Detection Range Adjuster | Screw it in clockwise direction fully. |
| Repeat Trigger Selector | Put jumper as shown on the image. |
Código de Arduino: El sensor de movimiento controla el servomotor
/*
* Este código de Arduino fue desarrollado por es.newbiely.com
* Este código de Arduino se proporciona al público sin ninguna restricción.
* Para tutoriales completos y diagramas de cableado, visite:
* https://es.newbiely.com/tutorials/arduino/arduino-motion-sensor-servo-motor
*/
#include <Servo.h>
// constants won't change
const int MOTION_SENSOR_PIN = 7; // Arduino pin connected to motion sensor's pin
const int SERVO_PIN = 9; // Arduino pin connected to servo motor's pin
Servo servo; // create servo object to control a servo
// variables will change:
int angle = 0; // the current angle of servo motor
int lastMotionState; // the previous state of motion sensor
int currentMotionState; // the current state of motion sensor
void setup() {
Serial.begin(9600); // initialize serial
pinMode(MOTION_SENSOR_PIN, INPUT); // set arduino pin to input mode
servo.attach(SERVO_PIN); // attaches the servo on pin 9 to the servo object
servo.write(angle);
currentMotionState = digitalRead(MOTION_SENSOR_PIN);
}
void loop() {
lastMotionState = currentMotionState; // save the last state
currentMotionState = digitalRead(MOTION_SENSOR_PIN); // read new state
if (currentMotionState == LOW && lastMotionState == HIGH) { // pin state change: LOW -> HIGH
Serial.println("Motion detected!");
servo.write(90);
}
else
if (currentMotionState == HIGH && lastMotionState == LOW) { // pin state change: HIGH -> LOW
Serial.println("Motion stopped!");
servo.write(0);
}
}
Pasos R\u00e1pidos
- Conecta Arduino al PC mediante un cable USB
- Abre Arduino IDE, selecciona la placa y el puerto correctos
- Copia el código anterior y ábrelo con Arduino IDE
- Haz clic en el botón Subir en Arduino IDE para subir el código al Arduino
- Mueve tu mano frente al sensor
- Observa el cambio en el servomotor
Video Tutorial
Estamos considerando crear tutoriales en video. Si considera que los tutoriales en video son importantes, suscríbase a nuestro canal de YouTube para motivarnos a crear los videos.