Divulgación: Algunos de los enlaces proporcionados en esta sección son enlaces de afiliado de Amazon. Podemos recibir una comisión por las compras realizadas a través de estos enlaces sin costo adicional para usted. Apreciamos su apoyo.
Acerca del sensor de fuerza
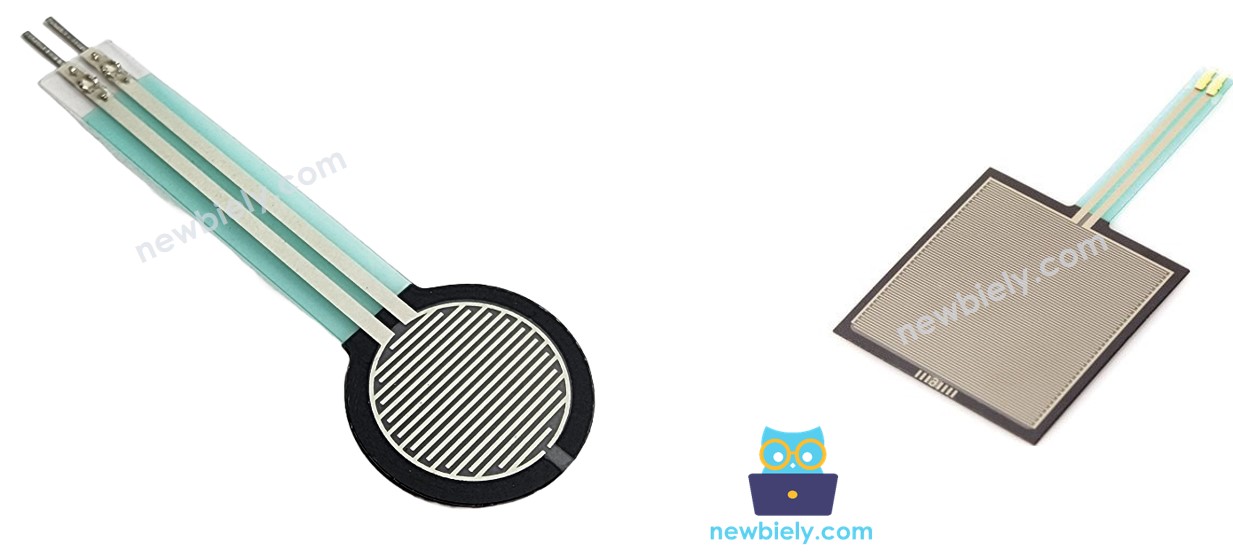
El sensor de fuerza también es conocido como resistor de detección de fuerza, resistor sensible a la fuerza, o simplemente FSR. El sensor de fuerza es básicamente un resistor cuyo valor de resistencia cambia según cuánto se haya presionado. El sensor de fuerza es:
Económico y fácil de usar.
Bueno para detectar la presión física, el apriete.
No es bueno para saber cuántas libras de peso llevan.
El sensor de fuerza se utiliza en baterías electrónicas, teléfonos móviles, dispositivos de juego portátiles y muchos otros dispositivos electrónicos portátiles.
Esquema de pines
Un sensor de fuerza tiene dos pines. Dado que es un tipo de resistor, no es necesario distinguir estos pines. Son simétricos.
Cómo funciona
El sensor de fuerza es básicamente una resistencia que cambia su resistencia según cuánto se haya presionado. Cuanto más presiones el sensor, menor será la resistencia entre los dos terminales.
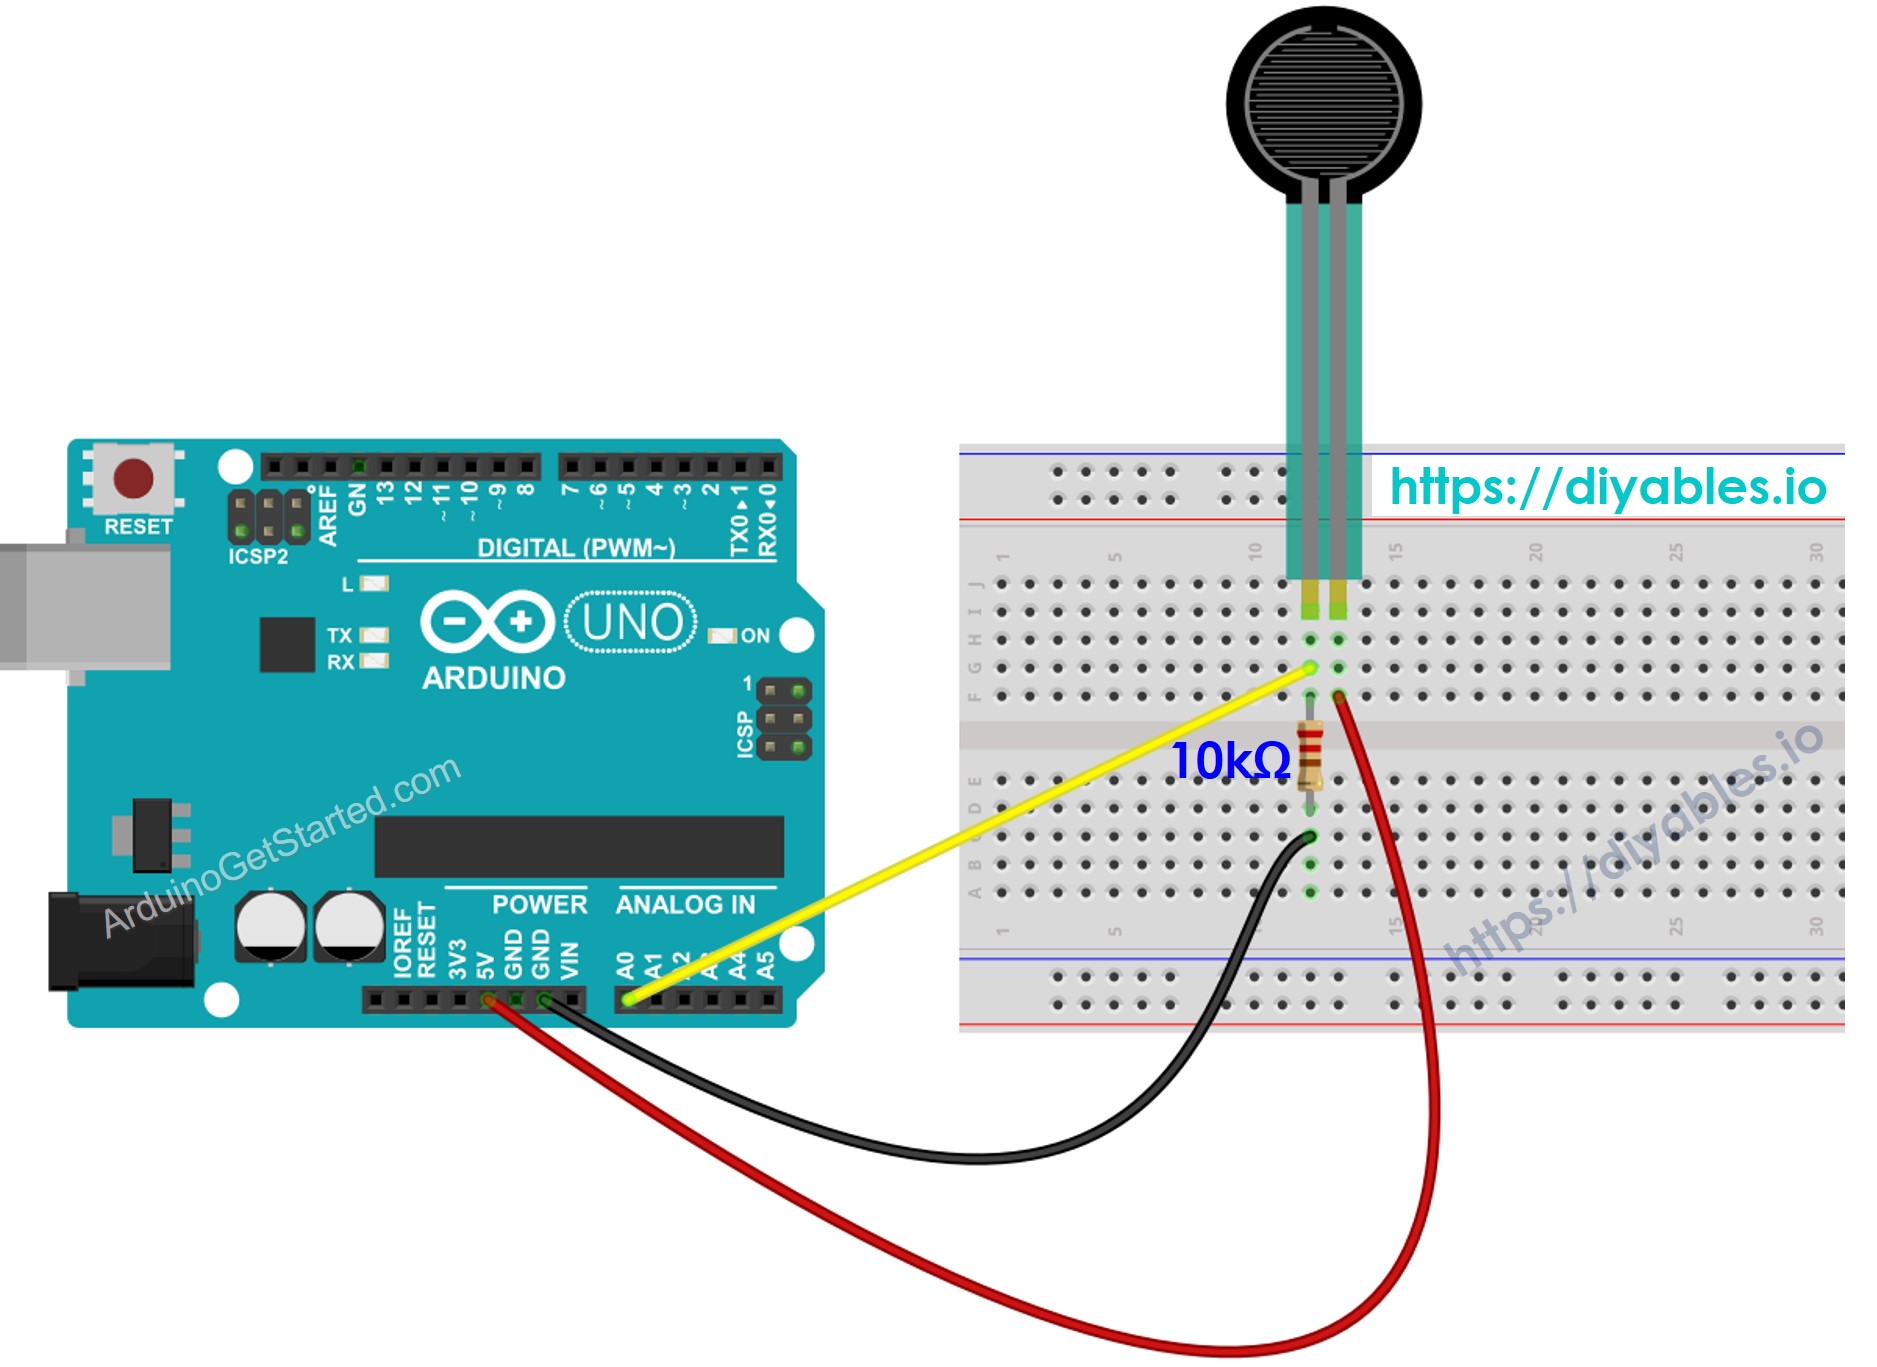
Diagrama de Cableado
This image is created using Fritzing. Click to enlarge image
Cómo programar para un sensor de fuerza
Los pines A0 a A5 del Arduino Uno pueden funcionar como entradas analógicas. El pin de entrada analógica convierte el voltaje (entre 0 V y VCC) en valores enteros (entre 0 y 1023), llamados valor ADC o valor analógico.
Conectando un pin del sensor de fuerza a un pin de entrada analógica, podemos leer el valor analógico del pin utilizando la función analogRead(), y luego podemos saber cuánto se ha presionado.
Código de Arduino
/* * Este código de Arduino fue desarrollado por es.newbiely.com * Este código de Arduino se proporciona al público sin ninguna restricción. * Para tutoriales completos y diagramas de cableado, visite: * https://es.newbiely.com/tutorials/arduino/arduino-force-sensor*/#define FORCE_SENSOR_PIN A0 // the FSR and 10K pulldown are connected to A0voidsetup() {Serial.begin(9600);}voidloop() {int analogReading = analogRead(FORCE_SENSOR_PIN);Serial.print("Force sensor reading = ");Serial.print(analogReading); // print the raw analog readingif (analogReading < 10) // from 0 to 9Serial.println(" -> no pressure");elseif (analogReading < 200) // from 10 to 199Serial.println(" -> light touch");elseif (analogReading < 500) // from 200 to 499Serial.println(" -> light squeeze");elseif (analogReading < 800) // from 500 to 799Serial.println(" -> medium squeeze");else// from 800 to 1023Serial.println(" -> big squeeze");delay(1000);}
Pasos R\u00e1pidos
Copia el código anterior y ábrelo con el IDE de Arduino
Haz clic en el botón Subir en el IDE de Arduino para subir el código al Arduino
Presiona el sensor de fuerza
Ve el resultado en el Monitor serie
Newbiely | Arduino IDE 2.3.8
──
☐
✕
File
Edit
Sketch
Tools
Help
Arduino Uno
Newbiely.ino
···
8Serial.println("Hello World!");
Output
Serial Monitor
Message (Enter to send message to 'Arduino Uno' on 'COM15')
New Line
9600 baud
Force sensor reading = 0 -> no pressure
Force sensor reading = 0 -> no pressure
Force sensor reading = 132 -> light touch
Force sensor reading = 147 -> light touch
Force sensor reading = 394 -> light squeeze
Force sensor reading = 421 -> light squeeze
Force sensor reading = 607 -> medium squeeze
Force sensor reading = 791 -> medium squeeze
Force sensor reading = 921 -> big squeeze
Force sensor reading = 987 -> big squeeze
Force sensor reading = 0 -> no pressure
Force sensor reading = 0 -> no pressure
Ln 11, Col 1
Arduino Uno on COM15
2
Video Tutorial
Estamos considerando crear tutoriales en video. Si considera que los tutoriales en video son importantes, suscríbase a nuestro canal de YouTube para motivarnos a crear los videos.
La demostración en video a continuación utiliza el siguiente código. Ten en cuenta que el video muestra el Arduino Uno R4, pero funciona de manera idéntica para el Arduino Uno R3:
/* * Este código de Arduino fue desarrollado por es.newbiely.com * Este código de Arduino se proporciona al público sin ninguna restricción. * Para tutoriales completos y diagramas de cableado, visite: * https://es.newbiely.com/tutorials/arduino/arduino-force-sensor*/#include <Wire.h>#include <Adafruit_GFX.h>#include <Adafruit_SSD1306.h>// OLED display configuration#define SCREEN_WIDTH 128#define SCREEN_HEIGHT 64#define OLED_RESET -1Adafruit_SSD1306display( SCREEN_WIDTH, SCREEN_HEIGHT, &Wire, OLED_RESET);// Force-sensitive resistor input#define FORCE_SENSOR_PIN A0// LED pins used to indicate force levelconstint ledPins[8] = { 2, 3, 4, 5, 6, 7, 8, 9};// Calibrated force sensor rangeconstint FORCE_MIN = 0;constint FORCE_MAX = 1000;// Exponential moving average filterfloat smoothValue = 0;constfloat alpha = 0.3;// Initialize hardware and displayvoidsetup() {Serial.begin(115200);// Configure LED outputs and turn all LEDs off.for (int i = 0; i < 8; i++) {pinMode(ledPins[i], OUTPUT);digitalWrite(ledPins[i], LOW); }// Initialize the OLED using I2C communication.if (!display.begin( SSD1306_SWITCHCAPVCC, 0x3C )) {Serial.println("OLED failed!");// Stop execution if the OLED cannot be initialized.while (1); }display.clearDisplay();display.setTextColor(SSD1306_WHITE);// Display startup screen.display.setTextSize(2);display.setCursor(20, 25);display.println("DIYables");display.display();delay(1500);// Initialize the filter with the first sensor reading// to prevent an incorrect initial value. smoothValue = analogRead(FORCE_SENSOR_PIN);}voidloop() {// Read the current FSR value.int rawValue = analogRead(FORCE_SENSOR_PIN);// Apply exponential moving average filtering// to reduce sensor noise and fluctuations. smoothValue = alpha * rawValue + (1.0 - alpha) * smoothValue;int forceValue = (int)smoothValue;// Convert the sensor value into 8 force levels.int level = map( forceValue, FORCE_MIN, FORCE_MAX, 0, 8 ); level = constrain(level, 0, 8);// Turn on LEDs progressively according to the force level.for (int i = 0; i < 8; i++) {if (i < level) {digitalWrite(ledPins[i], HIGH); }else {digitalWrite(ledPins[i], LOW); } }// Output sensor data for monitoring and calibration.Serial.print("FSR = ");Serial.print(forceValue);Serial.print(" | Level = ");Serial.println(level);// Refresh OLED display.display.clearDisplay();// Display title.display.setTextSize(2);display.setCursor(50, 0);display.println("FSR");// Configure the force indicator as a battery-style bar.int barX = 10;int barY = 25;int barWidth = 108;int barHeight = 18;// Draw the outer bar.display.drawRect( barX, barY, barWidth, barHeight, SSD1306_WHITE );// Draw the battery terminal.display.fillRect( barX + barWidth, barY + 5, 4, 8, SSD1306_WHITE );// Calculate the filled portion based on the force level.int fillWidth = map( level, 0, 8, 0, barWidth - 4 );if (fillWidth > 0) {display.fillRect( barX + 2, barY + 2, fillWidth, barHeight - 4, SSD1306_WHITE ); }// Display current force level.display.setTextSize(1);display.setCursor(5, 50);display.print("LEVEL: ");display.print(level);display.print("/8");// Display project branding.display.setCursor(78, 50);display.print("DIYables");display.display();// Short delay for stable display updates.delay(30);}
No dude en compartir el enlace de este tutorial. Sin embargo, por favor no use nuestro contenido en otros sitios web. Hemos invertido mucho esfuerzo y tiempo en crear el contenido, ¡por favor respete nuestro trabajo!