Arduino - OLED

La pantalla OLED (Diodo Orgánico de Emisión de Luz) es una alternativa a la pantalla LCD. La pantalla OLED es ultraligera, casi ultrafina como papel, flexible y produce una imagen más brillante y nítida.

En este tutorial, vamos a aprender:

Acerca de la pantalla OLED

Hay muchos tipos de pantallas OLED. Se diferencian entre sí por la interfaz de comunicación, por los tamaños y por los colores:

  • Interfaz de comunicación: I2C, SPI
  • Tamaño: 128x64, 128×32...
  • Color: blanco, azul, bicolor...
OLED de Arduino

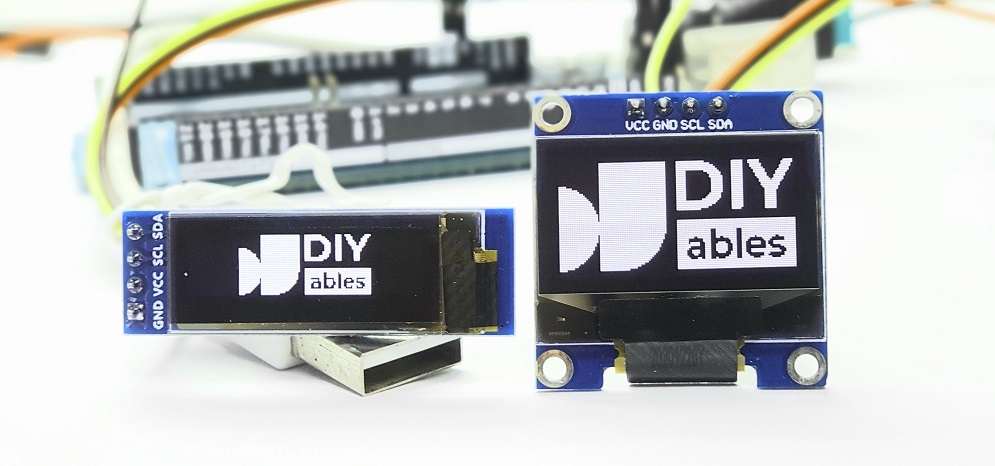
SPI suele ser más rápido que I2C, pero requiere más pines de Arduino. Mientras que I2C solo requiere dos pines y puede compartirse con otros periféricos I2C. Es una compensación entre pines y velocidad de comunicación. La elección depende de ti. Para OLED con interfaz I2C, existen varios tipos de controladores, como SSD1306 y SH1106. Este tutorial utiliza la pantalla OLED I2C SSD1306 de 128x64 y 128x32.

Disposición de pines de la pantalla OLED I2C

  • Pin GND: debe conectarse a la masa del Arduino
  • Pin VCC: es la fuente de alimentación para la pantalla, a la que conectamos el pin de 5 voltios del Arduino
  • Pin SCL: es un pin de reloj serial para la interfaz I2C
  • Pin SDA: es un pin de datos serial para la interfaz I2C
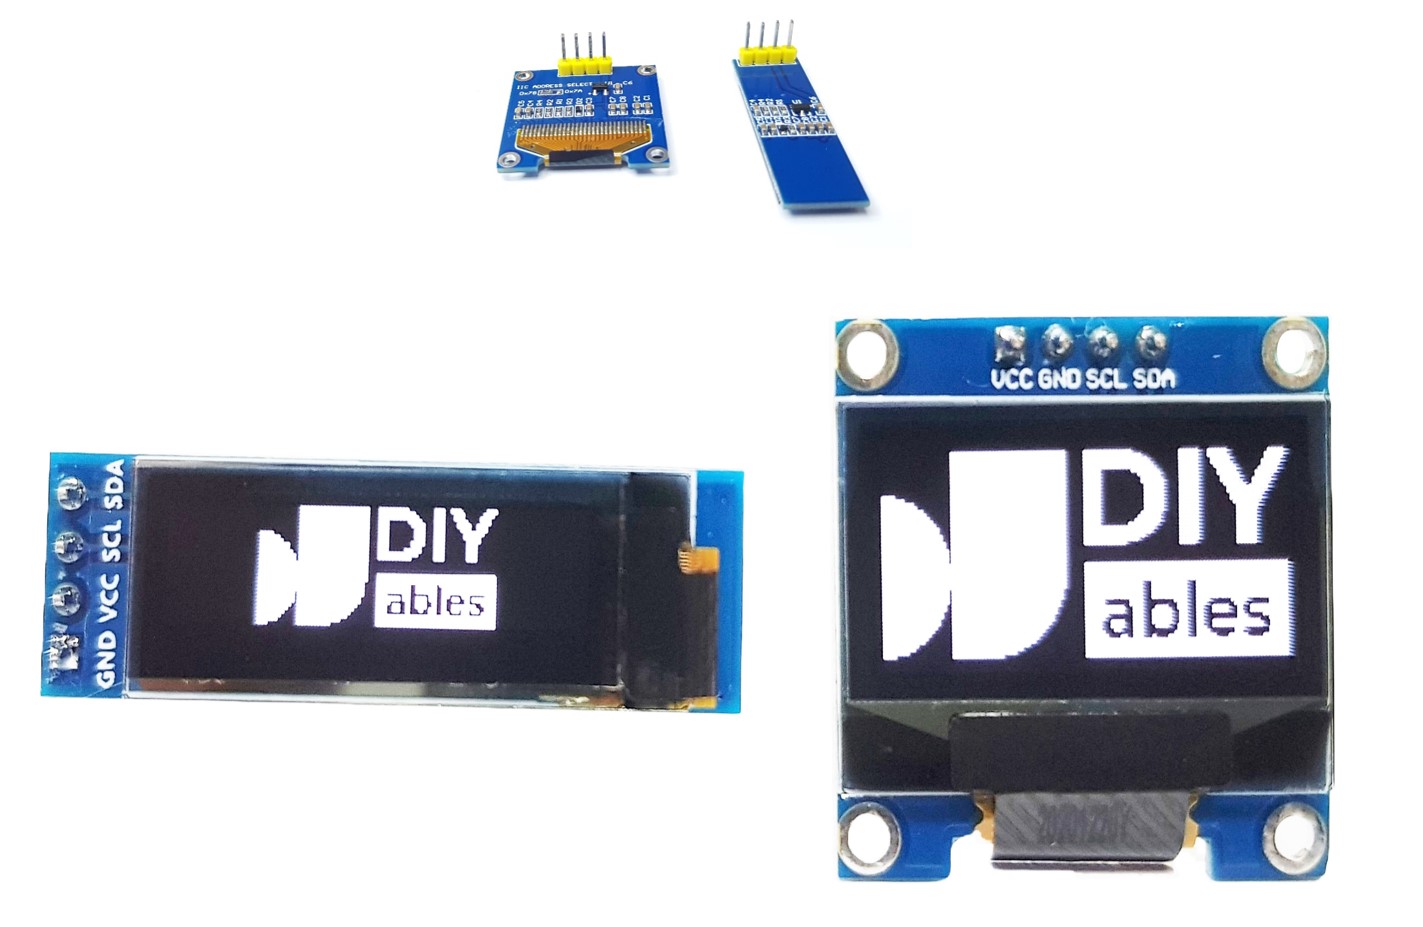
Diagrama de pines de OLED

※ Nota:

  • El orden de los pines del módulo OLED puede variar entre fabricantes y tipos de módulos. SIEMPRE utiliza las etiquetas impresas en el módulo OLED. ¡Observa detenidamente!
  • Este tutorial utiliza la pantalla OLED que usa el controlador I2C SSD1306. Hemos probado con la pantalla OLED de DIYables. Funciona sin ningún problema.

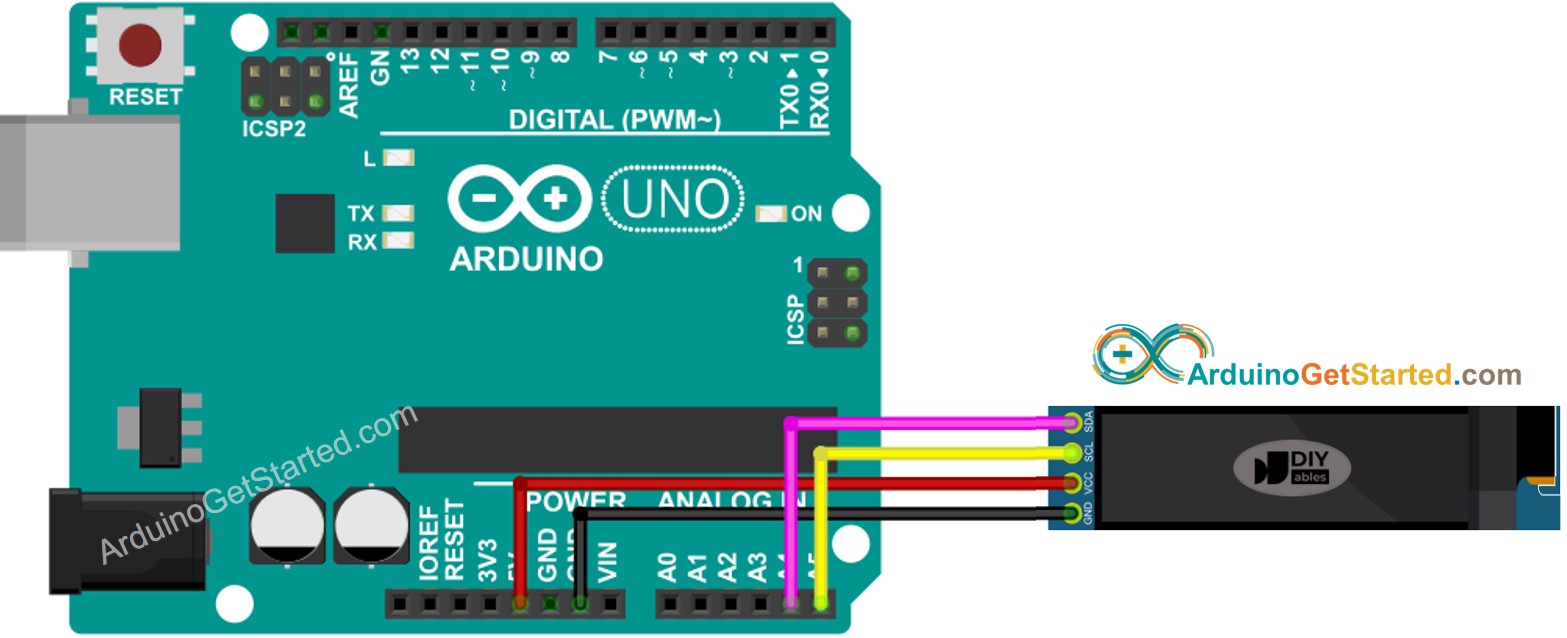
Diagrama de Cableado

  • Diagrama de cableado entre Arduino y OLED de 128x64
Diagrama de cableado de Arduino OLED 128×64

This image is created using Fritzing. Click to enlarge image

  • Diagrama de cableado entre Arduino y OLED 128x32
Diagrama de cableado de Arduino OLED 128x32

This image is created using Fritzing. Click to enlarge image

  • El diagrama real de cableado entre Arduino y OLED 128x64
Diagrama de cableado de Arduino OLED 128x64

This image is created using Fritzing. Click to enlarge image

  • El diagrama de cableado real entre Arduino y OLED de 128×32
Diagrama de cableado de Arduino OLED 128x32

This image is created using Fritzing. Click to enlarge image

Si utilizas otro Arduino que no sea el Uno, los pines son diferentes. Consulta la tabla que se muestra a continuación para otros Arduinos.

OLED Module Arduino Uno, Nano Arduino Mega
Vin 5V 5V
GND GND GND
SDA A4 20
SCL A5 21

Cómo usar OLED con Arduino

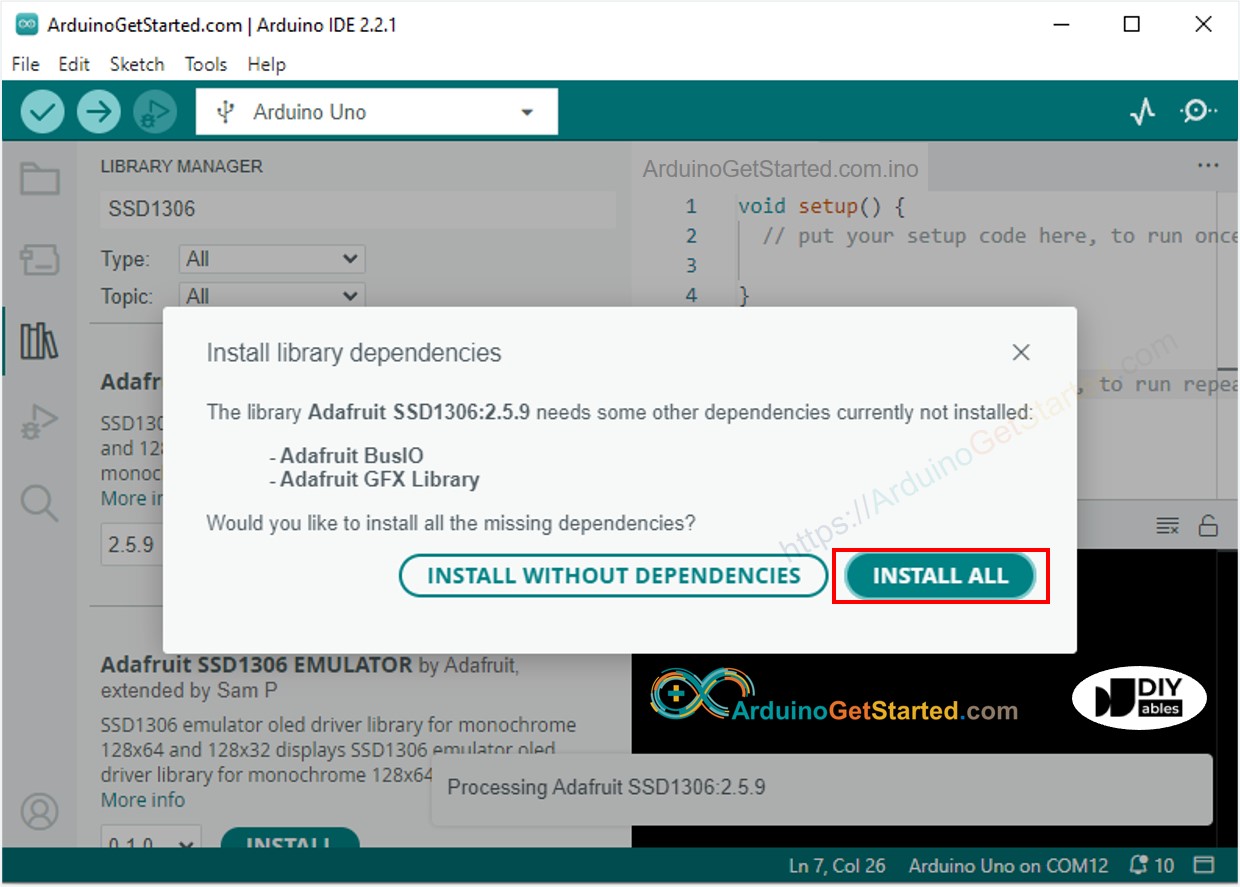
Instalar la biblioteca OLED SSD1306

  • Navega al icono Bibliotecas en la barra izquierda del IDE de Arduino.
  • Busca “SSD1306”, luego encuentra la biblioteca SSD1306 de Adafruit
  • Haz clic en el botón Instalar para instalar la biblioteca.
librería OLED para Arduino
  • Se le pedirá instalar algunas otras dependencias de la biblioteca
  • Haga clic en el botón Instalar todo para instalar todas las dependencias de la biblioteca.
Biblioteca de sensores de Arduino Adafruit GFX

Cómo programar para OLED

  • Incluir biblioteca
#include <Wire.h> #include <Adafruit_GFX.h> #include <Adafruit_SSD1306.h>
  • Define el tamaño de la pantalla si es OLED 123x64
#define SCREEN_WIDTH 128 // OLED display width, in pixels #define SCREEN_HEIGHT 64 // OLED display height, in pixels
  • Define el tamaño de la pantalla si es OLED 128×32
#define SCREEN_WIDTH 128 // OLED display width, in pixels #define SCREEN_HEIGHT 32 // OLED display height, in pixels
  • Declarar un objeto OLED SSD1306
// declare an SSD1306 display object connected to I2C Adafruit_SSD1306 oled(SCREEN_WIDTH, SCREEN_HEIGHT, &Wire, -1);
  • En la función setup(), inicializa la pantalla OLED
// initialize OLED display with address 0x3C for 128x64 if (!oled.begin(SSD1306_SWITCHCAPVCC, 0x3C)) { Serial.println(F("SSD1306 allocation failed")); while (true); }
  • Y luego puedes mostrar texto, imágenes, dibujar una línea ...

※ Nota:

A partir de este punto, todos los códigos se proporcionan para OLED 128x64, pero puedes adaptarlos fácilmente para OLED 128x32 cambiando el tamaño de la pantalla y ajustando las coordenadas si es necesario.

Código de Arduino - Mostrar texto en OLED

/* * Este código de Arduino fue desarrollado por es.newbiely.com * Este código de Arduino se proporciona al público sin ninguna restricción. * Para tutoriales completos y diagramas de cableado, visite: * https://es.newbiely.com/tutorials/arduino/arduino-oled */ #include <Wire.h> #include <Adafruit_GFX.h> #include <Adafruit_SSD1306.h> #define SCREEN_WIDTH 128 // OLED display width, in pixels #define SCREEN_HEIGHT 64 // OLED display height, in pixels // declare an SSD1306 display object connected to I2C Adafruit_SSD1306 oled(SCREEN_WIDTH, SCREEN_HEIGHT, &Wire, -1); void setup() { Serial.begin(9600); // initialize OLED display with address 0x3C for 128x64 if (!oled.begin(SSD1306_SWITCHCAPVCC, 0x3C)) { Serial.println(F("SSD1306 allocation failed")); while (true); } delay(2000); // wait for initializing oled.clearDisplay(); // clear display oled.setTextSize(1); // text size oled.setTextColor(WHITE); // text color oled.setCursor(0, 10); // position to display oled.println("Hello World!"); // text to display oled.display(); // show on OLED } void loop() { }

A continuación se muestran algunas funciones que puedes usar para mostrar texto en la pantalla OLED:

  • oled.clearDisplay(): todos los píxeles están apagados
  • oled.drawPixel(x,y, color): dibujar un píxel en las coordenadas x, y
  • oled.setTextSize(n): establece el tamaño de fuente; admite tamaños de 1 a 8
  • oled.setCursor(x,y): establece las coordenadas para empezar a escribir el texto
  • oled.setTextColor(WHITE): establece el color del texto
  • oled.setTextColor(BLACK, WHITE): establece el color del texto y el color de fondo
  • oled.println(“message”): imprimir los caracteres
  • oled.println(number): imprimir un número
  • oled.println(number, HEX): imprimir un número en formato hexadecimal
  • oled.display(): llama a este método para que los cambios tengan efecto
  • oled.startscrollright(start, stop): desplazar el texto de izquierda a derecha
  • oled.startscrollleft(start, stop): desplazar el texto de derecha a izquierda
  • oled.startscrolldiagright(start, stop): desplazar el texto desde la esquina inferior izquierda hasta la esquina superior derecha
  • oled.startscrolldiagleft(start, stop): desplazar el texto desde la esquina inferior derecha hasta la esquina superior izquierda
  • oled.stopscroll(): detener el desplazamiento

Cómo centrar vertical y horizontalmente el texto o número en la pantalla OLED

Ver Cómo centrar vertical y horizontalmente el texto y el número en OLED

Código de Arduino - Dibujo en OLED

/* * Este código de Arduino fue desarrollado por es.newbiely.com * Este código de Arduino se proporciona al público sin ninguna restricción. * Para tutoriales completos y diagramas de cableado, visite: * https://es.newbiely.com/tutorials/arduino/arduino-oled */ #include <Wire.h> #include <Adafruit_GFX.h> #include <Adafruit_SSD1306.h> #define SCREEN_WIDTH 128 // OLED display width, in pixels #define SCREEN_HEIGHT 64 // OLED display height, in pixels // declare an SSD1306 display object connected to I2C Adafruit_SSD1306 oled(SCREEN_WIDTH, SCREEN_HEIGHT, &Wire, -1); void setup() { Serial.begin(9600); // initialize OLED display with address 0x3C for 128x64 if (!oled.begin(SSD1306_SWITCHCAPVCC, 0x3C)) { Serial.println(F("SSD1306 allocation failed")); while (true); } delay(2000); // wait for initializing oled.setCursor(0, 0); } void loop() { // draw rectangle oled.clearDisplay(); oled.drawRect(0, 15, 60, 40, WHITE); oled.display(); delay(2000); // fill rectangle oled.clearDisplay(); oled.fillRect(0, 15, 60, 40, WHITE); oled.display(); delay(2000); // draw the round rectangle oled.clearDisplay(); oled.drawRoundRect(0, 15, 60, 40, 8, WHITE); oled.display(); delay(2000); // fill the round rectangle oled.clearDisplay(); oled.fillRoundRect(0, 15, 60, 40, 8, WHITE); oled.display(); delay(2000); // draw circle oled.clearDisplay(); oled.drawCircle(20, 35, 20, WHITE); oled.display(); delay(2000); // fill circle oled.clearDisplay(); oled.fillCircle(20, 35, 20, WHITE); oled.display(); delay(2000); // draw triangle oled.clearDisplay(); oled.drawTriangle(30, 15, 0, 60, 60, 60, WHITE); oled.display(); delay(2000); // fill triangle oled.clearDisplay(); oled.fillTriangle(30, 15, 0, 60, 60, 60, WHITE); oled.display(); delay(2000); }

Código de Arduino – Mostrar imagen

Para dibujar una imagen en una pantalla OLED, primero debemos convertir la imagen (en cualquier formato) en un arreglo de bitmap. La conversión se puede hacer usando esta herramienta en línea. Por favor, vea cómo convertir una imagen a un arreglo de bitmap en la imagen de abajo. Convertí el icono de Arduino a un arreglo de bitmap.

imagen a arreglo de mapas de bits

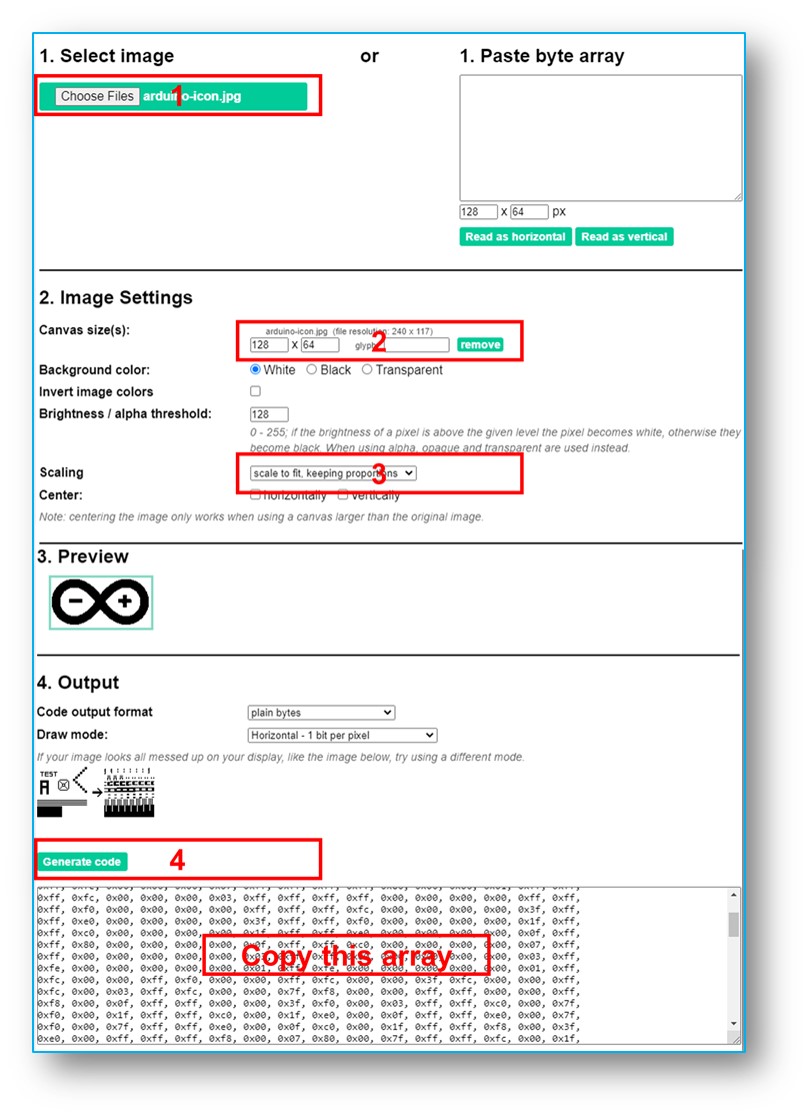
Después de convertir, copie el código del arreglo y actualice el código del arreglo ArduinoIcon en el código que aparece abajo.

/* * Este código de Arduino fue desarrollado por es.newbiely.com * Este código de Arduino se proporciona al público sin ninguna restricción. * Para tutoriales completos y diagramas de cableado, visite: * https://es.newbiely.com/tutorials/arduino/arduino-oled */ #include <Wire.h> #include <Adafruit_GFX.h> #include <Adafruit_SSD1306.h> #define SCREEN_WIDTH 128 // OLED display width, in pixels #define SCREEN_HEIGHT 64 // OLED display height, in pixels // declare an SSD1306 display object connected to I2C Adafruit_SSD1306 oled(SCREEN_WIDTH, SCREEN_HEIGHT, &Wire, -1); // bitmap of arduino-icon image const unsigned char ArduinoIcon [] PROGMEM = { // 'arduino-icon', 128x64px 0xff, 0xff, 0xff, 0xff, 0xff, 0xff, 0xff, 0xff, 0xff, 0xff, 0xff, 0xff, 0xff, 0xff, 0xff, 0xff, 0xff, 0xff, 0xff, 0xff, 0xff, 0xff, 0xff, 0xff, 0xff, 0xff, 0xff, 0xff, 0xff, 0xff, 0xff, 0xff, 0xff, 0xff, 0xfe, 0x00, 0x07, 0xff, 0xff, 0xff, 0xff, 0xff, 0xff, 0x80, 0x01, 0xff, 0xff, 0xff, 0xff, 0xff, 0xe0, 0x00, 0x00, 0xff, 0xff, 0xff, 0xff, 0xff, 0xfc, 0x00, 0x00, 0x3f, 0xff, 0xff, 0xff, 0xff, 0x80, 0x00, 0x00, 0x1f, 0xff, 0xff, 0xff, 0xff, 0xe0, 0x00, 0x00, 0x07, 0xff, 0xff, 0xff, 0xfe, 0x00, 0x00, 0x00, 0x07, 0xff, 0xff, 0xff, 0xff, 0x80, 0x00, 0x00, 0x01, 0xff, 0xff, 0xff, 0xfc, 0x00, 0x00, 0x00, 0x03, 0xff, 0xff, 0xff, 0xff, 0x00, 0x00, 0x00, 0x00, 0xff, 0xff, 0xff, 0xf0, 0x00, 0x00, 0x00, 0x00, 0xff, 0xff, 0xff, 0xfc, 0x00, 0x00, 0x00, 0x00, 0x3f, 0xff, 0xff, 0xe0, 0x00, 0x00, 0x00, 0x00, 0x3f, 0xff, 0xff, 0xf0, 0x00, 0x00, 0x00, 0x00, 0x1f, 0xff, 0xff, 0xc0, 0x00, 0x00, 0x00, 0x00, 0x1f, 0xff, 0xff, 0xe0, 0x00, 0x00, 0x00, 0x00, 0x0f, 0xff, 0xff, 0x80, 0x00, 0x00, 0x00, 0x00, 0x0f, 0xff, 0xff, 0xc0, 0x00, 0x00, 0x00, 0x00, 0x07, 0xff, 0xff, 0x00, 0x00, 0x00, 0x00, 0x00, 0x03, 0xff, 0xff, 0x80, 0x00, 0x00, 0x00, 0x00, 0x03, 0xff, 0xfe, 0x00, 0x00, 0x00, 0x00, 0x00, 0x01, 0xff, 0xfe, 0x00, 0x00, 0x00, 0x00, 0x00, 0x01, 0xff, 0xfc, 0x00, 0x00, 0xff, 0xf0, 0x00, 0x00, 0xff, 0xfc, 0x00, 0x00, 0x3f, 0xfc, 0x00, 0x00, 0xff, 0xfc, 0x00, 0x03, 0xff, 0xfc, 0x00, 0x00, 0x7f, 0xf8, 0x00, 0x00, 0xff, 0xff, 0x00, 0x00, 0xff, 0xf8, 0x00, 0x0f, 0xff, 0xff, 0x00, 0x00, 0x3f, 0xf0, 0x00, 0x03, 0xff, 0xff, 0xc0, 0x00, 0x7f, 0xf0, 0x00, 0x1f, 0xff, 0xff, 0xc0, 0x00, 0x1f, 0xe0, 0x00, 0x0f, 0xff, 0xff, 0xe0, 0x00, 0x7f, 0xf0, 0x00, 0x7f, 0xff, 0xff, 0xe0, 0x00, 0x0f, 0xc0, 0x00, 0x1f, 0xff, 0xff, 0xf8, 0x00, 0x3f, 0xe0, 0x00, 0xff, 0xff, 0xff, 0xf8, 0x00, 0x07, 0x80, 0x00, 0x7f, 0xff, 0xff, 0xfc, 0x00, 0x1f, 0xe0, 0x00, 0xff, 0xff, 0xff, 0xfc, 0x00, 0x03, 0x80, 0x00, 0xff, 0xff, 0xff, 0xfc, 0x00, 0x1f, 0xc0, 0x01, 0xff, 0xff, 0xff, 0xfe, 0x00, 0x03, 0x00, 0x01, 0xff, 0xff, 0xff, 0xfe, 0x00, 0x1f, 0xc0, 0x03, 0xff, 0xff, 0xff, 0xff, 0x00, 0x00, 0x00, 0x03, 0xff, 0xff, 0xff, 0xff, 0x00, 0x0f, 0xc0, 0x03, 0xff, 0xff, 0xff, 0xff, 0x80, 0x00, 0x00, 0x07, 0xff, 0xf0, 0x7f, 0xff, 0x00, 0x0f, 0xc0, 0x07, 0xff, 0xff, 0xff, 0xff, 0xc0, 0x00, 0x00, 0x0f, 0xff, 0xf0, 0x7f, 0xff, 0x80, 0x0f, 0x80, 0x07, 0xff, 0xff, 0xff, 0xff, 0xe0, 0x00, 0x00, 0x1f, 0xff, 0xf0, 0x7f, 0xff, 0x80, 0x07, 0x80, 0x0f, 0xff, 0xff, 0xff, 0xff, 0xf0, 0x00, 0x00, 0x3f, 0xff, 0xf0, 0x7f, 0xff, 0xc0, 0x07, 0x80, 0x0f, 0xff, 0xff, 0xff, 0xff, 0xf8, 0x00, 0x00, 0x7f, 0xff, 0xf0, 0x7f, 0xff, 0xc0, 0x07, 0x80, 0x0f, 0xfe, 0x00, 0x00, 0xff, 0xfc, 0x00, 0x00, 0xff, 0xfc, 0x00, 0x03, 0xff, 0xc0, 0x07, 0x80, 0x0f, 0xfe, 0x00, 0x00, 0xff, 0xfe, 0x00, 0x01, 0xff, 0xfc, 0x00, 0x01, 0xff, 0xc0, 0x07, 0x80, 0x0f, 0xfe, 0x00, 0x00, 0xff, 0xff, 0x00, 0x03, 0xff, 0xfc, 0x00, 0x01, 0xff, 0xc0, 0x07, 0x80, 0x0f, 0xfe, 0x00, 0x00, 0xff, 0xff, 0x00, 0x03, 0xff, 0xfc, 0x00, 0x01, 0xff, 0xc0, 0x07, 0x80, 0x0f, 0xfe, 0x00, 0x00, 0xff, 0xff, 0x00, 0x03, 0xff, 0xfc, 0x00, 0x01, 0xff, 0xc0, 0x07, 0x80, 0x0f, 0xff, 0xff, 0xff, 0xff, 0xfe, 0x00, 0x01, 0xff, 0xff, 0xe0, 0x7f, 0xff, 0xc0, 0x07, 0x80, 0x0f, 0xff, 0xff, 0xff, 0xff, 0xfc, 0x00, 0x00, 0xff, 0xff, 0xf0, 0x7f, 0xff, 0xc0, 0x07, 0x80, 0x0f, 0xff, 0xff, 0xff, 0xff, 0xfc, 0x00, 0x00, 0xff, 0xff, 0xf0, 0x7f, 0xff, 0xc0, 0x07, 0x80, 0x0f, 0xff, 0xff, 0xff, 0xff, 0xf8, 0x00, 0x00, 0x7f, 0xff, 0xf0, 0x7f, 0xff, 0xc0, 0x07, 0x80, 0x0f, 0xff, 0xff, 0xff, 0xff, 0xf0, 0x00, 0x00, 0x3f, 0xff, 0xf0, 0x7f, 0xff, 0x80, 0x07, 0x80, 0x07, 0xff, 0xff, 0xff, 0xff, 0xe0, 0x00, 0x00, 0x1f, 0xff, 0xf0, 0x7f, 0xff, 0x80, 0x07, 0xc0, 0x07, 0xff, 0xff, 0xff, 0xff, 0xc0, 0x00, 0x00, 0x0f, 0xff, 0xff, 0xff, 0xff, 0x80, 0x0f, 0xc0, 0x03, 0xff, 0xff, 0xff, 0xff, 0x80, 0x00, 0x00, 0x07, 0xff, 0xff, 0xff, 0xff, 0x00, 0x0f, 0xc0, 0x03, 0xff, 0xff, 0xff, 0xff, 0x00, 0x00, 0x00, 0x03, 0xff, 0xff, 0xff, 0xff, 0x00, 0x0f, 0xe0, 0x01, 0xff, 0xff, 0xff, 0xfe, 0x00, 0x03, 0x00, 0x01, 0xff, 0xff, 0xff, 0xfe, 0x00, 0x1f, 0xe0, 0x00, 0xff, 0xff, 0xff, 0xfc, 0x00, 0x07, 0x80, 0x00, 0xff, 0xff, 0xff, 0xfc, 0x00, 0x1f, 0xe0, 0x00, 0x7f, 0xff, 0xff, 0xf0, 0x00, 0x0f, 0xc0, 0x00, 0x3f, 0xff, 0xff, 0xf8, 0x00, 0x3f, 0xf0, 0x00, 0x3f, 0xff, 0xff, 0xe0, 0x00, 0x1f, 0xe0, 0x00, 0x1f, 0xff, 0xff, 0xf0, 0x00, 0x3f, 0xf8, 0x00, 0x1f, 0xff, 0xff, 0x80, 0x00, 0x3f, 0xe0, 0x00, 0x07, 0xff, 0xff, 0xe0, 0x00, 0x7f, 0xf8, 0x00, 0x0f, 0xff, 0xff, 0x00, 0x00, 0x7f, 0xf8, 0x00, 0x03, 0xff, 0xff, 0xc0, 0x00, 0x7f, 0xfc, 0x00, 0x03, 0xff, 0xf8, 0x00, 0x00, 0xff, 0xfc, 0x00, 0x00, 0xff, 0xff, 0x00, 0x00, 0xff, 0xfe, 0x00, 0x00, 0x7f, 0xe0, 0x00, 0x01, 0xff, 0xfe, 0x00, 0x00, 0x1f, 0xf8, 0x00, 0x01, 0xff, 0xfe, 0x00, 0x00, 0x00, 0x00, 0x00, 0x03, 0xff, 0xff, 0x00, 0x00, 0x00, 0x00, 0x00, 0x03, 0xff, 0xff, 0x00, 0x00, 0x00, 0x00, 0x00, 0x07, 0xff, 0xff, 0x80, 0x00, 0x00, 0x00, 0x00, 0x03, 0xff, 0xff, 0x80, 0x00, 0x00, 0x00, 0x00, 0x0f, 0xff, 0xff, 0xc0, 0x00, 0x00, 0x00, 0x00, 0x07, 0xff, 0xff, 0xc0, 0x00, 0x00, 0x00, 0x00, 0x1f, 0xff, 0xff, 0xe0, 0x00, 0x00, 0x00, 0x00, 0x0f, 0xff, 0xff, 0xe0, 0x00, 0x00, 0x00, 0x00, 0x7f, 0xff, 0xff, 0xf8, 0x00, 0x00, 0x00, 0x00, 0x3f, 0xff, 0xff, 0xf8, 0x00, 0x00, 0x00, 0x01, 0xff, 0xff, 0xff, 0xfe, 0x00, 0x00, 0x00, 0x00, 0x7f, 0xff, 0xff, 0xfc, 0x00, 0x00, 0x00, 0x03, 0xff, 0xff, 0xff, 0xff, 0x00, 0x00, 0x00, 0x00, 0xff, 0xff, 0xff, 0xff, 0x00, 0x00, 0x00, 0x0f, 0xff, 0xff, 0xff, 0xff, 0xc0, 0x00, 0x00, 0x03, 0xff, 0xff, 0xff, 0xff, 0xc0, 0x00, 0x00, 0x3f, 0xff, 0xff, 0xff, 0xff, 0xf0, 0x00, 0x00, 0x0f, 0xff, 0xff, 0xff, 0xff, 0xf0, 0x00, 0x01, 0xff, 0xff, 0xff, 0xff, 0xff, 0xfe, 0x00, 0x00, 0x3f, 0xff, 0xff, 0xff, 0xff, 0xff, 0x00, 0x0f, 0xff, 0xff, 0xff, 0xff, 0xff, 0xff, 0xc0, 0x03, 0xff, 0xff, 0xff, 0xff, 0xff, 0xff, 0xff, 0xff, 0xff, 0xff, 0xff, 0xff, 0xff, 0xff, 0xff, 0xff, 0xff, 0xff, 0xff, 0xff, 0xff, 0xff, 0xff, 0xff, 0xff, 0xff, 0xff, 0xff, 0xff, 0xff, 0xff, 0xff, 0xff, 0xff, 0xff, 0xff, 0xff, 0xff, 0xff, 0xff, 0xff, 0xff, 0xff, 0xff, 0xff, 0xff, 0xff, 0xff, 0xff, 0xff, 0xff, 0xff, 0xff, 0xff, 0xff, 0xff, 0xff, 0xff, 0xff, 0xff, 0xff, 0xff, 0xff, 0xff, 0xff, 0xff, 0xff }; void setup() { Serial.begin(9600); // initialize OLED display with address 0x3C for 128x64 if (!oled.begin(SSD1306_SWITCHCAPVCC, 0x3C)) { Serial.println(F("SSD1306 allocation failed")); while (true); } delay(2000); // wait for initializing oled.setCursor(0, 0); } void loop() { oled.clearDisplay(); // display bitmap oled.drawBitmap(0, 0, ArduinoIcon, 128, 64, WHITE); oled.display(); delay(2000); // invert display oled.invertDisplay(1); delay(2000); }

※ Nota:

  • El tamaño de la imagen debe ser menor o igual al tamaño de la pantalla.
  • Si quieres adaptar el código anterior para un OLED de 128x32, necesitas reescalar la imagen y cambiar el ancho y la altura en la función oled.drawBitmap();

Solución de problemas de OLED

Si el OLED no muestra nada, por favor siga la siguiente lista de verificación:

  • Asegúrate de que tu cableado sea correcto.
  • Asegúrate de que tu OLED I2C utilice el controlador SSD1306.
  • Verifica la dirección I2C del OLED ejecutando el código del escáner de direcciones I2C que se muestra a continuación en Arduino.
// I2C address scanner program #include <Wire.h> void setup() { Wire.begin(); Serial.begin(9600); Serial.println("I2C Scanner"); } void loop() { byte error, address; int nDevices; Serial.println("Scanning..."); nDevices = 0; for(address = 1; address < 127; address++ ) { Wire.beginTransmission(address); error = Wire.endTransmission(); if (error == 0) { Serial.print("I2C device found at address 0x"); if (address < 16) Serial.print("0"); Serial.print(address,HEX); Serial.println(" !"); nDevices++; } else if (error==4) { Serial.print("Unknown error at address 0x"); if (address < 16) Serial.print("0"); Serial.println(address,HEX); } } if (nDevices == 0) Serial.println("No I2C devices found"); else Serial.println("done"); delay(5000); // wait 5 seconds for next scan }

El resultado en el Monitor Serial:

COM6
Send
Scanning... I2C device found at address 0x3C ! done Scanning... I2C device found at address 0x3C ! done
Autoscroll Show timestamp
Clear output
9600 baud  
Newline  

※ NUESTROS MENSAJES

  • No dude en compartir el enlace de este tutorial. Sin embargo, por favor no use nuestro contenido en otros sitios web. Hemos invertido mucho esfuerzo y tiempo en crear el contenido, ¡por favor respete nuestro trabajo!