
ESP32 - LED de codificador giratorio

En este tutorial, vamos a aprender cómo programar el ESP32 para controlar el brillo de un LED según el valor de salida del codificador rotatorio.

Acerca de LED y el codificador rotatorio

¿No estás familiarizado con los LEDs y el codificador rotatorio, incluyendo sus pines, funcionalidad y programación? Explora tutoriales completos sobre estos temas a continuación:

Diagrama de Cableado
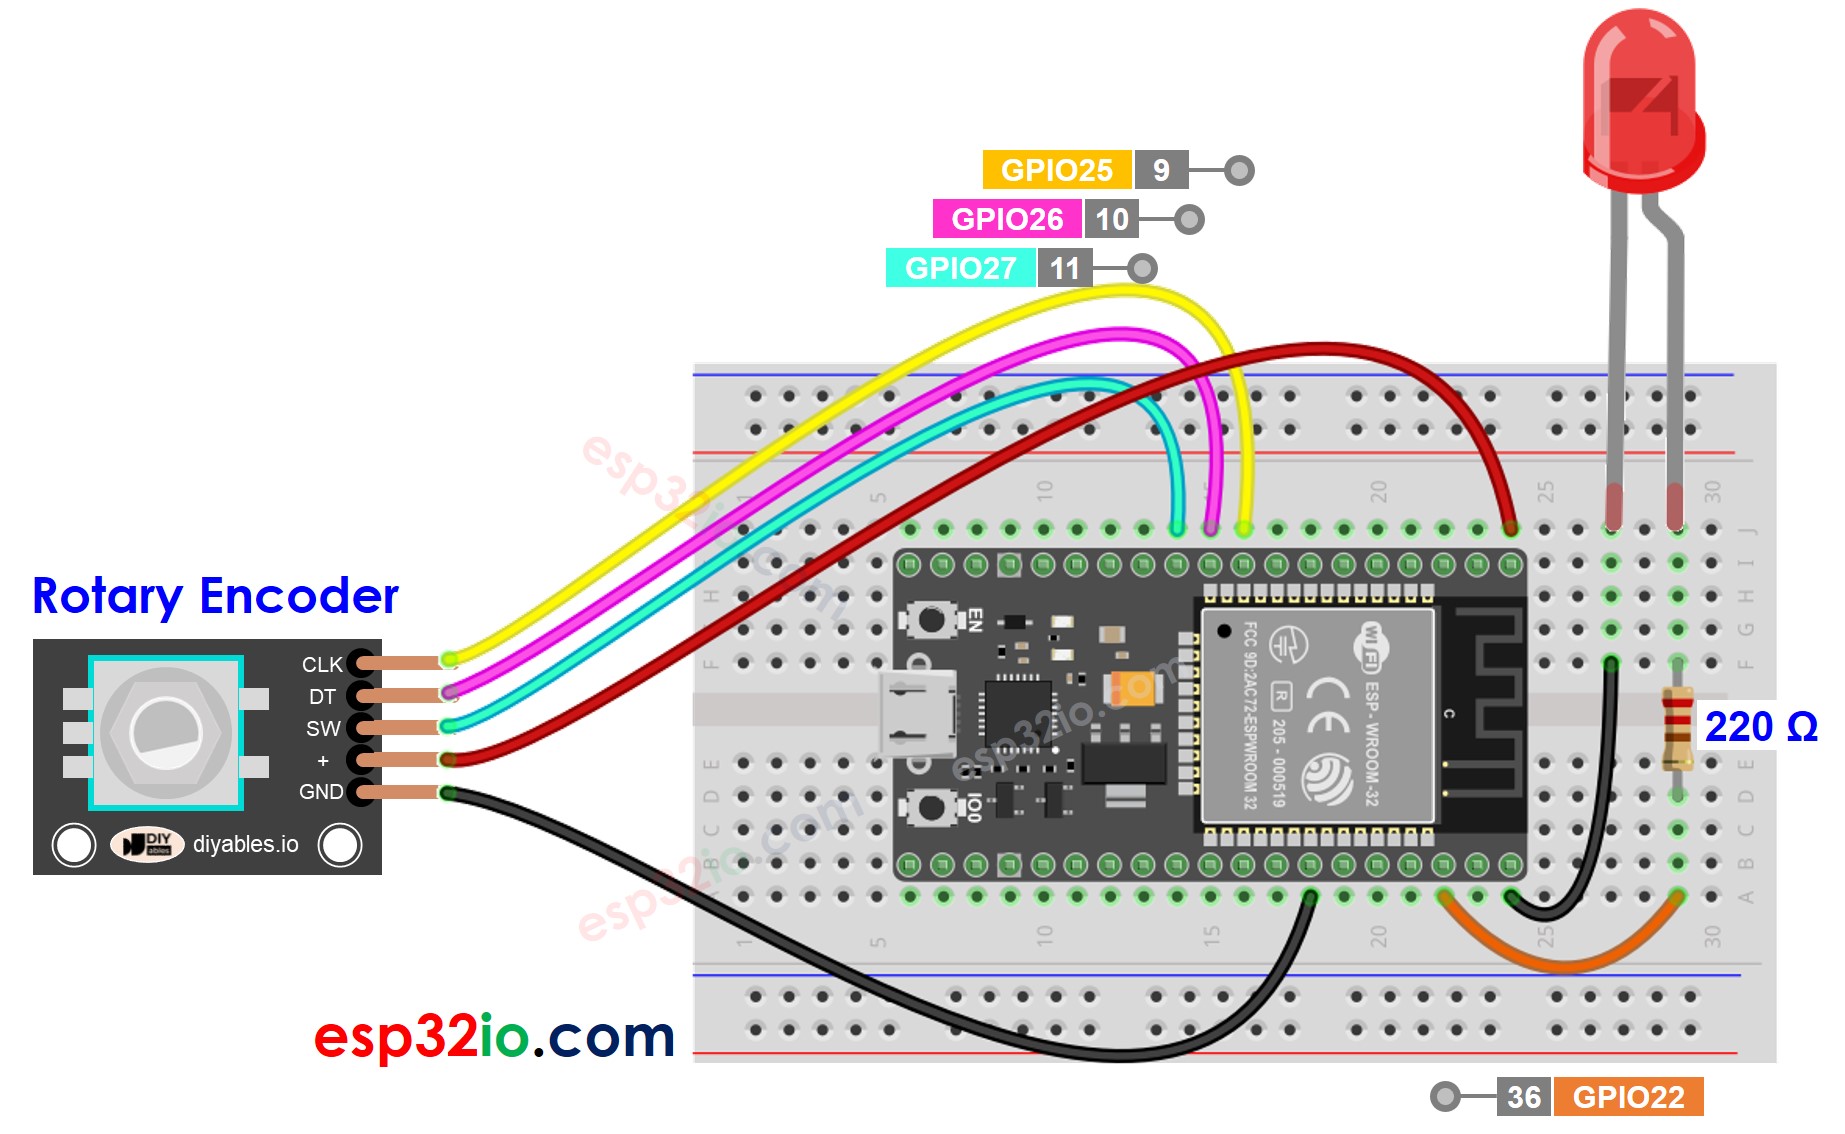
Diagrama de cableado de LEDs para codificador rotatorio ESP32

This image is created using Fritzing. Click to enlarge image

Si no sabe c\u00f3mo alimentar ESP32 y otros componentes, encuentre instrucciones en el siguiente tutorial: C\u00f3mo alimentar ESP32.

Código ESP32

/* * Este código de ESP32 fue desarrollado por es.newbiely.com * Este código de ESP32 se proporciona al público sin ninguna restricción. * Para tutoriales completos y diagramas de cableado, visite: * https://es.newbiely.com/tutorials/esp32/esp32-rotary-encoder-led */ #include <ESP32Servo.h> #define CLK_PIN 25 // ESP32 pin GPIO25 connected to the rotary encoder's CLK pin #define DT_PIN 26 // ESP32 pin GPIO26 connected to the rotary encoder's DT pin #define SW_PIN 27 // ESP32 pin GPIO27 connected to the rotary encoder's SW pin #define LED_PIN 22 // ESP32 pin GPIO22 connected to the LED #define DIRECTION_CW 0 // clockwise direction #define DIRECTION_CCW 1 // counter-clockwise direction int counter = 0; int direction = DIRECTION_CW; int CLK_state; int prev_CLK_state; int brightness = 125; // middle value void setup() { Serial.begin(9600); // configure encoder pins as inputs pinMode(CLK_PIN, INPUT); pinMode(DT_PIN, INPUT); // read the initial state of the rotary encoder's CLK pin prev_CLK_state = digitalRead(CLK_PIN); pinMode(LED_PIN, OUTPUT); } void loop() { // read the current state of the rotary encoder's CLK pin CLK_state = digitalRead(CLK_PIN); // If the state of CLK is changed, then pulse occurred // React to only the rising edge (from LOW to HIGH) to avoid double count if (CLK_state != prev_CLK_state && CLK_state == HIGH) { // if the DT state is HIGH // the encoder is rotating in counter-clockwise direction => decrease the counter if (digitalRead(DT_PIN) == HIGH) { direction = DIRECTION_CCW; counter--; brightness -= 10; // you can change this value } else { // the encoder is rotating in clockwise direction => increase the counter direction = DIRECTION_CW; counter++; brightness += 10; // you can change this value } if (brightness < 0) brightness = 0; else if (brightness > 255) brightness = 255; // sets the brightness of LED according to the counter analogWrite(LED_PIN, brightness); Serial.print("COUNTER: "); Serial.print(counter); Serial.print(" | BRIGHTNESS: "); Serial.println(brightness); } // save last CLK state prev_CLK_state = CLK_state; }

Pasos R\u00e1pidos

  • Si es la primera vez que usas ESP32, consulta cómo configurar el entorno para ESP32 en Arduino IDE.
  • Realiza el cableado como en la imagen de arriba.
  • Conecta la placa ESP32 a tu PC mediante un cable micro USB.
  • Abre el IDE de Arduino en tu PC.
  • Selecciona la placa ESP32 correcta (p. ej. ESP32 Módulo de Desarrollo) y el puerto COM.
  • Conecta ESP32 al PC mediante un cable USB.
  • Abre el IDE de Arduino, selecciona la placa y el puerto correctos.
  • Copia el código anterior y ábrelo con el IDE de Arduino.
  • Haz clic en el botón Subir en el IDE de Arduino para subir el código al ESP32.
  • Abre el Monitor Serial.
  • Gira el codificador giratorio.
  • Ver el brillo del LED.
  • Ver el resultado en el Monitor Serial.
Newbiely | Arduino IDE 2.3.8
──
File
Edit
Sketch
Tools
Help
ESP32 Dev Module
Newbiely.ino
···
8 Serial.println("Hello World!");
Output
Serial Monitor
Message (Enter to send message to 'ESP32 Dev Module' on 'COM15')
New Line
9600 baud
COUNTER: 1 | BRIGHTNESS: 135 COUNTER: 2 | BRIGHTNESS: 145 COUNTER: 3 | BRIGHTNESS: 155 COUNTER: 4 | BRIGHTNESS: 165 COUNTER: 5 | BRIGHTNESS: 175 COUNTER: 6 | BRIGHTNESS: 185 COUNTER: 7 | BRIGHTNESS: 195
Ln 11, Col 1
ESP32 Dev Module on COM15
2

Explicación del código

¡Lee la explicación línea por línea en los comentarios del código fuente!

Video Tutorial

Estamos considerando crear tutoriales en video. Si considera que los tutoriales en video son importantes, suscríbase a nuestro canal de YouTube para motivarnos a crear los videos.

※ NUESTROS MENSAJES

  • No dude en compartir el enlace de este tutorial. Sin embargo, por favor no use nuestro contenido en otros sitios web. Hemos invertido mucho esfuerzo y tiempo en crear el contenido, ¡por favor respete nuestro trabajo!