Ejemplo de ESP32 WebJoystick - Tutorial de Control del Joystick Virtual

Visión general

El ejemplo WebJoystick crea una interfaz de joystick virtual accesible desde cualquier navegador web. Diseñado para ESP32 plataforma educativa con capacidades robóticas mejoradas, características de control de motor integradas y una integración perfecta con módulos educativos de robótica. Perfecto para controlar robots, vehículos o cualquier sistema que requiera entrada de posición en 2D.

Ejemplo de Arduino WebJoystick - Tutorial de control de joystick virtual

Características

  • Joystick virtual: Control interactivo del joystick a través de la interfaz web
  • Coordenadas en tiempo real: Valores X/Y de -100 a +100 para un control preciso
  • Soporte táctil y de ratón: Funciona en computadoras de escritorio, tabletas y dispositivos móviles
  • Retorno automático configurable: Opción para que el joystick vuelva al centro al soltarse
  • Control de sensibilidad: Sensibilidad ajustable para evitar actualizaciones excesivas
  • Retroalimentación visual: Visualización de la posición en tiempo real y valores de las coordenadas
  • Comunicación WebSocket: Respuesta instantánea sin actualizar la página
  • Posición central: Indicador claro de la posición central para un control neutro

Hardware Requerido

1×Módulo de Desarrollo ESP32 ESP-WROOM-32
1×Cable USB Tipo-A a Tipo-C (para PC USB-A)
1×Cable USB Tipo-C a Tipo-C (para PC USB-C)
1×(Recomendado) Placa de Expansión de Terminales de Tornillo para ESP32
1×(Recomendado) Breakout Expansion Board for ESP32
1×(Recomendado) Divisor de Alimentación para ESP32

Or you can buy the following kits:

1×DIYables ESP32 Starter Kit (ESP32 included)
1×DIYables Sensor Kit (30 sensors/displays)
1×DIYables Sensor Kit (18 sensors/displays)
Divulgación: Algunos de los enlaces proporcionados en esta sección son enlaces de afiliado de Amazon. Podemos recibir una comisión por las compras realizadas a través de estos enlaces sin costo adicional para usted. Apreciamos su apoyo.

Instrucciones de configuración

Pasos rápidos

Siga estas instrucciones paso a paso:

  • Si es la primera vez que usas el ESP32, consulta el tutorial sobre configuración del entorno para ESP32 en el IDE de Arduino.
  • Conecta la placa ESP32 a tu ordenador usando un cable USB.
  • Inicia el IDE de Arduino en tu ordenador.
  • Selecciona la placa ESP32 adecuada (p. ej. ESP32 Dev Module) y el puerto COM.
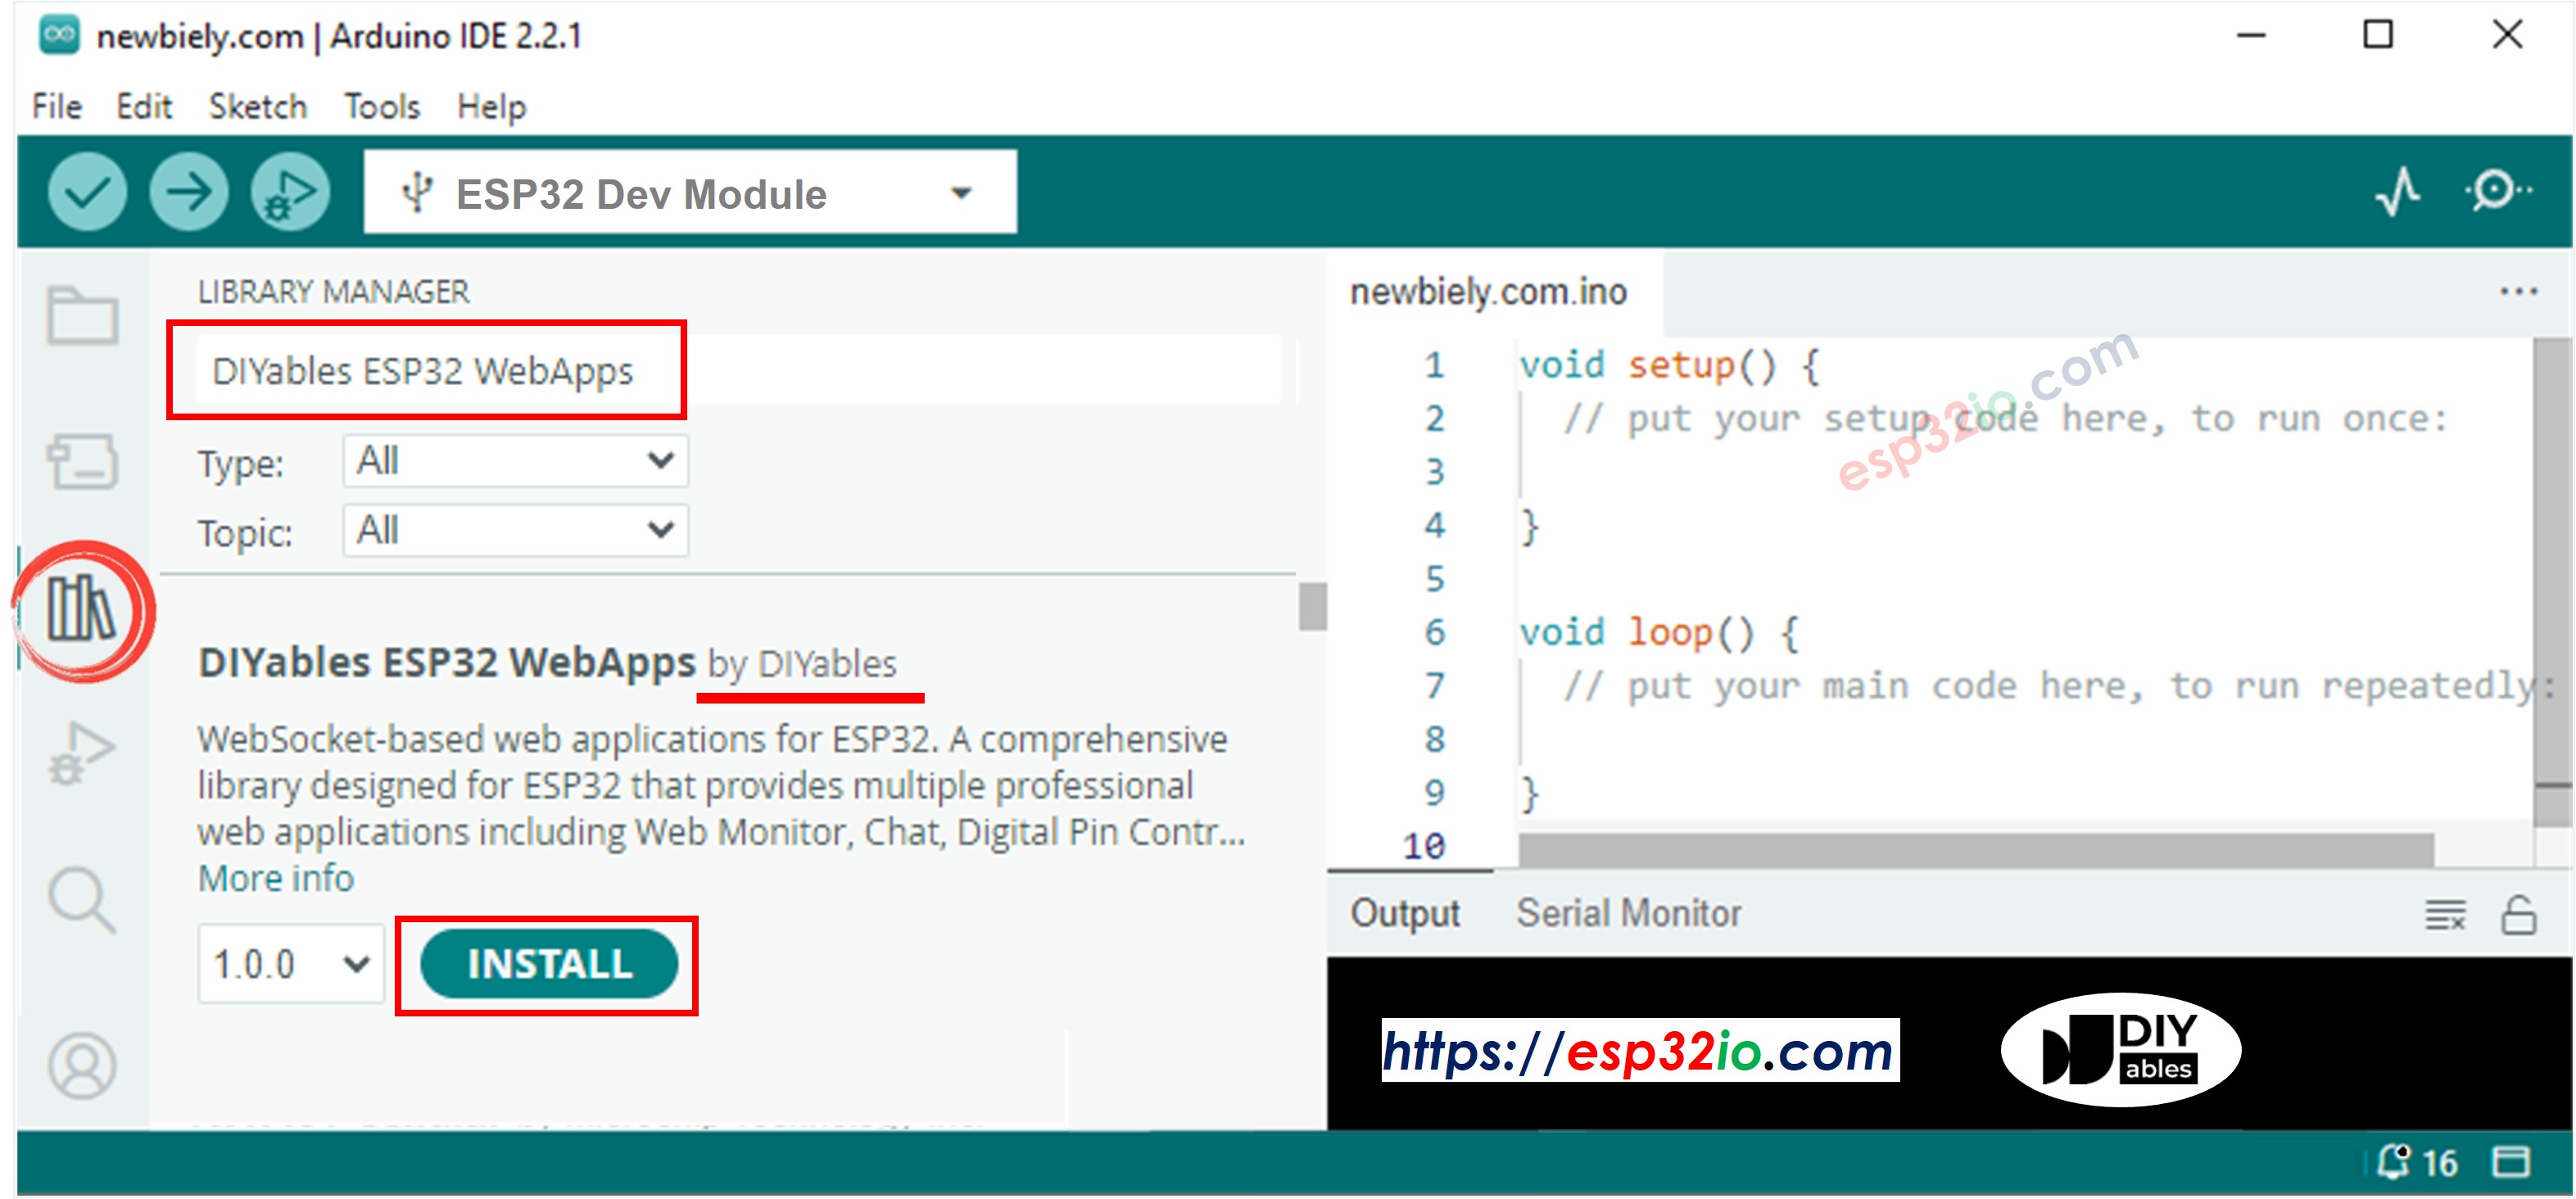
  • Navega hasta el icono Bibliotecas en la barra izquierda del IDE de Arduino.
  • Busca "DIYables ESP32 WebApps", luego localiza la biblioteca DIYables ESP32 WebApps de DIYables
  • Haz clic en el botón Instalar para instalar la biblioteca.
Biblioteca de ESP32 WebApps de DIYables
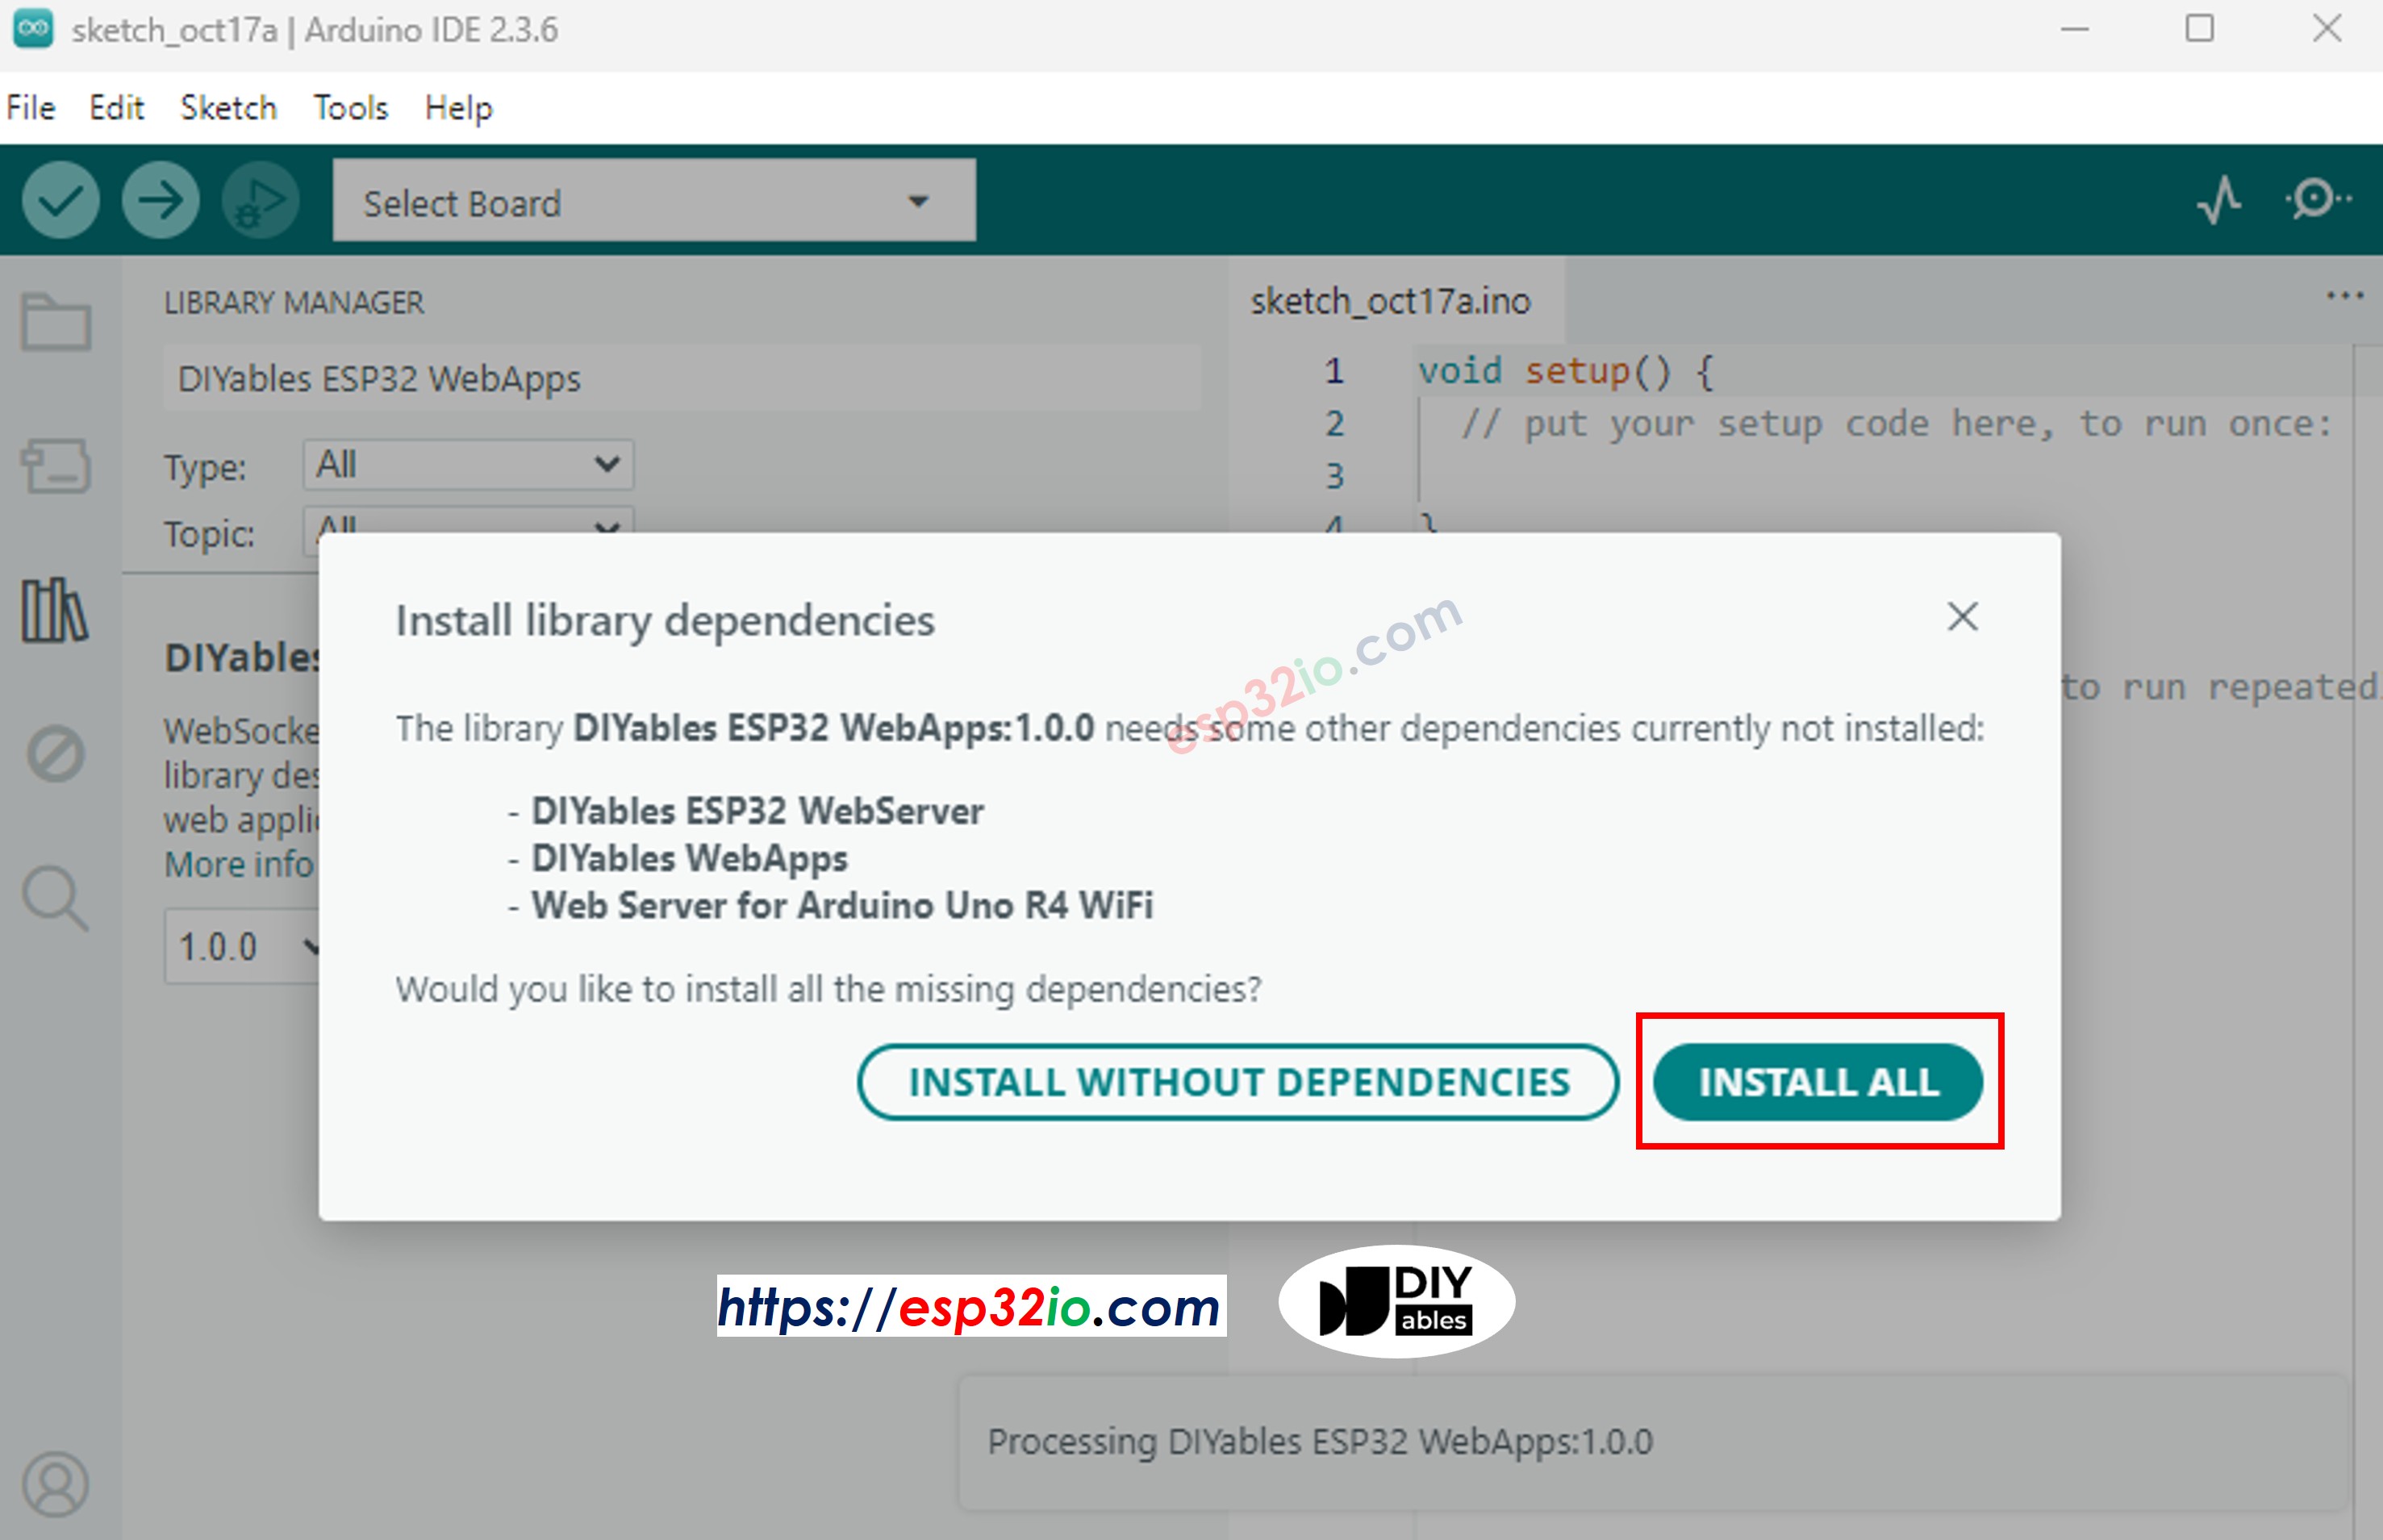
  • Se le pedirá instalar otras dependencias de bibliotecas.
  • Haga clic en el botón Instalar Todo para instalar todas las dependencias de la biblioteca.
Dependencia de DIYables ESP32 WebApps
  • En Arduino IDE, ve a Archivo Ejemplos DIYables ESP32 WebApps WebJoystick ejemplo, o copia el código anterior y pégalo en el editor de Arduino IDE
/* * DIYables WebApp Library - Web Joystick Example * * This example demonstrates the Web Joystick feature: * - Interactive joystick control via web interface * - Real-time X/Y coordinate values (-100 to +100) * - Control pins based on joystick position * * Hardware: ESP32 Boards * * Setup: * 1. Update WiFi credentials below * 2. Upload the sketch to your Arduino * 3. Open Serial Monitor to see the IP address * 4. Navigate to http://[IP_ADDRESS]/webjoystick */ #include <DIYables_ESP32_Platform.h> #include <DIYablesWebApps.h> // WiFi credentials - UPDATE THESE WITH YOUR NETWORK const char WIFI_SSID[] = "YOUR_WIFI_SSID"; const char WIFI_PASSWORD[] = "YOUR_WIFI_PASSWORD"; // Create WebApp server and page instances // MEMORY SAFETY FIX: Use static factory to avoid stack object lifetime issues static ESP32ServerFactory serverFactory; // Static ensures lifetime matches program DIYablesWebAppServer webAppsServer(serverFactory, 80, 81); DIYablesHomePage homePage; // Configure joystick with autoReturn=false and sensitivity=5 (minimum 5% change to trigger updates) DIYablesWebJoystickPage webJoystickPage(false, 5); // Variables to store current joystick values int currentJoystickX = 0; int currentJoystickY = 0; void setup() { Serial.begin(9600); delay(1000); // TODO: initialize your hardware pins here Serial.println("DIYables ESP32 WebApp - Web Joystick Example"); // Add home and web joystick pages webAppsServer.addApp(&homePage); webAppsServer.addApp(&webJoystickPage); // Optional: Add 404 page for better user experience webAppsServer.setNotFoundPage(DIYablesNotFoundPage()); // Start the WebApp server if (!webAppsServer.begin(WIFI_SSID, WIFI_PASSWORD)) { while (1) { Serial.println("Failed to start WebApp server!"); delay(1000); } } // Set up joystick callback for position changes webJoystickPage.onJoystickValueFromWeb([](int x, int y) { // Store the received values currentJoystickX = x; currentJoystickY = y; // Print joystick position values (-100 to +100) Serial.println("Joystick - X: " + String(x) + ", Y: " + String(y)); // TODO: Add your control logic here based on joystick position // Examples: // - Control motors: if (x > 50) { /* move right */ } // - Control servos: servo.write(map(y, -100, 100, 0, 180)); // - Control LEDs: analogWrite(LED_PIN, map(abs(x), 0, 100, 0, 255)); // - Send commands to other devices via Serial, I2C, SPI, etc. }); // Optional: Handle requests for current joystick values (when web page loads) webJoystickPage.onJoystickValueToWeb([]() { // Send the stored joystick values back to the web client webJoystickPage.sendToWebJoystick(currentJoystickX, currentJoystickY); Serial.println("Web client requested values - Sent to Web: X=" + String(currentJoystickX) + ", Y=" + String(currentJoystickY)); }); // You can change configuration at runtime: // webJoystickPage.setAutoReturn(false); // Disable auto-return // webJoystickPage.setSensitivity(10.0); // Only send updates when joystick moves >10% (less sensitive) } void loop() { // Handle WebApp server communications webAppsServer.loop(); // TODO: Add your main application code here delay(10); }
  • Configura las credenciales de WiFi en el código actualizando estas líneas:
const char WIFI_SSID[] = "YOUR_WIFI_NETWORK"; const char WIFI_PASSWORD[] = "YOUR_WIFI_PASSWORD";
  • Haz clic en el botón Subir en el IDE de Arduino para subir el código al ESP32
  • Abre el Monitor Serial
  • Echa un vistazo al resultado en el Monitor Serial. Se ve como lo siguiente
COM6
Send
DIYables WebApp - Web Joystick Example INFO: Added app / INFO: Added app /web-joystick DIYables WebApp Library Platform: ESP32 Network connected! IP address: 192.168.0.2 HTTP server started on port 80 Configuring WebSocket server callbacks... WebSocket server started on port 81 WebSocket URL: ws://192.168.0.2:81 WebSocket server started on port 81 ========================================== DIYables WebApp Ready! ========================================== 📱 Web Interface: http://192.168.0.2 🔗 WebSocket: ws://192.168.0.2:81 📋 Available Applications: 🏠 Home Page: http://192.168.0.2/ 🕹️ Web Joystick: http://192.168.0.2/web-joystick ==========================================
Autoscroll Show timestamp
Clear output
9600 baud  
Newline  
  • Si no ves nada, reinicia la placa ESP32.
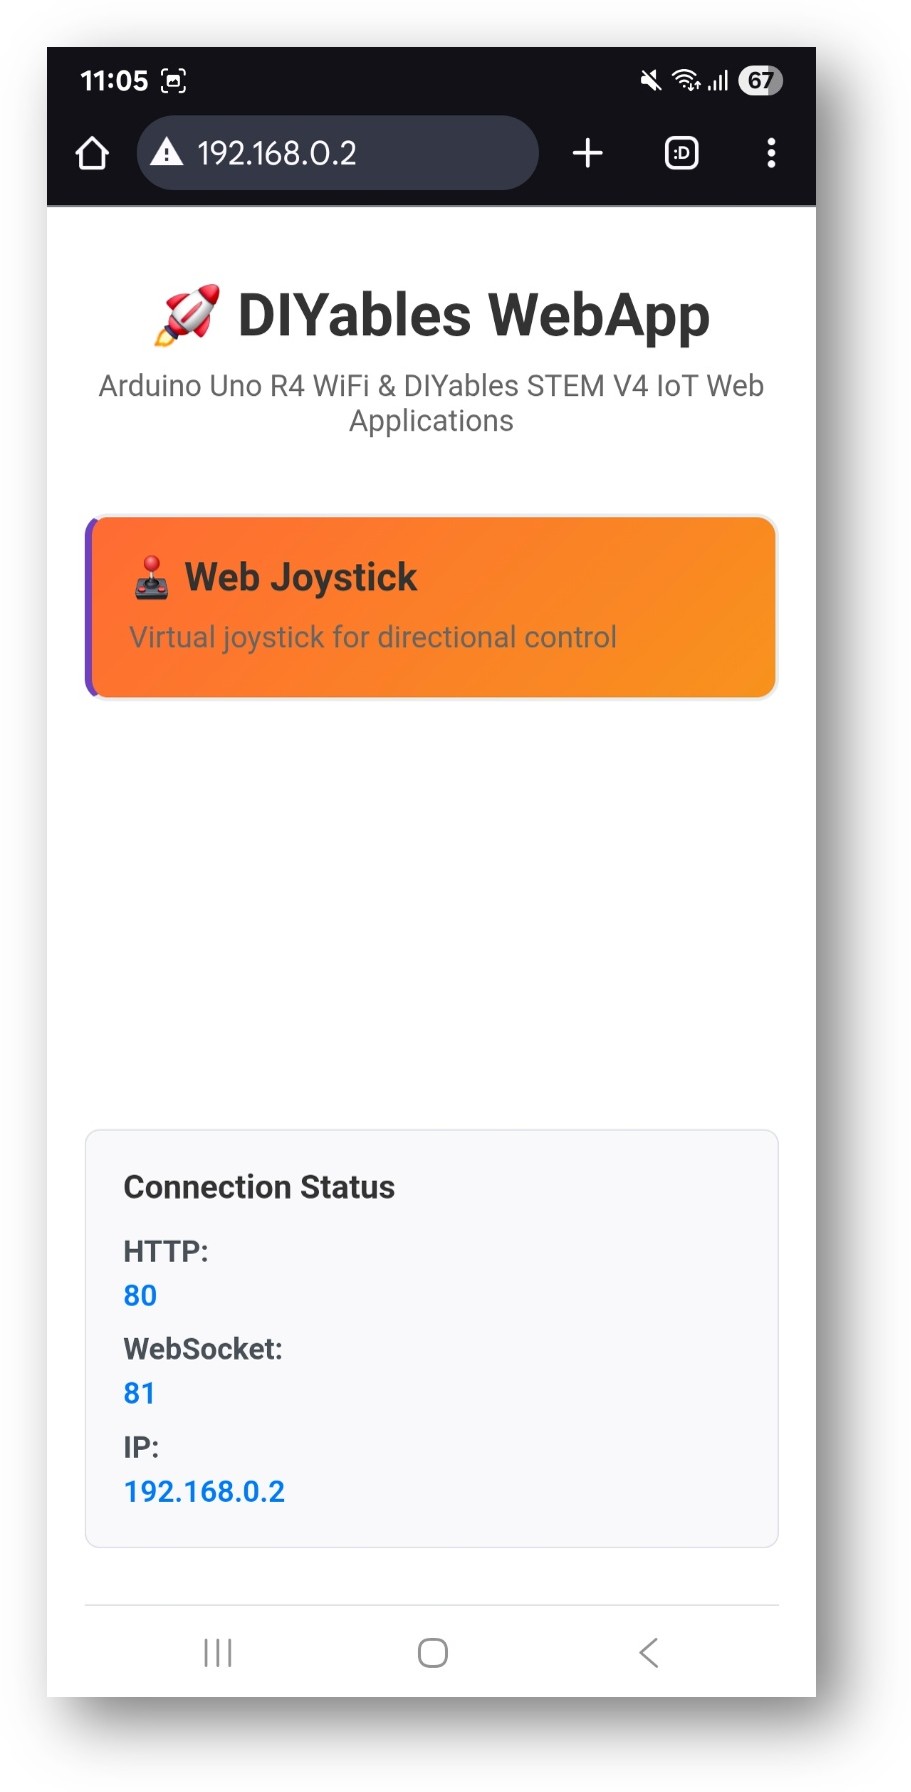
  • Toma nota de la dirección IP que se muestre y escribe esa dirección en la barra de direcciones de un navegador web en tu teléfono inteligente o PC.
  • Ejemplo: http://192.168.0.2
  • Verás la página de inicio como en la imagen de abajo:
Página principal de la WebApp de ESP32 DIYables con la aplicación Web Joystick
  • Haz clic en el enlace de Web Joystick; verás la interfaz de usuario de la aplicación Web Joystick como se muestra a continuación:
ESP32 DIYables Aplicación web de joystick
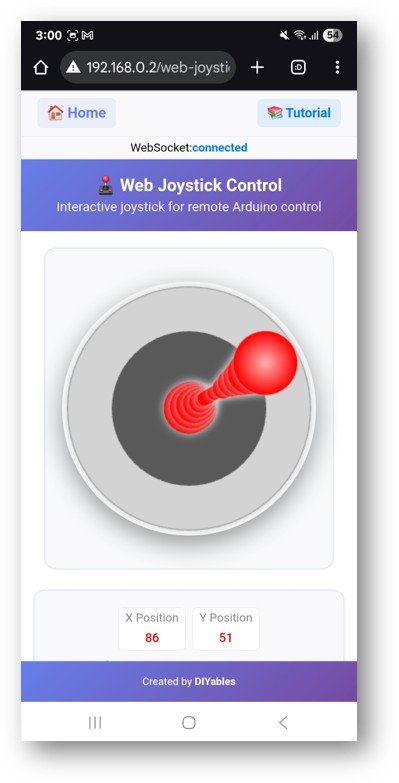
  • O también puedes acceder a la página directamente mediante la dirección IP seguida de /web-joystick. Por ejemplo: http://192.168.0.2/web-joystick
  • Prueba controlar el joystick virtual haciendo clic y arrastrando en el área del joystick y observa los valores de las coordenadas X/Y (-100 a +100) en el Monitor Serie.

Personalización creativa - Adapta el código a tu proyecto

2. Configurar los ajustes del joystick

El joystick se puede configurar con diferentes parámetros:

Configuración básica

// Create joystick with default settings (autoReturn=true, sensitivity=1) DIYablesWebJoystickPage webJoystickPage;

Configuración avanzada

// Create joystick with custom settings // autoReturn=false: Joystick stays at last position when released // sensitivity=5: Only send updates when movement > 5% DIYablesWebJoystickPage webJoystickPage(false, 5);

Cómo usar el joystick

Controles de la interfaz web

La interfaz del joystick proporciona:

  • Pad del Joystick: Área de control circular para entrada táctil/ratón
  • Indicador de posición: Muestra la posición actual del joystick
  • Pantalla de coordenadas: Valores X/Y en tiempo real (-100 a +100)
  • Punto Central: Referencia visual para la posición neutra

Operación del joystick

Escritorio (Control del ratón)

  1. Haz clic y arrastra: Haz clic en el joystick y arrastra para mover
  2. Soltar: El joystick regresa al centro (si autoReturn=true)
  3. Posición de clic: Haz clic directamente para establecer la posición del joystick

Móvil/Tableta (control táctil)

  1. Toque y arrastre: Toque el joystick y arrastre el dedo para moverse
  2. Multitoque: Un solo dedo para un control preciso
  3. Soltar: Regreso automático al centro (si está activado)

Sistema de Coordenadas

El joystick proporciona coordenadas en un sistema cartesiano estándar:

  • Eje X: -100 (extremo izquierdo) a +100 (extremo derecho)
  • Eje Y: -100 (extremo inferior) a +100 (extremo superior)
  • Centro: X=0, Y=0 (posición neutral)
  • Esquinas: Las posiciones diagonales proporcionan valores combinados de X e Y

Ejemplos de Programación

Manejador básico de joystick

void setup() { // Set up joystick callback for position changes webJoystickPage.onJoystickValueFromWeb([](int x, int y) { // Store the received values currentJoystickX = x; currentJoystickY = y; // Print joystick position values Serial.println("Joystick - X: " + String(x) + ", Y: " + String(y)); // Add your control logic here }); }

Ejemplo de control de motor

// Pin definitions for motor driver const int MOTOR_LEFT_PIN1 = 2; const int MOTOR_LEFT_PIN2 = 3; const int MOTOR_RIGHT_PIN1 = 4; const int MOTOR_RIGHT_PIN2 = 5; const int MOTOR_LEFT_PWM = 9; const int MOTOR_RIGHT_PWM = 10; void setup() { // Configure motor pins pinMode(MOTOR_LEFT_PIN1, OUTPUT); pinMode(MOTOR_LEFT_PIN2, OUTPUT); pinMode(MOTOR_RIGHT_PIN1, OUTPUT); pinMode(MOTOR_RIGHT_PIN2, OUTPUT); pinMode(MOTOR_LEFT_PWM, OUTPUT); pinMode(MOTOR_RIGHT_PWM, OUTPUT); webJoystickPage.onJoystickValueFromWeb([](int x, int y) { controlRobot(x, y); }); } void controlRobot(int x, int y) { // Convert joystick coordinates to motor speeds int leftSpeed = y + x; // Forward/backward + turn left/right int rightSpeed = y - x; // Forward/backward - turn left/right // Constrain speeds to valid range leftSpeed = constrain(leftSpeed, -100, 100); rightSpeed = constrain(rightSpeed, -100, 100); // Control left motor if (leftSpeed > 0) { digitalWrite(MOTOR_LEFT_PIN1, HIGH); digitalWrite(MOTOR_LEFT_PIN2, LOW); analogWrite(MOTOR_LEFT_PWM, map(leftSpeed, 0, 100, 0, 255)); } else if (leftSpeed < 0) { digitalWrite(MOTOR_LEFT_PIN1, LOW); digitalWrite(MOTOR_LEFT_PIN2, HIGH); analogWrite(MOTOR_LEFT_PWM, map(-leftSpeed, 0, 100, 0, 255)); } else { digitalWrite(MOTOR_LEFT_PIN1, LOW); digitalWrite(MOTOR_LEFT_PIN2, LOW); analogWrite(MOTOR_LEFT_PWM, 0); } // Control right motor if (rightSpeed > 0) { digitalWrite(MOTOR_RIGHT_PIN1, HIGH); digitalWrite(MOTOR_RIGHT_PIN2, LOW); analogWrite(MOTOR_RIGHT_PWM, map(rightSpeed, 0, 100, 0, 255)); } else if (rightSpeed < 0) { digitalWrite(MOTOR_RIGHT_PIN1, LOW); digitalWrite(MOTOR_RIGHT_PIN2, HIGH); analogWrite(MOTOR_RIGHT_PWM, map(-rightSpeed, 0, 100, 0, 255)); } else { digitalWrite(MOTOR_RIGHT_PIN1, LOW); digitalWrite(MOTOR_RIGHT_PIN2, LOW); analogWrite(MOTOR_RIGHT_PWM, 0); } }

Ejemplo de control de servomotor

#include <Servo.h> Servo panServo; // X-axis control (left/right) Servo tiltServo; // Y-axis control (up/down) void setup() { // Attach servos to pins panServo.attach(9); tiltServo.attach(10); // Center servos initially panServo.write(90); tiltServo.write(90); webJoystickPage.onJoystickValueFromWeb([](int x, int y) { controlServos(x, y); }); } void controlServos(int x, int y) { // Map joystick coordinates to servo angles int panAngle = map(x, -100, 100, 0, 180); // X controls pan (0-180°) int tiltAngle = map(y, -100, 100, 180, 0); // Y controls tilt (inverted) // Move servos to calculated positions panServo.write(panAngle); tiltServo.write(tiltAngle); Serial.println("Pan: " + String(panAngle) + "°, Tilt: " + String(tiltAngle) + "°"); }

Indicador de posición LED

// LED pins for position indication const int LED_UP = 2; const int LED_DOWN = 3; const int LED_LEFT = 4; const int LED_RIGHT = 5; const int LED_CENTER = 13; void setup() { // Configure LED pins pinMode(LED_UP, OUTPUT); pinMode(LED_DOWN, OUTPUT); pinMode(LED_LEFT, OUTPUT); pinMode(LED_RIGHT, OUTPUT); pinMode(LED_CENTER, OUTPUT); webJoystickPage.onJoystickValueFromWeb([](int x, int y) { updateLEDIndicators(x, y); }); } void updateLEDIndicators(int x, int y) { // Turn off all LEDs first digitalWrite(LED_UP, LOW); digitalWrite(LED_DOWN, LOW); digitalWrite(LED_LEFT, LOW); digitalWrite(LED_RIGHT, LOW); digitalWrite(LED_CENTER, LOW); // Check if joystick is near center if (abs(x) < 10 && abs(y) < 10) { digitalWrite(LED_CENTER, HIGH); return; } // Activate LEDs based on direction if (y > 20) digitalWrite(LED_UP, HIGH); if (y < -20) digitalWrite(LED_DOWN, HIGH); if (x > 20) digitalWrite(LED_RIGHT, HIGH); if (x < -20) digitalWrite(LED_LEFT, HIGH); }

Configuración avanzada

Cambios de configuración en tiempo de ejecución

void setup() { // Initial setup with default values webJoystickPage.onJoystickValueFromWeb([](int x, int y) { handleJoystickInput(x, y); }); // Change settings at runtime webJoystickPage.setAutoReturn(false); // Disable auto-return webJoystickPage.setSensitivity(10.0); // Reduce sensitivity } void handleJoystickInput(int x, int y) { // Handle different modes based on current settings static bool precisionMode = false; // Toggle precision mode with extreme positions if (abs(x) > 95 && abs(y) > 95) { precisionMode = !precisionMode; if (precisionMode) { webJoystickPage.setSensitivity(1.0); // High sensitivity Serial.println("Precision mode ON"); } else { webJoystickPage.setSensitivity(10.0); // Low sensitivity Serial.println("Precision mode OFF"); } } }

Implementación de la Zona Muerta

void processJoystickWithDeadZone(int x, int y) { const int DEAD_ZONE = 15; // 15% dead zone around center // Apply dead zone filtering int filteredX = (abs(x) < DEAD_ZONE) ? 0 : x; int filteredY = (abs(y) < DEAD_ZONE) ? 0 : y; // Scale values outside dead zone if (filteredX != 0) { filteredX = map(abs(filteredX), DEAD_ZONE, 100, 0, 100); filteredX = (x < 0) ? -filteredX : filteredX; } if (filteredY != 0) { filteredY = map(abs(filteredY), DEAD_ZONE, 100, 0, 100); filteredY = (y < 0) ? -filteredY : filteredY; } // Use filtered values for control controlDevice(filteredX, filteredY); }

Rampa de velocidad

class SpeedController { private: int targetX = 0, targetY = 0; int currentX = 0, currentY = 0; unsigned long lastUpdate = 0; const int RAMP_RATE = 5; // Change per update cycle public: void setTarget(int x, int y) { targetX = x; targetY = y; } void update() { if (millis() - lastUpdate > 20) { // Update every 20ms // Ramp X value if (currentX < targetX) { currentX = min(currentX + RAMP_RATE, targetX); } else if (currentX > targetX) { currentX = max(currentX - RAMP_RATE, targetX); } // Ramp Y value if (currentY < targetY) { currentY = min(currentY + RAMP_RATE, targetY); } else if (currentY > targetY) { currentY = max(currentY - RAMP_RATE, targetY); } // Apply ramped values applyControlValues(currentX, currentY); lastUpdate = millis(); } } void applyControlValues(int x, int y) { // Your control logic here with smooth ramped values Serial.println("Ramped - X: " + String(x) + ", Y: " + String(y)); } }; SpeedController speedController; void setup() { webJoystickPage.onJoystickValueFromWeb([](int x, int y) { speedController.setTarget(x, y); }); } void loop() { server.loop(); speedController.update(); // Apply speed ramping }

Ejemplos de integración de hardware

Control de vehículo robótico

void setupRobotCar() { // Motor driver pins pinMode(2, OUTPUT); // Left motor direction 1 pinMode(3, OUTPUT); // Left motor direction 2 pinMode(4, OUTPUT); // Right motor direction 1 pinMode(5, OUTPUT); // Right motor direction 2 pinMode(9, OUTPUT); // Left motor PWM pinMode(10, OUTPUT); // Right motor PWM webJoystickPage.onJoystickValueFromWeb([](int x, int y) { // Tank drive calculation int leftMotor = y + (x / 2); // Forward/back + steering int rightMotor = y - (x / 2); // Forward/back - steering // Constrain to valid range leftMotor = constrain(leftMotor, -100, 100); rightMotor = constrain(rightMotor, -100, 100); // Control motors setMotorSpeed(9, 2, 3, leftMotor); // Left motor setMotorSpeed(10, 4, 5, rightMotor); // Right motor }); } void setMotorSpeed(int pwmPin, int dir1Pin, int dir2Pin, int speed) { if (speed > 0) { digitalWrite(dir1Pin, HIGH); digitalWrite(dir2Pin, LOW); analogWrite(pwmPin, map(speed, 0, 100, 0, 255)); } else if (speed < 0) { digitalWrite(dir1Pin, LOW); digitalWrite(dir2Pin, HIGH); analogWrite(pwmPin, map(-speed, 0, 100, 0, 255)); } else { digitalWrite(dir1Pin, LOW); digitalWrite(dir2Pin, LOW); analogWrite(pwmPin, 0); } }

Control del gimbal de la cámara

#include <Servo.h> Servo panServo, tiltServo; int panOffset = 90, tiltOffset = 90; // Center positions void setupCameraGimbal() { panServo.attach(9); tiltServo.attach(10); // Set initial center positions panServo.write(panOffset); tiltServo.write(tiltOffset); webJoystickPage.onJoystickValueFromWeb([](int x, int y) { // Calculate servo positions with offset int panPos = panOffset + map(x, -100, 100, -45, 45); // ±45° range int tiltPos = tiltOffset + map(y, -100, 100, -30, 30); // ±30° range // Constrain to servo limits panPos = constrain(panPos, 0, 180); tiltPos = constrain(tiltPos, 0, 180); // Move servos smoothly panServo.write(panPos); tiltServo.write(tiltPos); }); }

Control de color de LED RGB

const int RED_PIN = 9; const int GREEN_PIN = 10; const int BLUE_PIN = 11; void setupRGBControl() { pinMode(RED_PIN, OUTPUT); pinMode(GREEN_PIN, OUTPUT); pinMode(BLUE_PIN, OUTPUT); webJoystickPage.onJoystickValueFromWeb([](int x, int y) { // Convert joystick position to RGB values int red = map(abs(x), 0, 100, 0, 255); int green = map(abs(y), 0, 100, 0, 255); int blue = map(abs(x + y), 0, 141, 0, 255); // Diagonal distance // Apply quadrant-specific color mixing if (x > 0 && y > 0) { // Upper right: Red + Green = Yellow blue = 0; } else if (x < 0 && y > 0) { // Upper left: Green + Blue = Cyan red = 0; } else if (x < 0 && y < 0) { // Lower left: Blue + Red = Magenta green = 0; } else if (x > 0 && y < 0) { // Lower right: Red only green = blue = 0; } // Set RGB values analogWrite(RED_PIN, red); analogWrite(GREEN_PIN, green); analogWrite(BLUE_PIN, blue); }); }

Solución de problemas

Problemas comunes

1. El joystick no responde

  • Verificar el estado de la conexión WebSocket en la consola del navegador
  • Verificar la conectividad de la red
  • Actualizar la página del navegador
  • Verificar errores en el Monitor de serie

2. Movimiento brusco o irregular

  • Aumentar el valor de la sensibilidad para reducir la frecuencia de actualización
  • Implementar filtrado de zona muerta
  • Añadir una rampa de velocidad para transiciones suaves
  • Verificar problemas de latencia de la red

3. Regreso automático no funciona

  • Verificar la configuración de autoReturn: webJoystickPage.setAutoReturn(true)
  • Verificar la compatibilidad del navegador (algunos dispositivos táctiles varían)
  • Probar con diferentes métodos de entrada (ratón vs táctil)

4. Valores que no alcanzan el rango completo

  • Verificar la calibración del joystick en la interfaz web
  • Verificar los cálculos de coordenadas en la devolución de llamada
  • Probar con diferentes combinaciones de navegadores y dispositivos

Consejos de depuración

Añadir depuración exhaustiva:

void debugJoystickState(int x, int y) { Serial.println("=== Joystick Debug ==="); Serial.println("X: " + String(x) + " (" + String(map(x, -100, 100, 0, 100)) + "%)"); Serial.println("Y: " + String(y) + " (" + String(map(y, -100, 100, 0, 100)) + "%)"); Serial.println("Distance from center: " + String(sqrt(x*x + y*y))); Serial.println("Angle: " + String(atan2(y, x) * 180 / PI) + "°"); Serial.println("====================="); }

Ideas de Proyectos

Proyectos de robótica

  • Coche robótico controlado a distancia
  • Control de brazo robótico
  • Control de vuelo de drón (movimientos básicos)
  • Navegación de robot para mascotas

Automatización del hogar

  • Control de cortinas inteligentes (abrir/cerrar/posición)
  • Control de paneo e inclinación de la cámara
  • Control de brillo y color de la luz
  • Control de velocidad y dirección del ventilador

Proyectos educativos

  • Herramienta didáctica de sistemas de coordenadas
  • Demostraciones de control de motores
  • Experimentos de posicionamiento con servomotores
  • Interfaces de mando para videojuegos

Arte y Proyectos Creativos

  • Control de patrones de matriz LED
  • Control de visualización musical
  • Control del robot de dibujo
  • Instalaciones de arte interactivo

Integración con otros ejemplos

Combinar con WebSlider

Usa el joystick para la dirección y los deslizadores para la velocidad/intensidad:

// Use joystick for direction, sliders for speed limits webJoystickPage.onJoystickValueFromWeb([](int x, int y) { int maxSpeed = getSliderValue(); // From WebSlider int scaledX = map(x, -100, 100, -maxSpeed, maxSpeed); int scaledY = map(y, -100, 100, -maxSpeed, maxSpeed); controlRobot(scaledX, scaledY); });

Combinar con WebDigitalPins

Utiliza las posiciones del joystick para activar los estados de los pines digitales:

webJoystickPage.onJoystickValueFromWeb([](int x, int y) { // Activate pins based on joystick quadrants webDigitalPinsPage.setPinState(2, x > 50); // Right quadrant webDigitalPinsPage.setPinState(3, x < -50); // Left quadrant webDigitalPinsPage.setPinState(4, y > 50); // Upper quadrant webDigitalPinsPage.setPinState(5, y < -50); // Lower quadrant });

Próximos pasos

Después de dominar el ejemplo de WebJoystick, prueba:

  1. WebSlider - Para control analógico adicional
  2. WebDigitalPins - Para control discreto de encendido/apagado
  3. WebMonitor - Para depurar los valores del joystick
  4. MultipleWebApps - Combinando el joystick con otros controles

Soporte

Para obtener ayuda adicional:

  • Consulta la documentación de la API
  • Visita los tutoriales de DIYables: https://esp32io.com/tutorials/diyables-esp32-webapps
  • Foros de la comunidad ESP32

※ NUESTROS MENSAJES

  • No dude en compartir el enlace de este tutorial. Sin embargo, por favor no use nuestro contenido en otros sitios web. Hemos invertido mucho esfuerzo y tiempo en crear el contenido, ¡por favor respete nuestro trabajo!