ESP32 - Múltiples Botones

Este tutorial te guía para programar un ESP32 para utilizar múltiples botones simultáneamente sin depender de la función delay(). El tutorial ofrece código en dos métodos:

Mostraremos cuatro botones. Sin embargo, puede ajustar fácilmente el código para dos botones, tres botones, cinco botones o incluso más.

Acerca del Botón

Tenemos tutoriales específicos sobre el botón. Cada tutorial contiene información detallada e instrucciones paso a paso sobre el pinout de hardware, el principio de funcionamiento, las conexiones de cableado al ESP32 y el código para ESP32... Obtén más información sobre ellos en los siguientes enlaces:

Diagrama de Cableado

Diagrama de cableado de ESP32 con múltiples botones

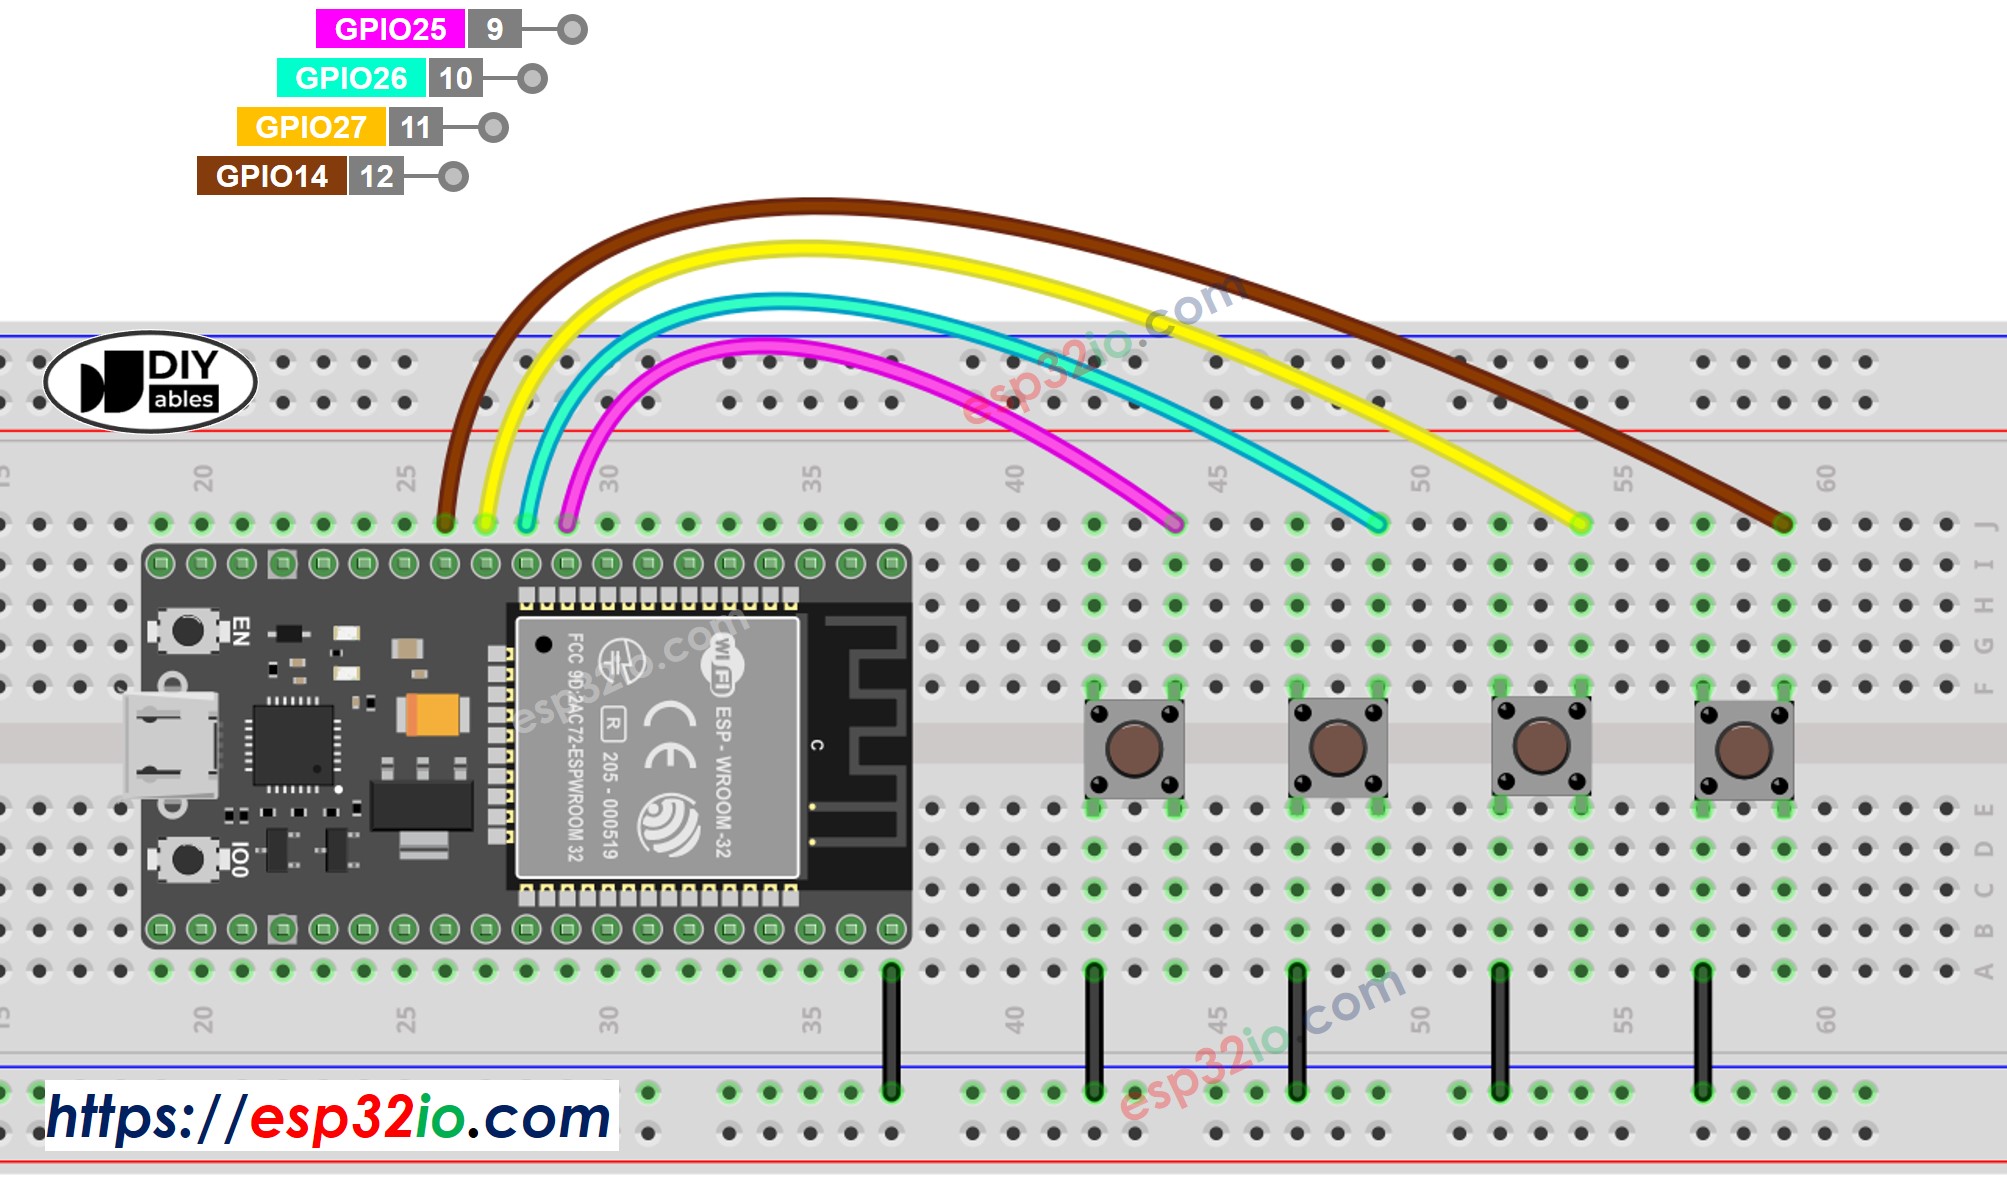
This image is created using Fritzing. Click to enlarge image

Si no sabe c\u00f3mo alimentar ESP32 y otros componentes, encuentre instrucciones en el siguiente tutorial: C\u00f3mo alimentar ESP32.

Código ESP32 - Múltiples botones con rebote

Al tratar con varios botones, la complejidad puede surgir en situaciones específicas:

Afortunadamente, la biblioteca ezButton simplifica este proceso al gestionar internamente el rebote y los eventos de los botones. Esto evita que los usuarios tengan que gestionar marcas de tiempo y variables al usar la biblioteca. Además, emplear una matriz de botones puede mejorar la claridad y concisión del código.

/* * Este código de ESP32 fue desarrollado por es.newbiely.com * Este código de ESP32 se proporciona al público sin ninguna restricción. * Para tutoriales completos y diagramas de cableado, visite: * https://es.newbiely.com/tutorials/esp32/esp32-multiple-button */ #include <ezButton.h> #define BUTTON_PIN_1 25 // The ESP32 pin GPIO25 connected to the button 1 #define BUTTON_PIN_2 26 // The ESP32 pin GPIO26 connected to the button 2 #define BUTTON_PIN_3 27 // The ESP32 pin GPIO27 connected to the button 3 #define BUTTON_PIN_4 14 // The ESP32 pin GPIO14 connected to the button 4 ezButton button1(BUTTON_PIN_1); // create ezButton object for button 1 ezButton button2(BUTTON_PIN_2); // create ezButton object for button 2 ezButton button3(BUTTON_PIN_3); // create ezButton object for button 3 ezButton button4(BUTTON_PIN_4); // create ezButton object for button 4 void setup() { Serial.begin(9600); button1.setDebounceTime(100); // set debounce time to 100 milliseconds button2.setDebounceTime(100); // set debounce time to 100 milliseconds button3.setDebounceTime(100); // set debounce time to 100 milliseconds button4.setDebounceTime(100); // set debounce time to 100 milliseconds } void loop() { button1.loop(); // MUST call the loop() function first button2.loop(); // MUST call the loop() function first button3.loop(); // MUST call the loop() function first button4.loop(); // MUST call the loop() function first // get button state after debounce int button1_state = button1.getState(); // the state after debounce int button2_state = button2.getState(); // the state after debounce int button3_state = button3.getState(); // the state after debounce int button4_state = button4.getState(); // the state after debounce /* Serial.print("The button 1 state: "); Serial.println(button1_state); Serial.print("The button 2 state: "); Serial.println(button2_state); Serial.print("The button 3 state: "); Serial.println(button3_state); Serial.print("The button 4 state: "); Serial.println(button4_state); */ if (button1.isPressed()) Serial.println("The button 1 is pressed"); if (button1.isReleased()) Serial.println("The button 1 is released"); if (button2.isPressed()) Serial.println("The button 2 is pressed"); if (button2.isReleased()) Serial.println("The button 2 is released"); if (button3.isPressed()) Serial.println("The button 3 is pressed"); if (button3.isReleased()) Serial.println("The button 3 is released"); if (button4.isPressed()) Serial.println("The button 4 is pressed"); if (button4.isReleased()) Serial.println("The button 4 is released"); }

Pasos R\u00e1pidos

  • Si es la primera vez que usas ESP32, consulta cómo configurar el entorno para ESP32 en Arduino IDE.
  • Realiza el cableado como se muestra en la imagen anterior.
  • Conecta la placa ESP32 a tu PC mediante un cable micro USB.
  • Abre Arduino IDE en tu PC.
  • Selecciona la placa ESP32 correcta (p. ej., ESP32 Dev Module) y el puerto COM.
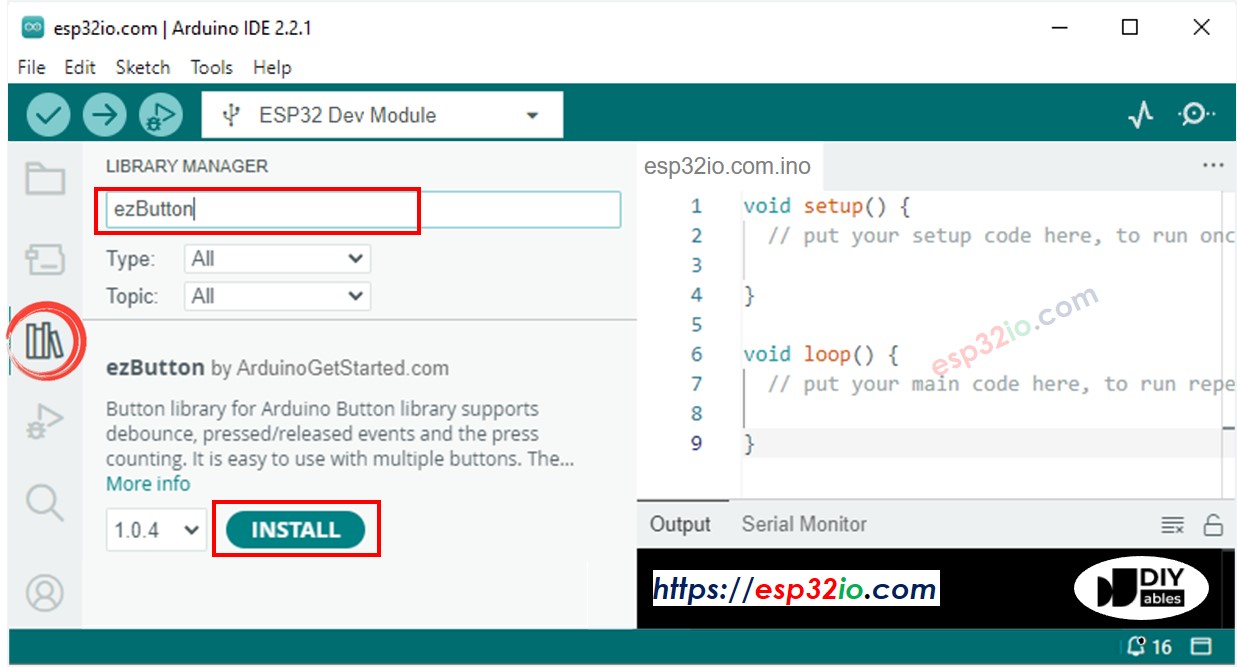
  • Haz clic en el icono Bibliotecas en la barra izquierda del IDE de Arduino.
  • Busca “ezButton”, luego localiza la biblioteca ezButton de ArduinoGetStarted.
  • Haz clic en el botón Instalar para instalar la biblioteca ezButton.
Librería de botones para ESP32
  • Copia el código anterior y pégalo en Arduino IDE.
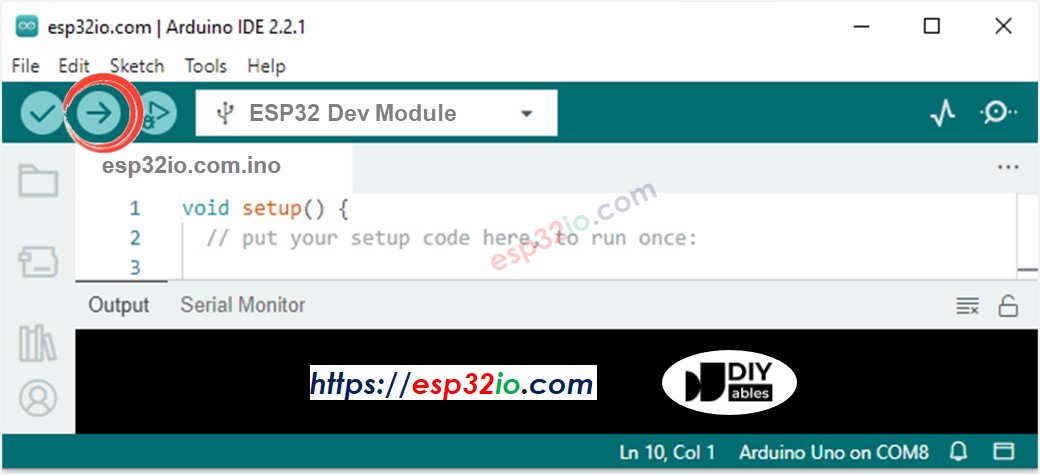
  • Compila y sube el código a la placa ESP32 haciendo clic en el botón Subir en Arduino IDE.
Cómo subir código ESP32 al IDE de Arduino
  • Abrir el Monitor Serial en el IDE de Arduino
  • Presiona y suelta el botón uno por uno
COM6
Send
The button 1 is pressed The button 1 is released The button 2 is pressed The button 2 is released The button 3 is pressed The button 3 is released The button 4 is pressed The button 4 is released
Autoscroll Show timestamp
Clear output
9600 baud  
Newline  

Código ESP32 - Múltiples botones usando arreglos

Podemos mejorar el código proporcionado utilizando un arreglo de botones. El código que sigue demuestra cómo este arreglo gestiona los objetos de botón.

/* * Este código de ESP32 fue desarrollado por es.newbiely.com * Este código de ESP32 se proporciona al público sin ninguna restricción. * Para tutoriales completos y diagramas de cableado, visite: * https://es.newbiely.com/tutorials/esp32/esp32-multiple-button */ #include <ezButton.h> #define BUTTON_NUM 4 // the number of buttons #define BUTTON_PIN_1 25 // The ESP32 pin GPIO25 connected to the button 1 #define BUTTON_PIN_2 26 // The ESP32 pin GPIO26 connected to the button 2 #define BUTTON_PIN_3 27 // The ESP32 pin GPIO27 connected to the button 3 #define BUTTON_PIN_4 14 // The ESP32 pin GPIO14 connected to the button 4 ezButton buttonArray[] = { ezButton(BUTTON_PIN_1), ezButton(BUTTON_PIN_2), ezButton(BUTTON_PIN_3), ezButton(BUTTON_PIN_4) }; void setup() { Serial.begin(9600); for (byte i = 0; i < BUTTON_NUM; i++) { buttonArray[i].setDebounceTime(100); // set debounce time to 100 milliseconds } } void loop() { for (byte i = 0; i < BUTTON_NUM; i++) buttonArray[i].loop(); // MUST call the loop() function first for (byte i = 0; i < BUTTON_NUM; i++) { // get button state after debounce int button_state = buttonArray[i].getState(); // the state after debounce /* Serial.print("The button "); Serial.print(i + 1); Serial.print(": "); Serial.println(button_state); */ if (buttonArray[i].isPressed()) { Serial.print("The button "); Serial.print(i + 1); Serial.println(" is pressed"); } if (buttonArray[i].isReleased()) { Serial.print("The button "); Serial.print(i + 1); Serial.println(" is released"); } } }

Video Tutorial

Estamos considerando crear tutoriales en video. Si considera que los tutoriales en video son importantes, suscríbase a nuestro canal de YouTube para motivarnos a crear los videos.

※ NUESTROS MENSAJES

  • No dude en compartir el enlace de este tutorial. Sin embargo, por favor no use nuestro contenido en otros sitios web. Hemos invertido mucho esfuerzo y tiempo en crear el contenido, ¡por favor respete nuestro trabajo!