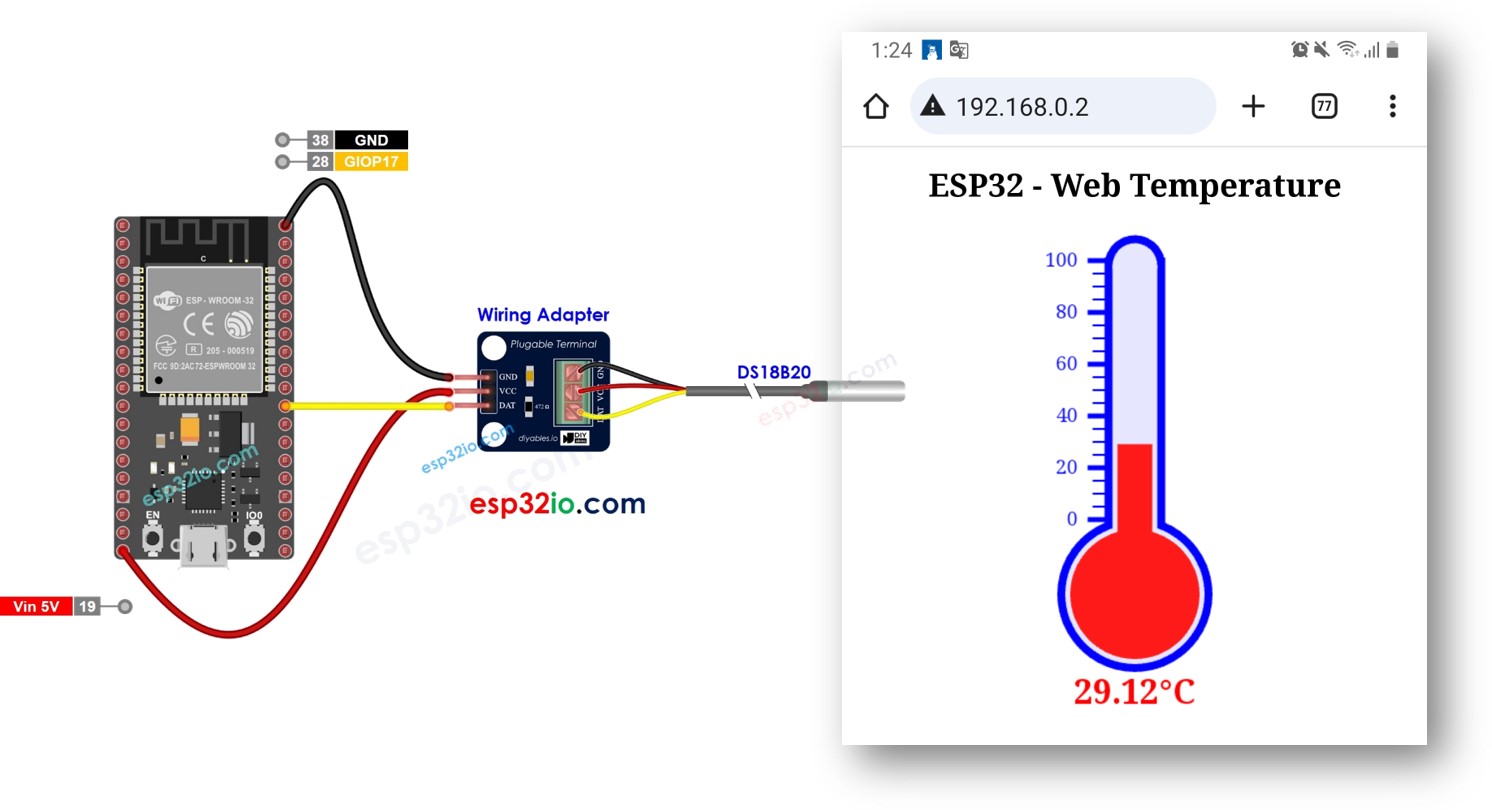
En esta guía, exploraremos el proceso de programar el ESP32 para que funcione como un servidor web, permitiéndote acceder a los datos de temperatura a través de una interfaz web. Usando un sensor de temperatura DS18B20 conectado, puedes comprobar fácilmente la temperatura actual utilizando tu teléfono inteligente o tu PC para visitar la página web servida por el ESP32. A continuación, una breve visión general de cómo funciona:
ESP32 está programado como un servidor web.
Escribes la dirección IP del ESP32 en un navegador web en tu teléfono inteligente o PC.
ESP32 responde a la solicitud del navegador web con una página web que contiene la temperatura leída del sensor DS18B20.
Vamos a revisar dos códigos de ejemplo:
Código ESP32 que proporciona una página web muy simple que muestra la temperatura del sensor DS18B20. Esto facilita que entiendas cómo funciona. El contenido HTML está incrustado en el código del ESP32
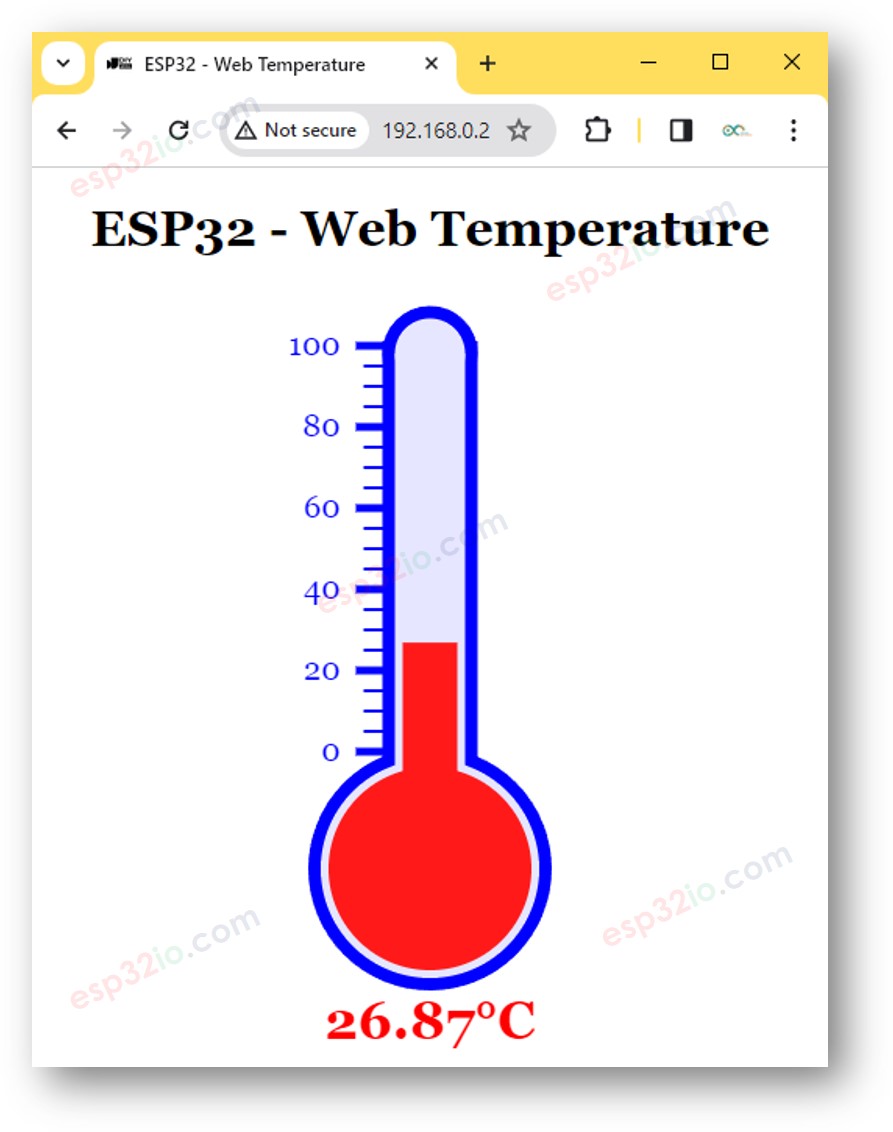
Código ESP32 que proporciona una página web gráfica que muestra la temperatura del sensor DS18B20, el contenido HTML está separado del código ESP32
Divulgación: Algunos de los enlaces proporcionados en esta sección son enlaces de afiliado de Amazon. Podemos recibir una comisión por las compras realizadas a través de estos enlaces sin costo adicional para usted. Apreciamos su apoyo.
Buy Note: Many DS18B20 sensors available in the market are unreliable. We strongly recommend buying the sensor from the DIYables brand using the link provided above. We tested it, and it worked reliably.
Acerca del servidor web ESP32 y del sensor de temperatura DS18B20
Si no estás familiarizado con el servidor web ESP32 y el sensor de temperatura DS18B20 (disposición de pines, cómo funciona, cómo programarlo, ...), aprende sobre ellos en los siguientes tutoriales:
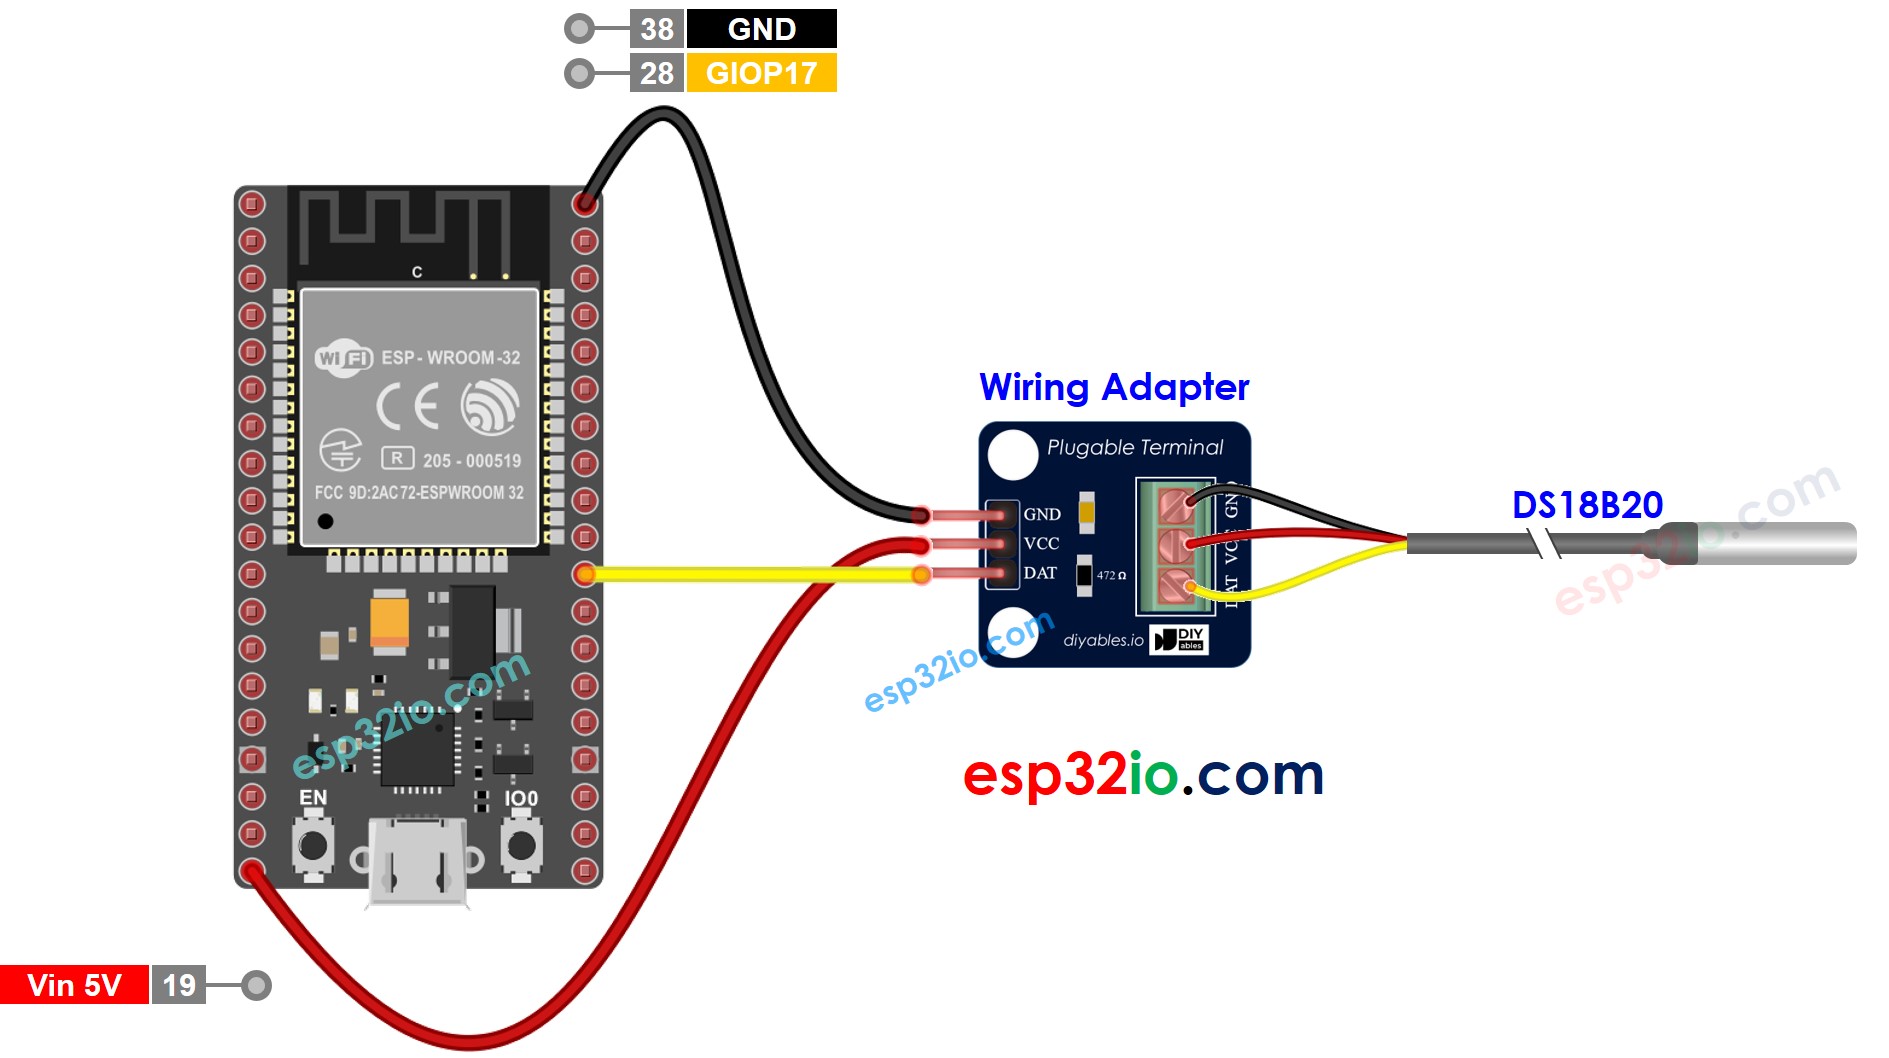
This image is created using Fritzing. Click to enlarge image
Si no sabe c\u00f3mo alimentar ESP32 y otros componentes, encuentre instrucciones en el siguiente tutorial: C\u00f3mo alimentar ESP32.
Código ESP32 - Página web simple
/* * Este código de ESP32 fue desarrollado por es.newbiely.com * Este código de ESP32 se proporciona al público sin ninguna restricción. * Para tutoriales completos y diagramas de cableado, visite: * https://es.newbiely.com/tutorials/esp32/esp32-temperature-via-web*/#include <DIYables_ESP32_WebServer.h>#include <OneWire.h>#include <DallasTemperature.h>#define SENSOR_PIN 17 // ESP32 pin GPIO17 connected to DS18B20 sensor's DATA pin// WiFi credentialsconstchar WIFI_SSID[] = "YOUR_WIFI_SSID";constchar WIFI_PASSWORD[] = "YOUR_WIFI_PASSWORD";// Create web server instanceDIYables_ESP32_WebServer server;OneWire oneWire(SENSOR_PIN); // setup a oneWire instanceDallasTemperature DS18B20(&oneWire); // pass oneWire to DallasTemperature libraryfloatgetTemperature() { DS18B20.requestTemperatures(); // send the command to get temperaturesfloat tempC = DS18B20.getTempCByIndex(0); // read temperature in °Creturn tempC;}// Page handlersvoid handleHome(WiFiClient& client, const String& method, const String& request, const QueryParams& params, const String& jsonData) {Serial.println("ESP32 Web Server: New request received"); // for debugging// get temperature from sensorfloat temperature = getTemperature();// Format the temperature with two decimal placesString temperatureStr = String(temperature, 2);String html = "<!DOCTYPE HTML>"; html += "<html>"; html += "<head>"; html += "<link rel=\"icon\" href=\"data:,\">"; html += "</head>"; html += "<p>"; html += "Temperature: <span style=\"color: red;\">"; html += temperature; html += "°C</span>"; html += "</p>"; html += "</html>"; server.sendResponse(client, html.c_str());}voidsetup() {Serial.begin(9600);delay(1000); DS18B20.begin(); // initialize the DS18B20 sensorSerial.println("ESP32 Web Server");// Configure routes server.addRoute("/", handleHome);// Start web server with WiFi connection server.begin(WIFI_SSID, WIFI_PASSWORD);}voidloop() { server.handleClient();}
Conecta la placa ESP32 a tu PC mediante un cable micro USB
Abre Arduino IDE en tu PC.
Selecciona la placa ESP32 correcta (p. ej. ESP32 Dev Module) y el puerto COM.
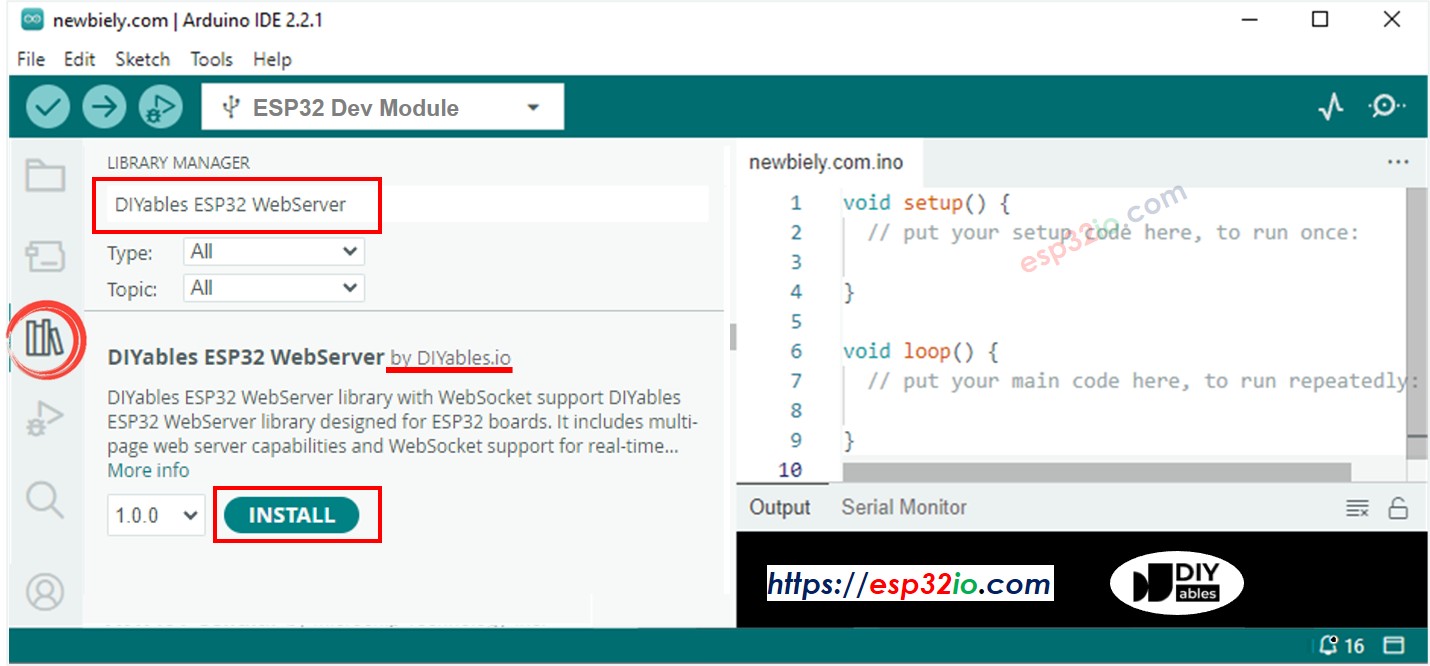
Abre el Administrador de Bibliotecas haciendo clic en el icono Library Manager en la barra de navegación izquierda de Arduino IDE.
Busca “DIYables ESP32 WebServer”, luego encuentra la biblioteca Web Server creada por DIYables.
Haz clic en el botón Install para instalar la biblioteca Web Server.
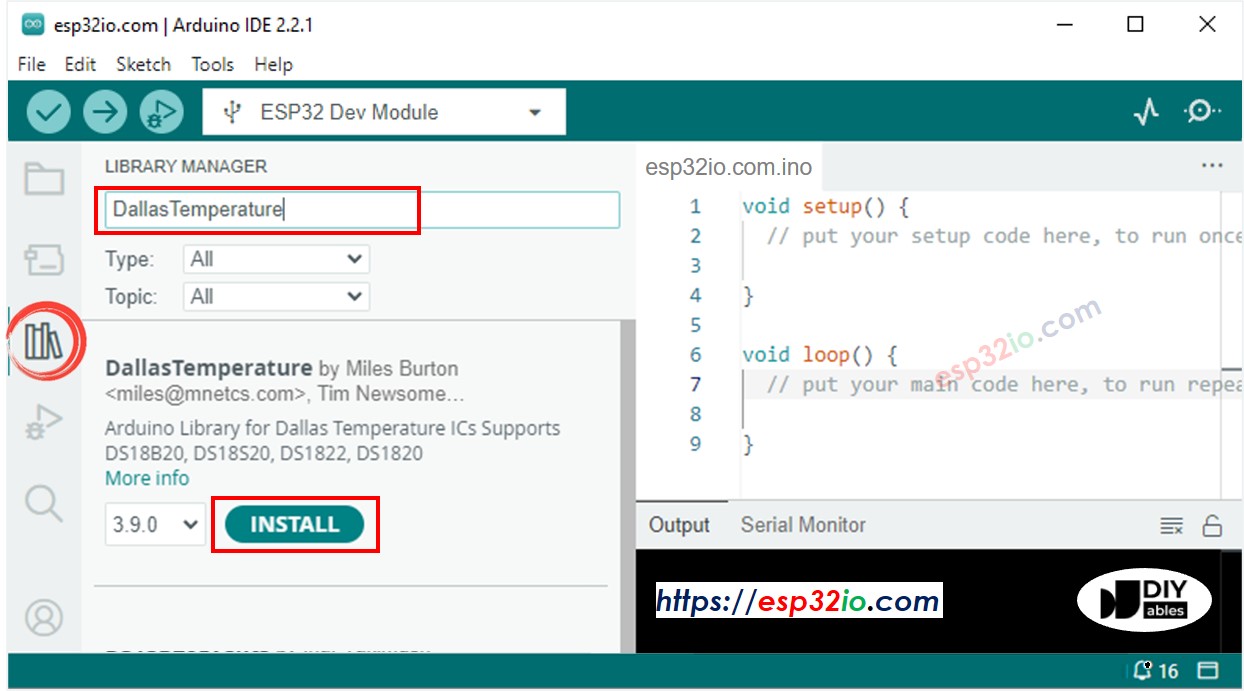
Busca “DallasTemperature” en la caja de búsqueda, luego busca la biblioteca DallasTemperature de Miles Burton.
Haz clic en el botón Instalar para instalar la biblioteca DallasTemperature.
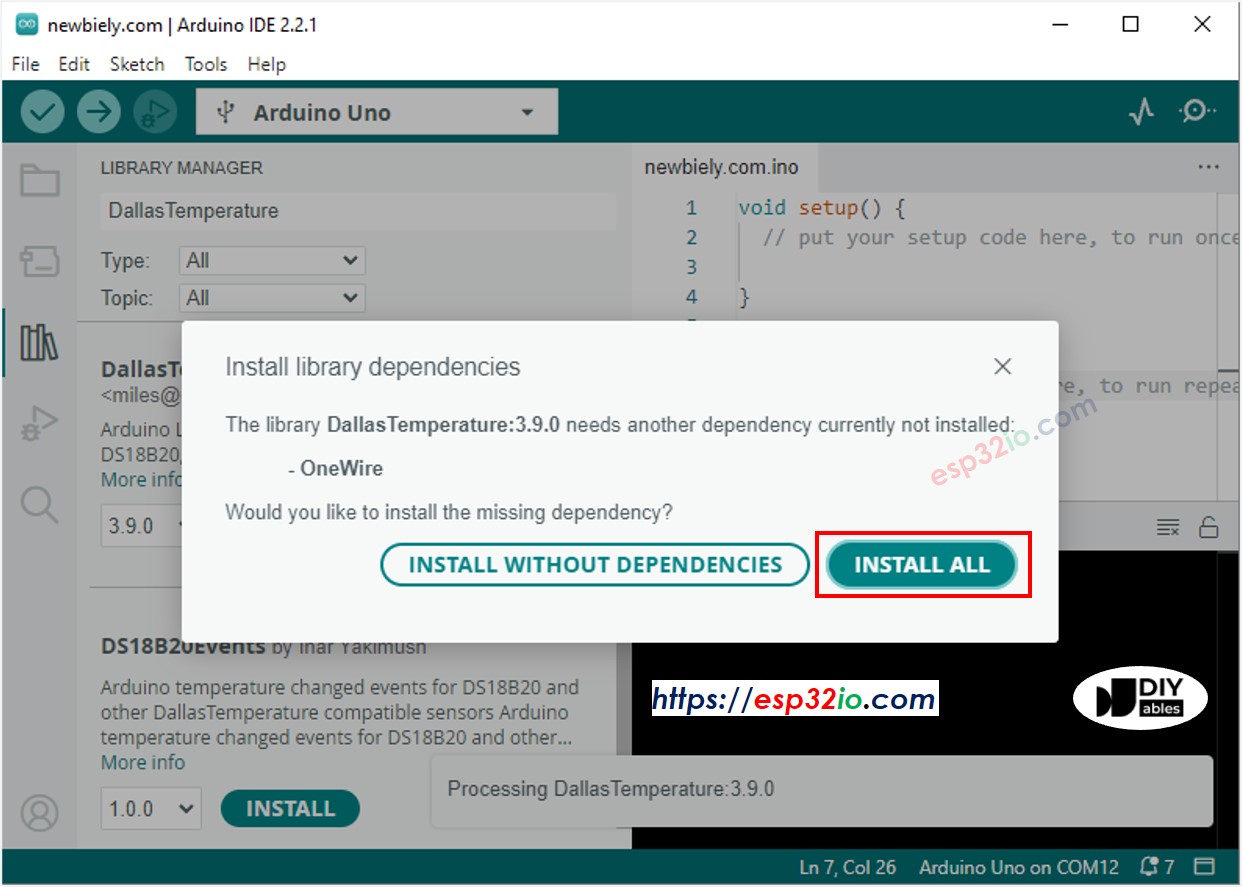
Se le pedirá que instale la dependencia. Haga clic en el botón Instalar Todo para instalar la biblioteca OneWire.
Copia el código anterior y ábrelo con el IDE de Arduino
Cambia la información de WiFi (SSID y contraseña) en el código por la tuya
Haz clic en el botón Subir en el Arduino IDE para subir el código al ESP32
Abre el Monitor Serial
Consulta el resultado en el Monitor Serial.
Newbiely | Arduino IDE 2.3.8
──
☐
✕
File
Edit
Sketch
Tools
Help
ESP32 Dev Module
Newbiely.ino
···
8Serial.println("Hello World!");
Output
Serial Monitor
Message (Enter to send message to 'ESP32 Dev Module' on 'COM15')
New Line
9600 baud
Connecting to WiFi...
Connected to WiFi
ESP32 Web Server's IP address: 192.168.0.2
Ln 11, Col 1
ESP32 Dev Module on COM15
2
Encontrarás una dirección IP.
Escribe esta dirección IP en la barra de direcciones de un navegador web en tu teléfono móvil o PC.
Verás la siguiente salida en el Monitor Serial.
Newbiely | Arduino IDE 2.3.8
──
☐
✕
File
Edit
Sketch
Tools
Help
ESP32 Dev Module
Newbiely.ino
···
8Serial.println("Hello World!");
Output
Serial Monitor
Message (Enter to send message to 'ESP32 Dev Module' on 'COM15')
New Line
9600 baud
Connecting to WiFi...
Connected to WiFi
ESP32 Web Server's IP address: 192.168.0.2
ESP32 Web Server: New request received:
GET /
Ln 11, Col 1
ESP32 Dev Module on COM15
2
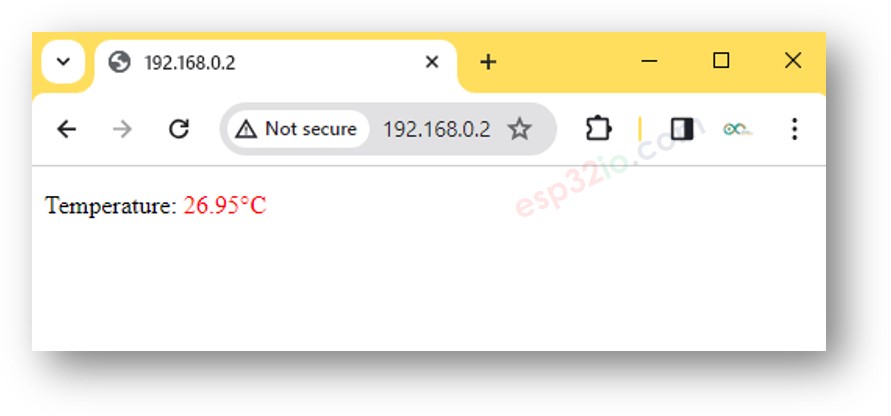
Verás una página web muy simple de la placa ESP32 en el navegador web, como se muestra a continuación:
※ Nota:
Con el código proporcionado arriba, para obtener la actualización de la temperatura, tienes que recargar la página en el navegador web. En la próxima parte, aprenderemos cómo hacer que la página web actualice el valor de la temperatura en segundo plano sin recargar la página.
Código ESP32 - Página web gráfica
Dado que una página web gráfica contiene una gran cantidad de contenido HTML, incrustarlo en el código ESP32 como antes resulta inconveniente. Para abordar esto, necesitamos separar el código ESP32 y el código HTML en archivos diferentes:
El código ESP32 se colocará en un archivo .ino.
El código HTML (incluyendo HTML, CSS y JavaScript) se colocará en un archivo .h.
Para obtener detalles sobre cómo separar el código HTML del código ESP32, consulte el tutorial ESP32 - Web Server.
Pasos R\u00e1pidos
Abre Arduino IDE y crea un nuevo sketch, ponle un nombre, por ejemplo, newbiely.com.ino
Copia el código de abajo y ábrelo con Arduino IDE
/* * Este código de ESP32 fue desarrollado por es.newbiely.com * Este código de ESP32 se proporciona al público sin ninguna restricción. * Para tutoriales completos y diagramas de cableado, visite: * https://es.newbiely.com/tutorials/esp32/esp32-temperature-via-web*/#include <DIYables_ESP32_WebServer.h>#include"index.h"// Include the index.h file#include <OneWire.h>#include <DallasTemperature.h>#define SENSOR_PIN 17 // ESP32 pin GPIO17 connected to DS18B20 sensor's DATA pinOneWire oneWire(SENSOR_PIN); // setup a oneWire instanceDallasTemperature DS18B20(&oneWire); // pass oneWire to DallasTemperature library// WiFi credentialsconstchar WIFI_SSID[] = "YOUR_WIFI_SSID";constchar WIFI_PASSWORD[] = "YOUR_WIFI_PASSWORD";// Create web server instanceDIYables_ESP32_WebServer server;floatgetTemperature() { DS18B20.requestTemperatures(); // send the command to get temperaturesfloat tempC = DS18B20.getTempCByIndex(0); // read temperature in °Creturn tempC;}// Page handlersvoid handleHome(WiFiClient& client, const String& method, const String& request, const QueryParams& params, const String& jsonData) {Serial.println("ESP32 Web Server: New request received"); // for debugging server.sendResponse(client, webpage); // webpage is from index}// Page handlersvoid handleTemperature(WiFiClient& client, const String& method, const String& request, const QueryParams& params, const String& jsonData) {Serial.println("ESP32 Web Server: New request received"); // for debuggingfloat temperature = getTemperature();String temperatureStr = String(temperature, 2); server.sendResponse(client, temperatureStr.c_str(), "text/plain");}voidsetup() {Serial.begin(9600);delay(1000); DS18B20.begin(); // initialize the DS18B20 sensorSerial.println("ESP32 Web Server");// Define a route to get the web page server.addRoute("/", handleHome);// Define a route to get the temperature data server.addRoute("/temperature", handleTemperature);// Start web server with WiFi connection server.begin(WIFI_SSID, WIFI_PASSWORD);}voidloop() { server.handleClient();}
Cambia la información de WiFi (SSID y contraseña) en el código por la tuya
Crea el archivo index.h en el IDE de Arduino haciendo:
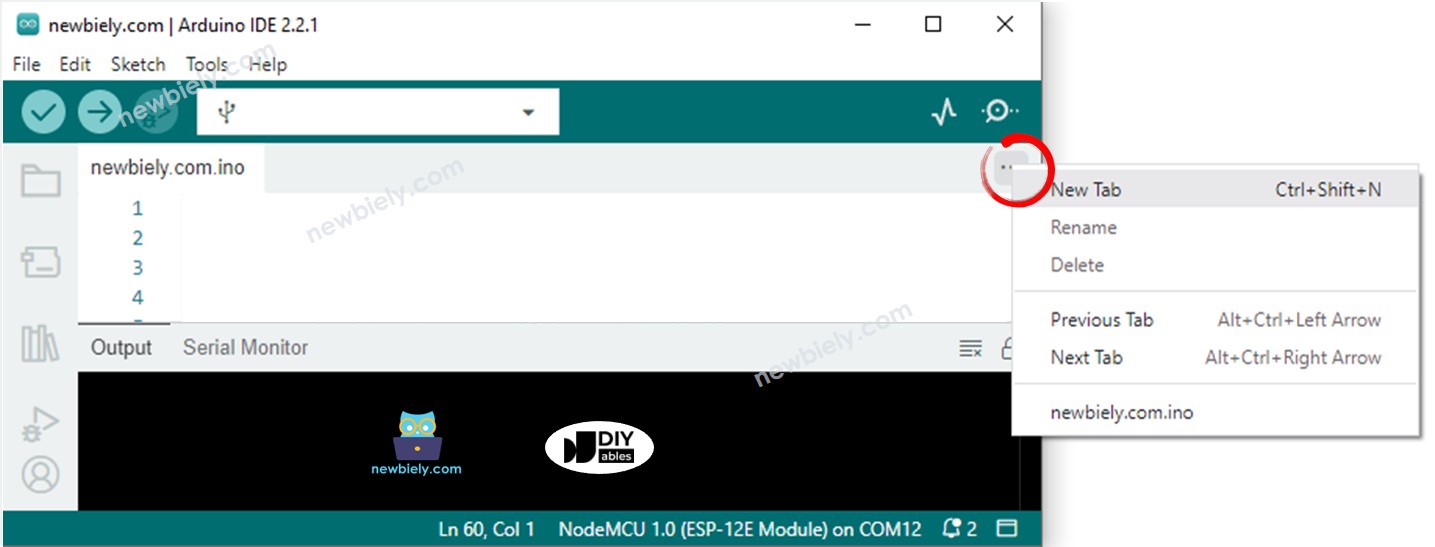
Haz clic en el botón justo debajo del icono del monitor serie y elige New Tab, o usa las teclas Ctrl+Shift+N
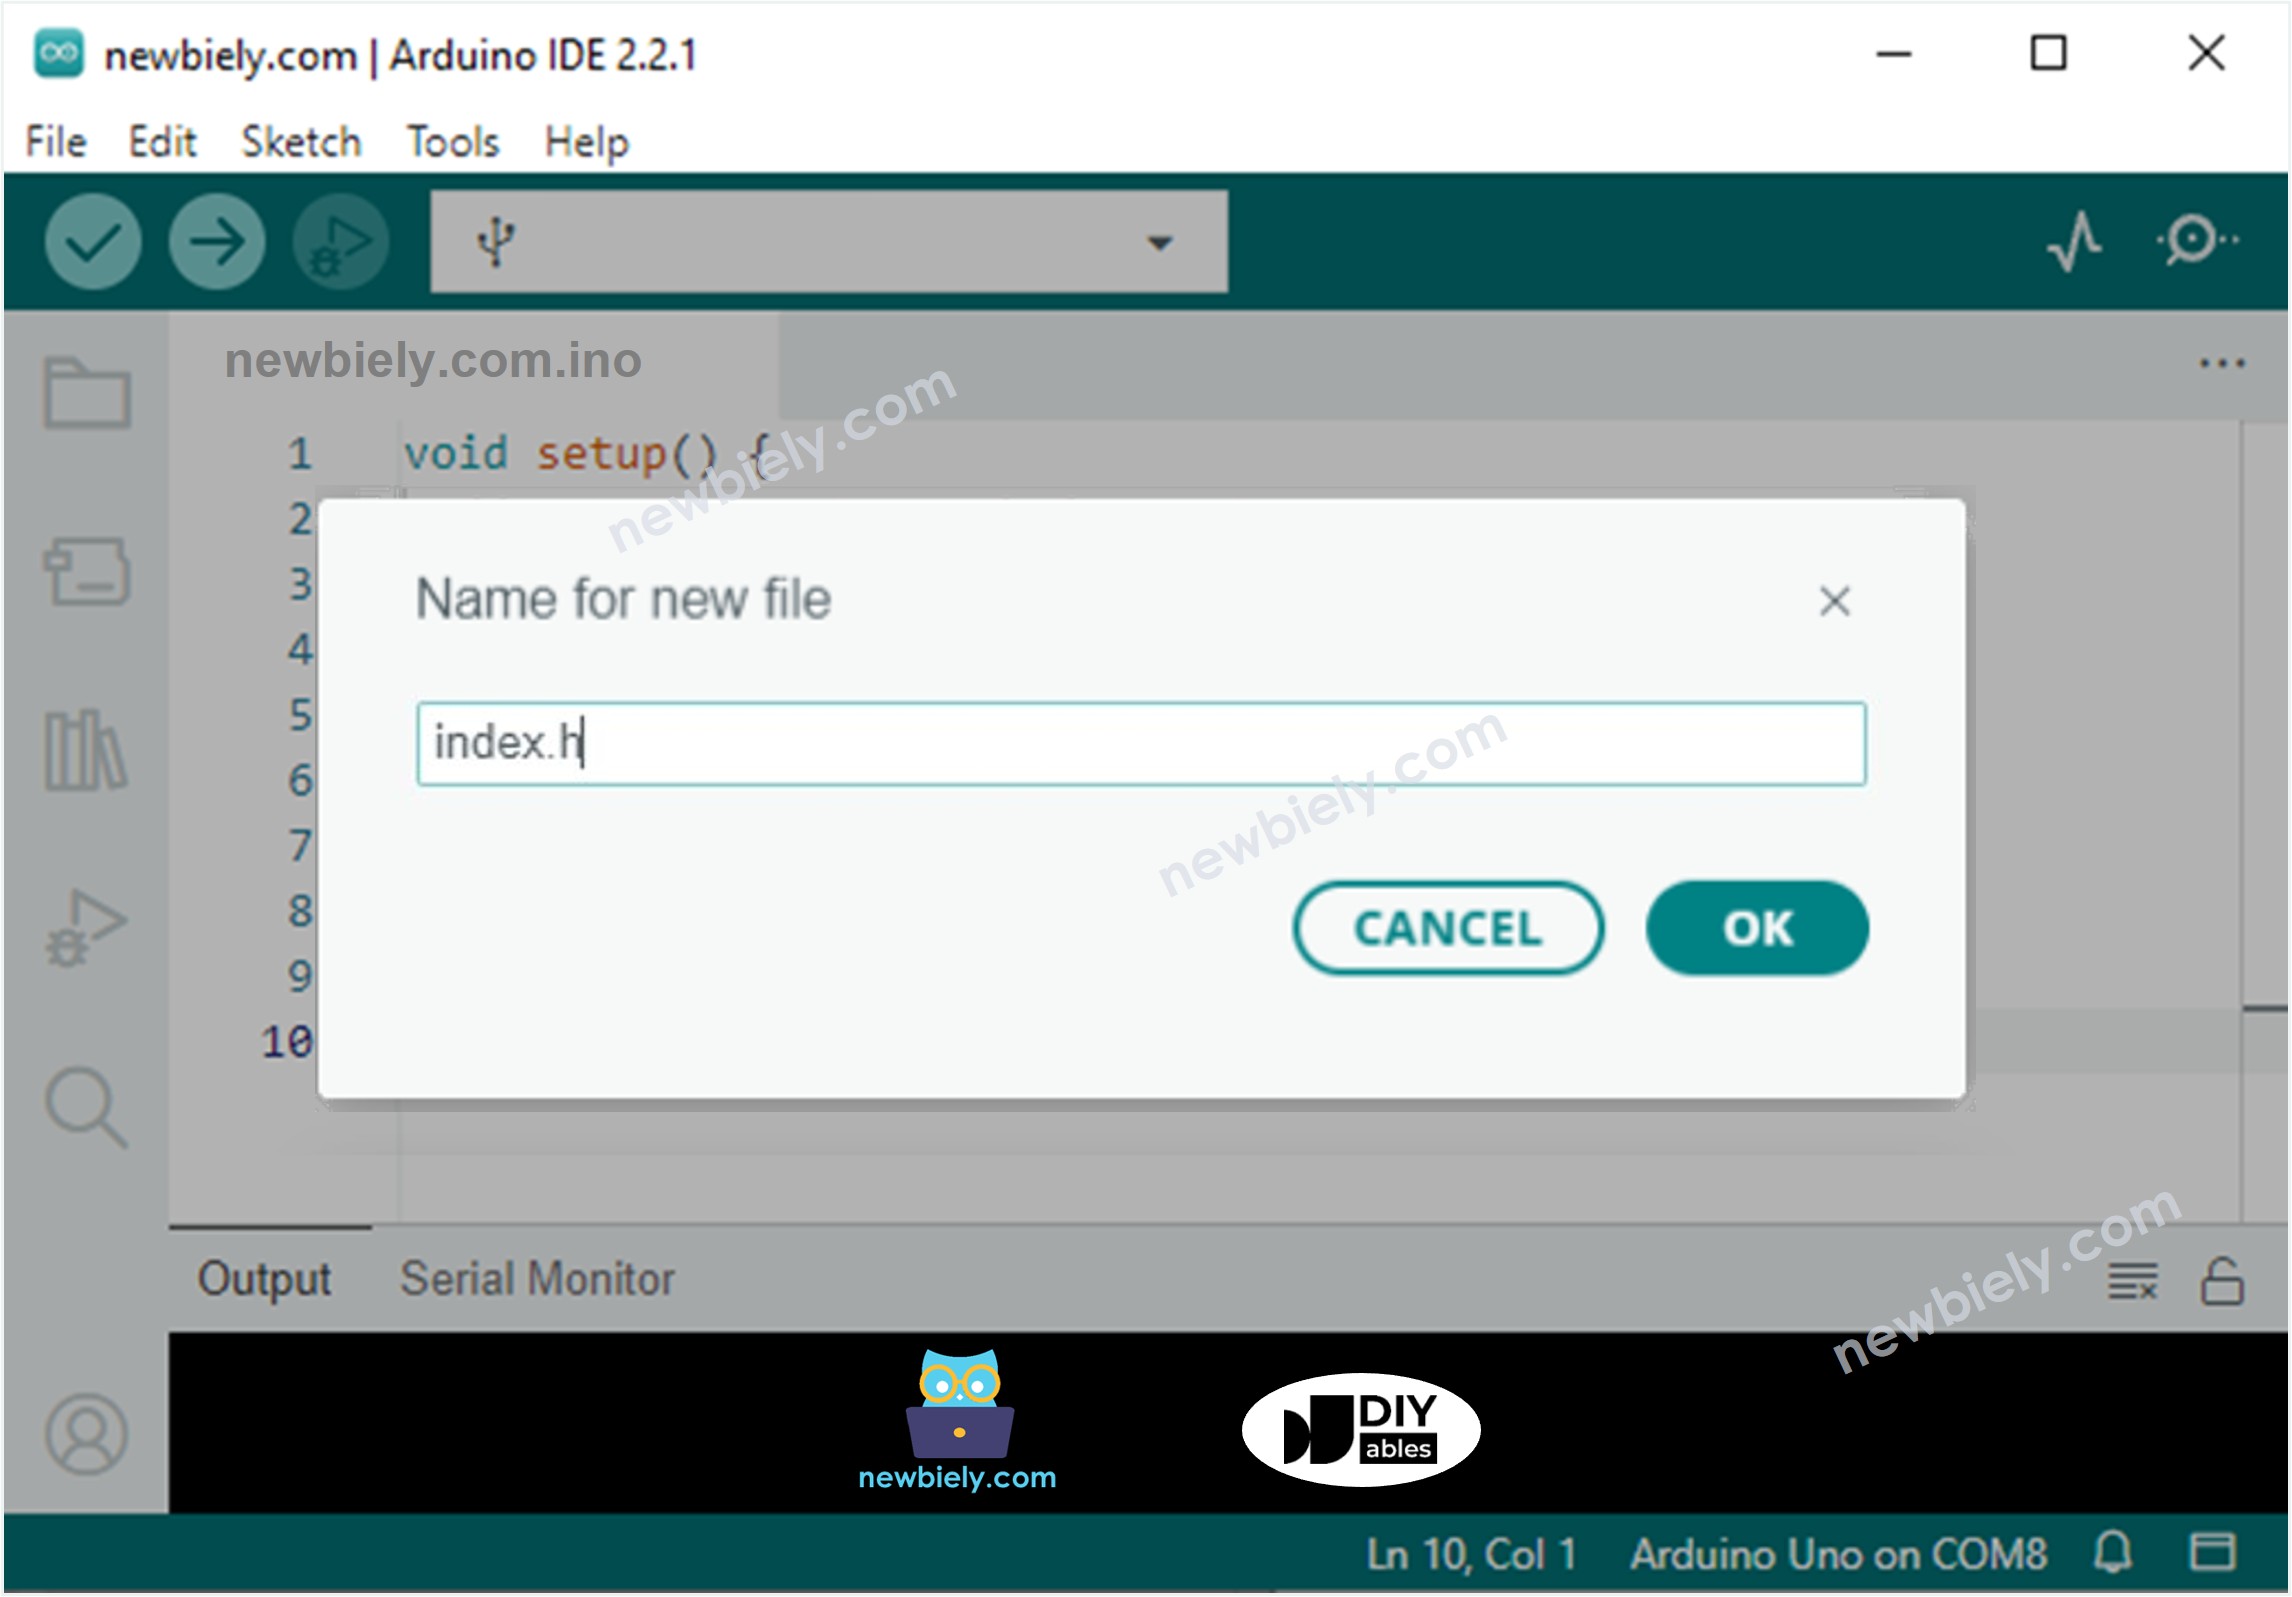
Escribe el nombre del archivo index.h y haz clic en el botón OK
Copia el código que se muestra abajo y pégalo en index.h.
/* * Este código de ESP32 fue desarrollado por es.newbiely.com * Este código de ESP32 se proporciona al público sin ninguna restricción. * Para tutoriales completos y diagramas de cableado, visite: * https://es.newbiely.com/tutorials/esp32/esp32-temperature-via-web*/#ifndef WEBPAGE_H#define WEBPAGE_Hconst char* webpage = R"=====(<!DOCTYPE html><html><head><title>ESP32 - Web Temperature</title><meta name="viewport" content="width=device-width, initial-scale=0.7, maximum-scale=0.7"><meta charset="utf-8"><link rel="icon" href="https://diyables.io/images/page/diyables.svg"><style>body { font-family: "Georgia"; text-align: center; font-size: width/2pt;}h1 { font-weight: bold; font-size: width/2pt;}h2 { font-weight: bold; font-size: width/2pt;}button { font-weight: bold; font-size: width/2pt;}</style><script>var cvs_width = 200, cvs_height = 450;function init() { var canvas = document.getElementById("cvs"); canvas.width = cvs_width; canvas.height = cvs_height + 50; var ctx = canvas.getContext("2d"); ctx.translate(cvs_width/2, cvs_height - 80); fetchTemperature(); setInterval(fetchTemperature, 4000); // Update temperature every 4 seconds}function fetchTemperature() { fetch("/temperature") .then(response => response.text()) .then(data => {update_view(data);});}function update_view(temp) { var canvas = document.getElementById("cvs"); var ctx = canvas.getContext("2d"); var radius = 70; var offset = 5; var width = 45; var height = 330; ctx.clearRect(-cvs_width/2, -cvs_height + 80, cvs_width, cvs_height + 50); ctx.strokeStyle="blue"; ctx.fillStyle="blue";//5-step Degree var x = -width/2; ctx.lineWidth=2;for (var i = 0; i <= 100; i+=5) { var y = -(height - radius)*i/100 - radius - 5; ctx.beginPath(); ctx.lineTo(x, y); ctx.lineTo(x - 20, y); ctx.stroke(); }//20-step Degree ctx.lineWidth=5;for (var i = 0; i <= 100; i+=20) { var y = -(height - radius)*i/100 - radius - 5; ctx.beginPath(); ctx.lineTo(x, y); ctx.lineTo(x - 25, y); ctx.stroke(); ctx.font="20px Georgia"; ctx.textBaseline="middle"; ctx.textAlign="right"; ctx.fillText(i.toString(), x - 35, y); }// shape ctx.lineWidth=16; ctx.beginPath(); ctx.arc(0, 0, radius, 0, 2 * Math.PI); ctx.stroke(); ctx.beginPath(); ctx.rect(-width/2, -height, width, height); ctx.stroke(); ctx.beginPath(); ctx.arc(0, -height, width/2, 0, 2 * Math.PI); ctx.stroke(); ctx.fillStyle="#e6e6ff"; ctx.beginPath(); ctx.arc(0, 0, radius, 0, 2 * Math.PI); ctx.fill(); ctx.beginPath(); ctx.rect(-width/2, -height, width, height); ctx.fill(); ctx.beginPath(); ctx.arc(0, -height, width/2, 0, 2 * Math.PI); ctx.fill(); ctx.fillStyle="#ff1a1a"; ctx.beginPath(); ctx.arc(0, 0, radius - offset, 0, 2 * Math.PI); ctx.fill(); temp = Math.round(temp * 100) / 100; var y = (height - radius)*temp/100.0 + radius + 5; ctx.beginPath(); ctx.rect(-width/2 + offset, -y, width - 2*offset, y); ctx.fill(); ctx.fillStyle="red"; ctx.font="bold 34px Georgia"; ctx.textBaseline="middle"; ctx.textAlign="center"; ctx.fillText(temp.toString() + "°C", 0, 100);}window.onload = init;</script></head><body><h1>ESP32 - Web Temperature</h1><canvas id="cvs"></canvas></body></html>)=====";#endif
Ahora tienes el código en dos archivos: newbiely.com.ino y index.h
Haz clic en el botón Subir en el IDE de Arduino para cargar el código al ESP32
Accede a la página web de la placa ESP32 a través de un navegador web en tu PC o teléfono inteligente como antes. La verás a continuación:
※ Nota:
Si modificas el contenido HTML en index.h y no tocas nada en el archivo newbiely.com.ino, al compilar y cargar el código al ESP32, el IDE de Arduino no actualizará el contenido HTML.
Para que el IDE de Arduino actualice el contenido HTML en este caso, realiza un cambio en el archivo newbiely.com.ino (por ejemplo, añadir una línea en blanco o un comentario).
No dude en compartir el enlace de este tutorial. Sin embargo, por favor no use nuestro contenido en otros sitios web. Hemos invertido mucho esfuerzo y tiempo en crear el contenido, ¡por favor respete nuestro trabajo!