ESP8266 - Servidor Web con Varias Páginas
Este tutorial te enseña cómo convertir un ESP8266 en un servidor web que puede manejar varias páginas al mismo tiempo, como index.html, temperature.html, led.html, error_404.html y error_405.html...
Al seguir este tutorial, podrás convertir tu ESP8266 en un servidor web con algunas características interesantes:
Múltiples páginas web están activas al mismo tiempo.
El contenido HTML (incluyendo HTML, CSS y JavaScript) para cada página se mantiene por separado en su propio archivo dentro del IDE de Arduino.
El contenido HTML puede actualizarse dinámicamente con valores en tiempo real de sensores, haciendo que las páginas web sean dinámicas y responsivas.
El servidor web permite controlar algo conectado al ESP8266 a través de la web.
El servidor web maneja códigos de error HTTP como 404 No Encontrado y 405 Método No Permitido
Puede parecer complicado, ¡pero no te preocupes! Este tutorial ofrece orientación paso a paso y el código está diseñado para ser apto para principiantes, asegurando que puedas entenderlo fácilmente y crear tu propio servidor web ESP8266.
Or you can buy the following kits:
Divulgación: Algunos de los enlaces proporcionados en esta sección son enlaces de afiliado de Amazon. Podemos recibir una comisión por las compras realizadas a través de estos enlaces sin costo adicional para usted. Apreciamos su apoyo.
Si no estás familiarizado con ESP8266 y el servidor web (incluyendo el esquema de pines, cómo funciona y la programación), puedes aprender sobre ellos a través de los siguientes tutoriales:
A continuación se muestra el código completo de ESP8266 que crea un servidor web con varias páginas. Para mantenerlo simple, el contenido HTML de cada página es muy simple y está incrustado directamente en el código del ESP8266. En la siguiente parte aprenderemos cómo separar los contenidos HTML de cada página en archivos separados, haciendo que el código sea más organizado y manejable.
#include <ESP8266WiFi.h>
#include <ESP8266WebServer.h>
#define LED_PIN D5
const char *ssid = "YOUR_WIFI_SSID";
const char *password = "YOUR_WIFI_PASSWORD";
ESP8266WebServer server(80);
int LED_state = LOW;
float getTemperature() {
float temp_x100 = random(0, 10000);
return temp_x100 / 100;
}
void setup() {
Serial.begin(9600);
pinMode(LED_PIN, OUTPUT);
WiFi.begin(ssid, password);
while (WiFi.status() != WL_CONNECTED) {
delay(1000);
Serial.println("Connecting to WiFi...");
}
Serial.println("Connected to WiFi");
Serial.print("ESP8266 Web Server's IP address: ");
Serial.println(WiFi.localIP());
server.on("/", HTTP_GET, []() {
Serial.println("Web Server: home page");
server.send(200, "text/html", "This is the ESP8266 home page");
});
server.on("/temperature.html", HTTP_GET, []() {
Serial.println("Web Server: temperature page");
float temperature = getTemperature();
server.send(200, "text/html", "Temperature: " + String(temperature));
});
server.on("/led.html", HTTP_GET, []() {
Serial.print("Web Server: LED page");
if (server.arg("state")) {
String state = server.arg("state");
if (state == "on") {
LED_state = HIGH;
} else if (state == "off") {
LED_state = LOW;
}
digitalWrite(LED_PIN, LED_state);
Serial.print(" => turning LED to ");
Serial.print(state);
}
Serial.println();
server.send(200, "text/html", "LED state: " + String(LED_state));
});
server.onNotFound([]() {
if (server.method() == HTTP_GET) {
Serial.println("Web Server: Not Found");
server.send(404, "text/html", "Not Found");
} else {
Serial.println("Web Server: Method Not Allowed");
server.send(405, "text/html", "Method Not Allowed");
}
});
server.begin();
Serial.println("ESP8266 Web server started");
}
void loop() {
server.handleClient();
}
Para empezar con ESP8266 en el IDE de Arduino, siga estos pasos:
Conecta los componentes como se muestra en el diagrama.
Conecta la placa ESP8266 a tu computadora usando un cable USB.
Abre Arduino IDE en tu computadora.
Elige la placa ESP8266 correcta, como (p. ej. NodeMCU 1.0 (ESP-12E Module)), y su puerto COM correspondiente.
Copia el código anterior y ábrelo con Arduino IDE.
Cambia la información de WiFi (SSID y contraseña) en el código por la tuya.
Haz clic en el botón Subir en Arduino IDE para cargar el código al ESP8266.
Abre el Monitor serie.
Consulta el resultado en el Monitor serie.
Connecting to WiFi...
Connected to WiFi
ESP8266 Web Server's IP address: 192.168.0.5
ESP8266 Web server started
Verás una dirección IP en el Monitor Serial, por ejemplo: 192.168.0.5
Escribe la siguiente lista una por una en la barra de direcciones de un navegador web en tu teléfono inteligente o PC.
192.168.0.5
192.168.0.5/index.html
192.168.0.5/led.html
192.168.0.5/temperature.html
192.168.0.5/blabla.html
Tenga en cuenta que debe cambiar la 192.168.0.5 por la dirección IP que obtuvo en el Monitor Serial.
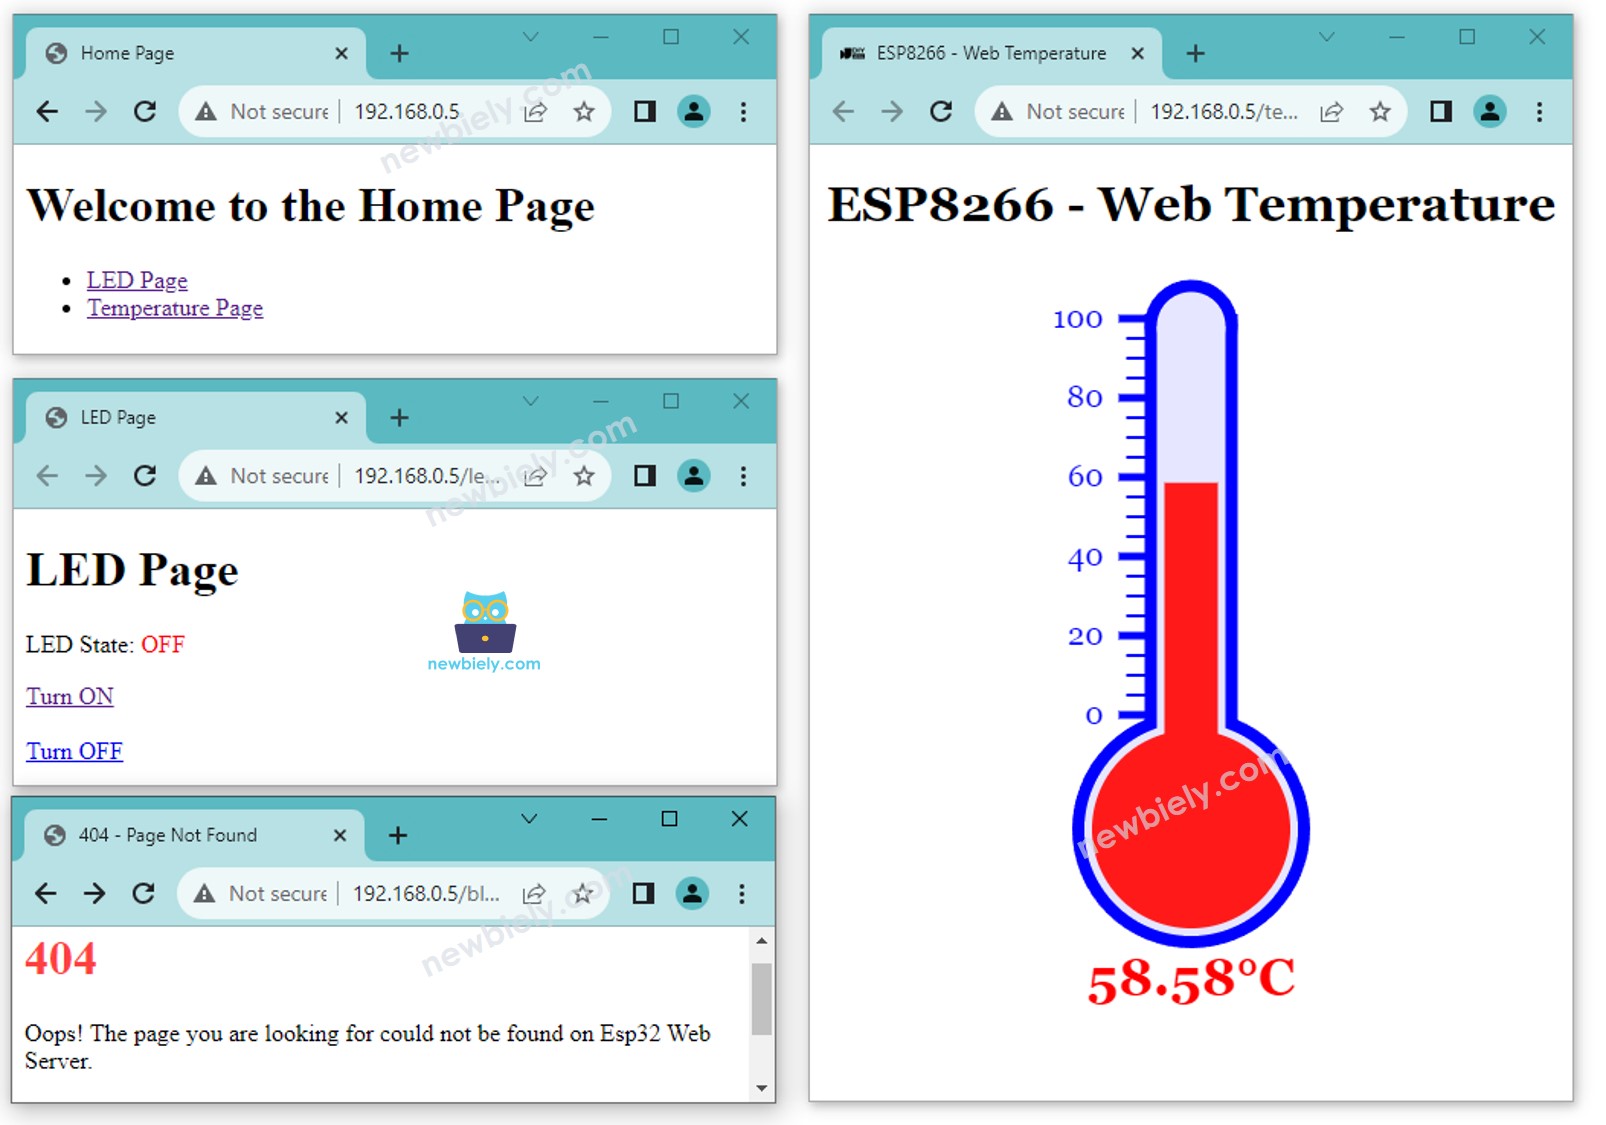
Verá las siguientes páginas: la página de inicio, la página LED, la página de temperatura y la página No Encontrada.
También puede ver la salida en el Monitor Serial.
Connecting to WiFi...
Connected to WiFi
ESP8266 Web Server's IP address: 192.168.0.5
ESP8266 Web server started
Web Server: home page
Web Server: LED page
Web Server: LED page => turning LED to on
Web Server: LED page => turning LED to off
Web Server: temperature page
Web Server: Not Found
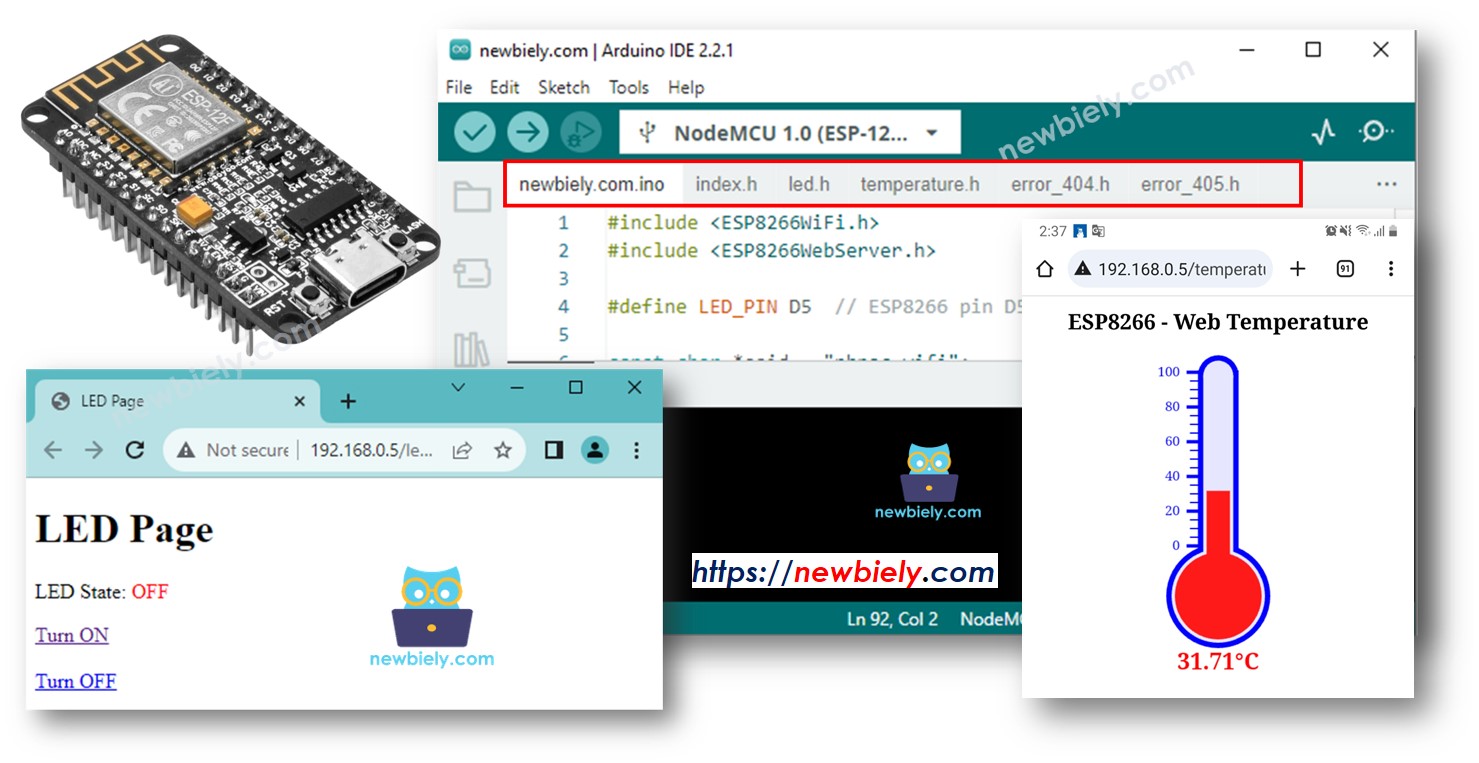
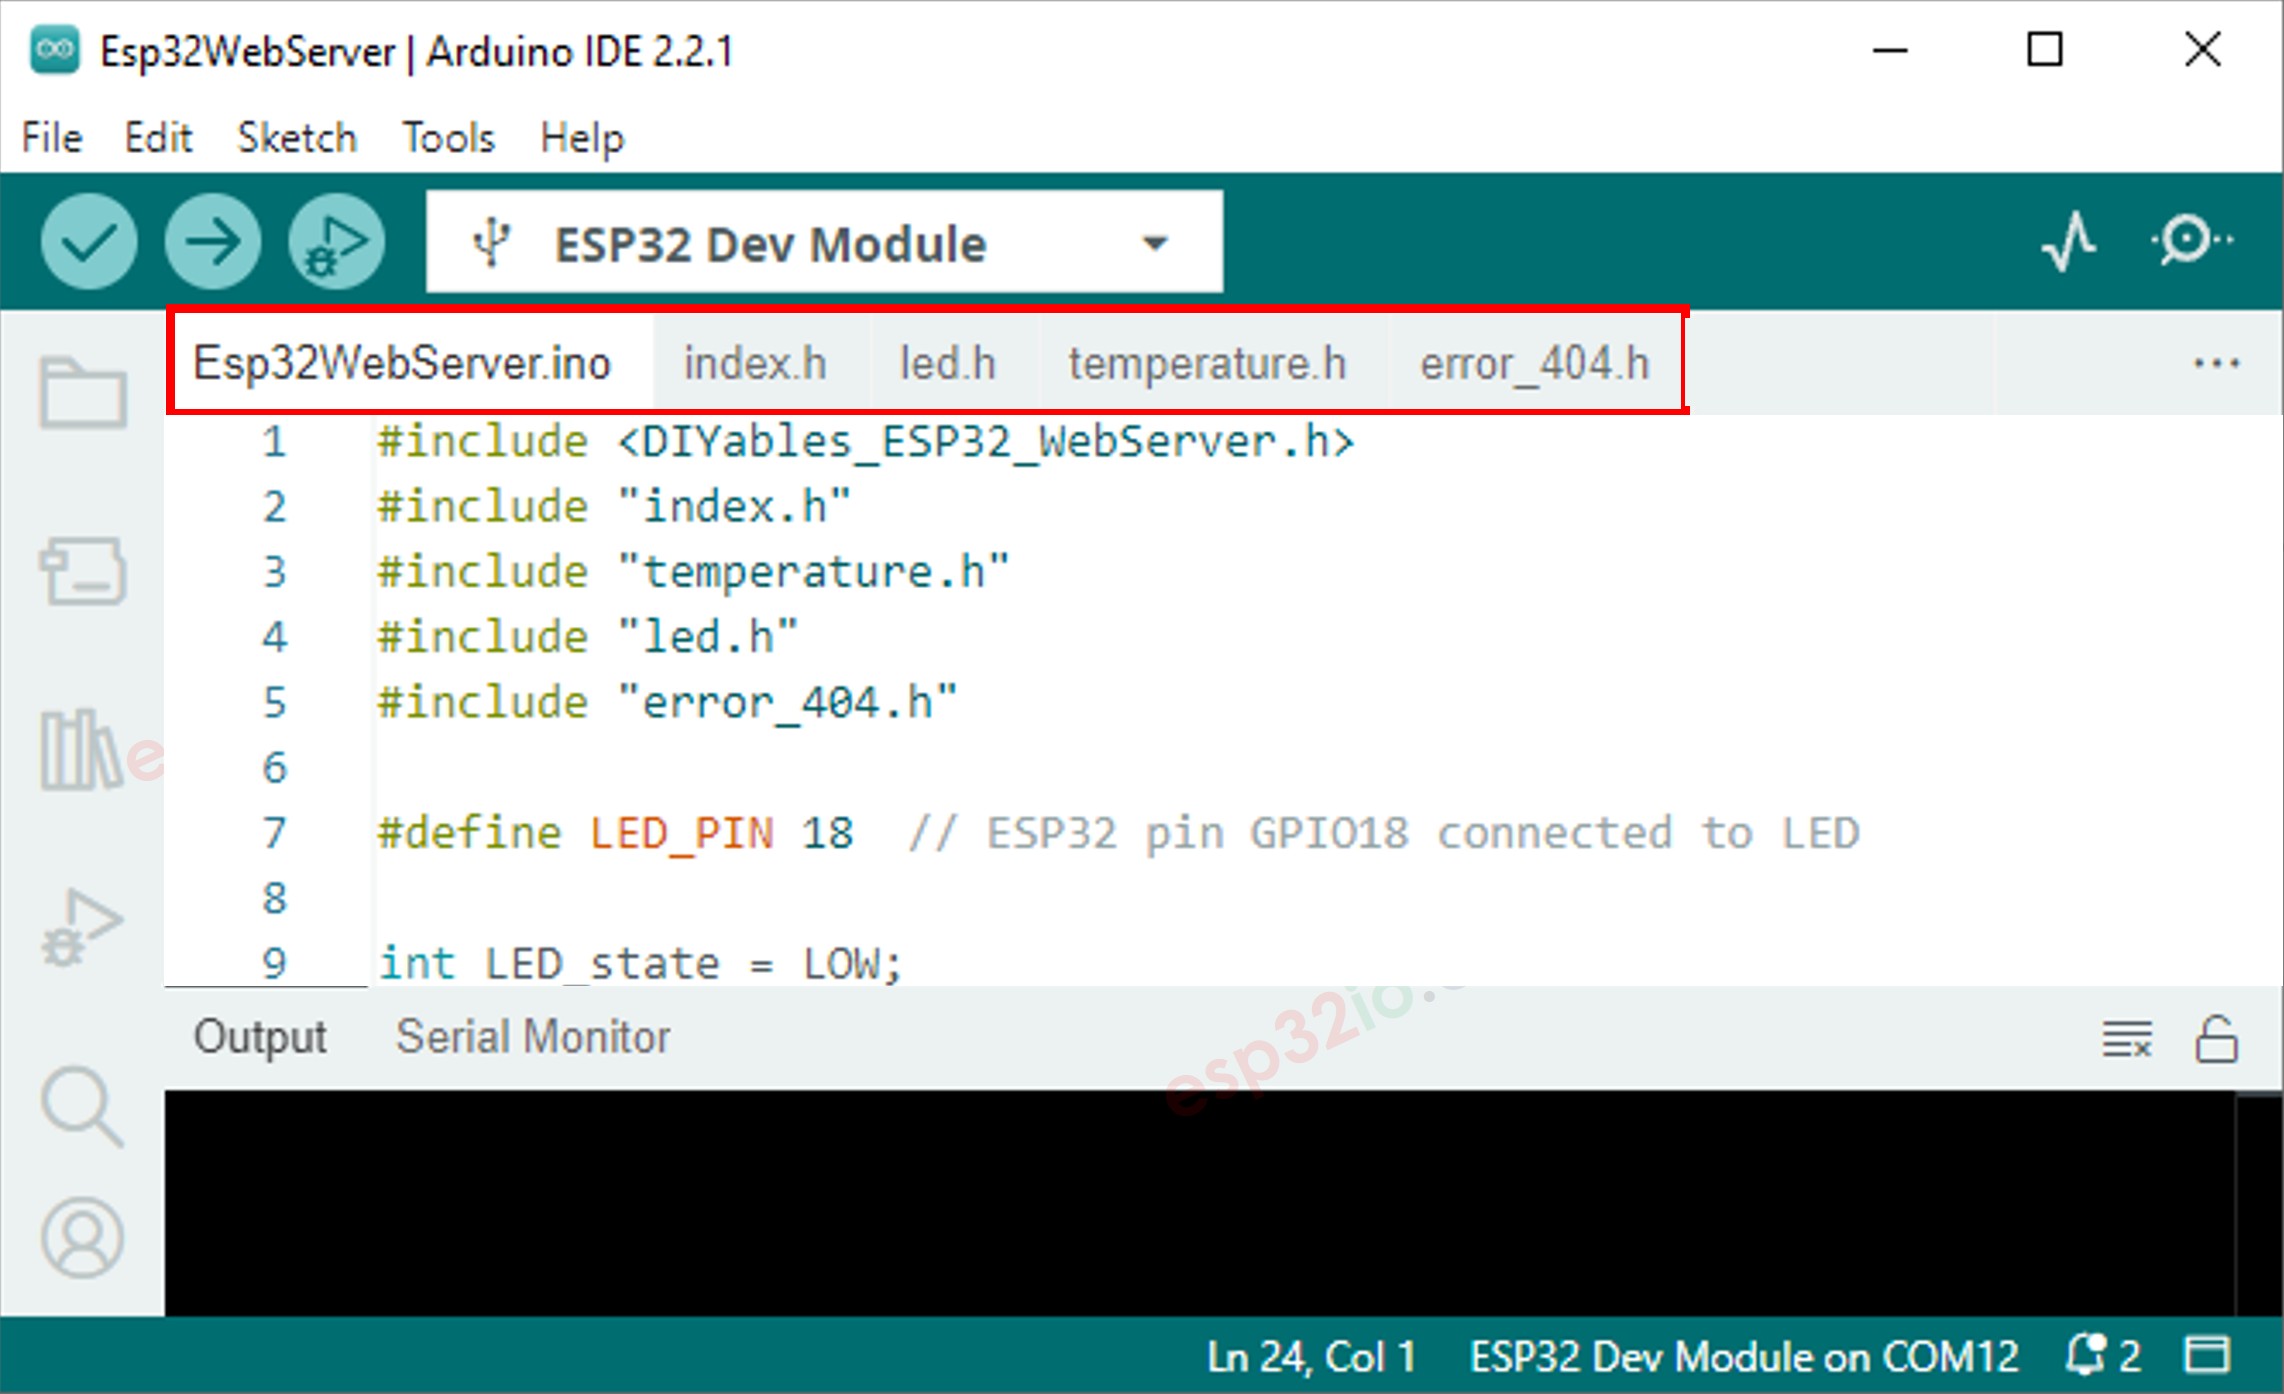
El código anterior tiene un contenido HTML muy simple para cada página. Pero si queremos crear una interfaz sofisticada con mucho HTML, el código puede volverse grande y desordenado. Para simplificarlo, aprenderemos a separar el HTML del código del ESP8266. Esto nos permitirá mantener el HTML en archivos separados, lo que facilita su gestión y su uso.
Abre el IDE de Arduino.
Crea un nuevo sketch y ponle un nombre, por ejemplo, ESP8266WebServer.ino.
Copia el código proporcionado y pégalo en ese archivo.
#include <ESP8266WiFi.h>
#include <ESP8266WebServer.h>
#include "index.h"
#include "temperature.h"
#include "led.h"
#include "error_404.h"
#include "error_405.h"
#define LED_PIN D6
const char *ssid = "YOUR_WIFI_SSID";
const char *password = "YOUR_WIFI_PASSWORD";
ESP8266WebServer server(80);
int LED_state = LOW;
float getTemperature() {
float temp_x100 = random(0, 10000);
return temp_x100 / 100;
}
void setup() {
Serial.begin(9600);
pinMode(LED_PIN, OUTPUT);
WiFi.begin(ssid, password);
while (WiFi.status() != WL_CONNECTED) {
delay(1000);
Serial.println("Connecting to WiFi...");
}
Serial.println("Connected to WiFi");
Serial.print("ESP8266 Web Server's IP address: ");
Serial.println(WiFi.localIP());
server.on("/", HTTP_GET, []() {
Serial.println("Web Server: home page");
String html = HTML_CONTENT_HOME;
server.send(200, "text/html", html);
});
server.on("/temperature.html", HTTP_GET, []() {
Serial.println("Web Server: temperature page");
String html = HTML_CONTENT_TEMPERATURE;
float temperature = getTemperature();
html.replace("%TEMPERATURE_VALUE%", String(temperature));
server.send(200, "text/html", html);
});
server.on("/led.html", HTTP_GET, []() {
Serial.print("Web Server: LED page");
if (server.arg("state")) {
String state = server.arg("state");
if (state == "on") {
LED_state = HIGH;
} else if (state == "off") {
LED_state = LOW;
}
digitalWrite(LED_PIN, LED_state);
Serial.print(" => turning LED to ");
Serial.print(state);
}
Serial.println();
String html = HTML_CONTENT_LED;
html.replace("%LED_STATE%", LED_state ? "ON" : "OFF");
server.send(200, "text/html", html);
});
server.onNotFound([]() {
if (server.method() == HTTP_GET) {
Serial.println("Web Server: Not Found");
String html = HTML_CONTENT_404;
server.send(404, "text/html", html);
} else {
Serial.println("Web Server: Method Not Allowed");
String html = HTML_CONTENT_405;
server.send(405, "text/html", html);
}
});
server.begin();
Serial.println("ESP8266 Web server started");
}
void loop() {
server.handleClient();
}
Cambia la información de WiFi (SSID y contraseña) en el código por la tuya
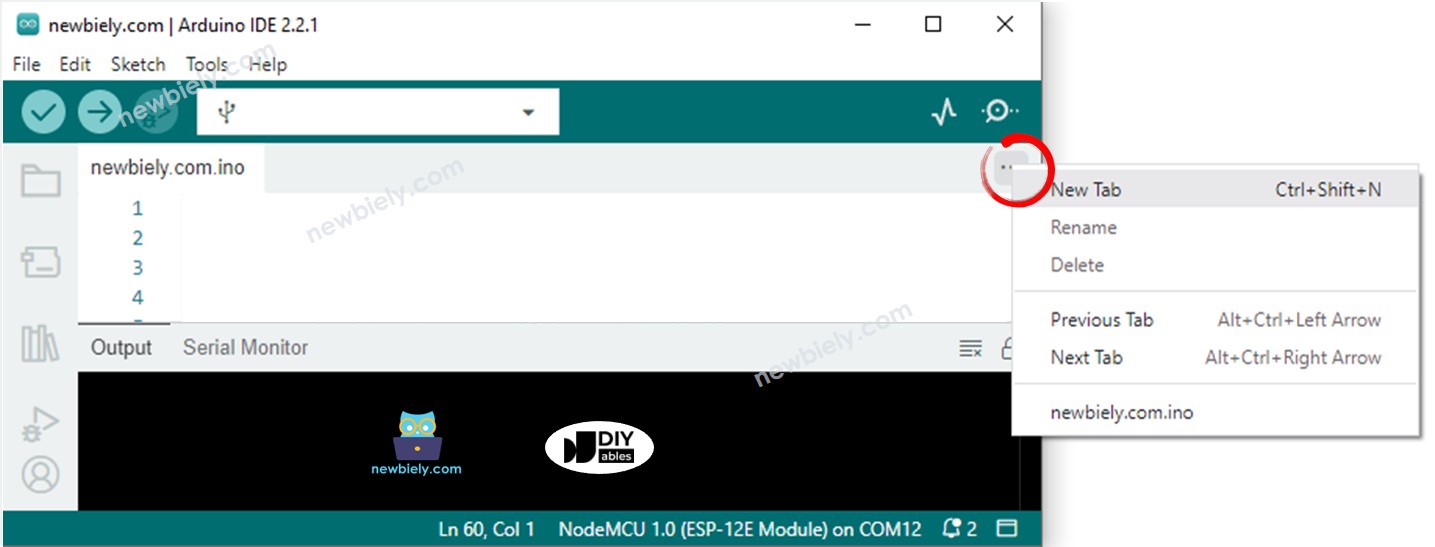
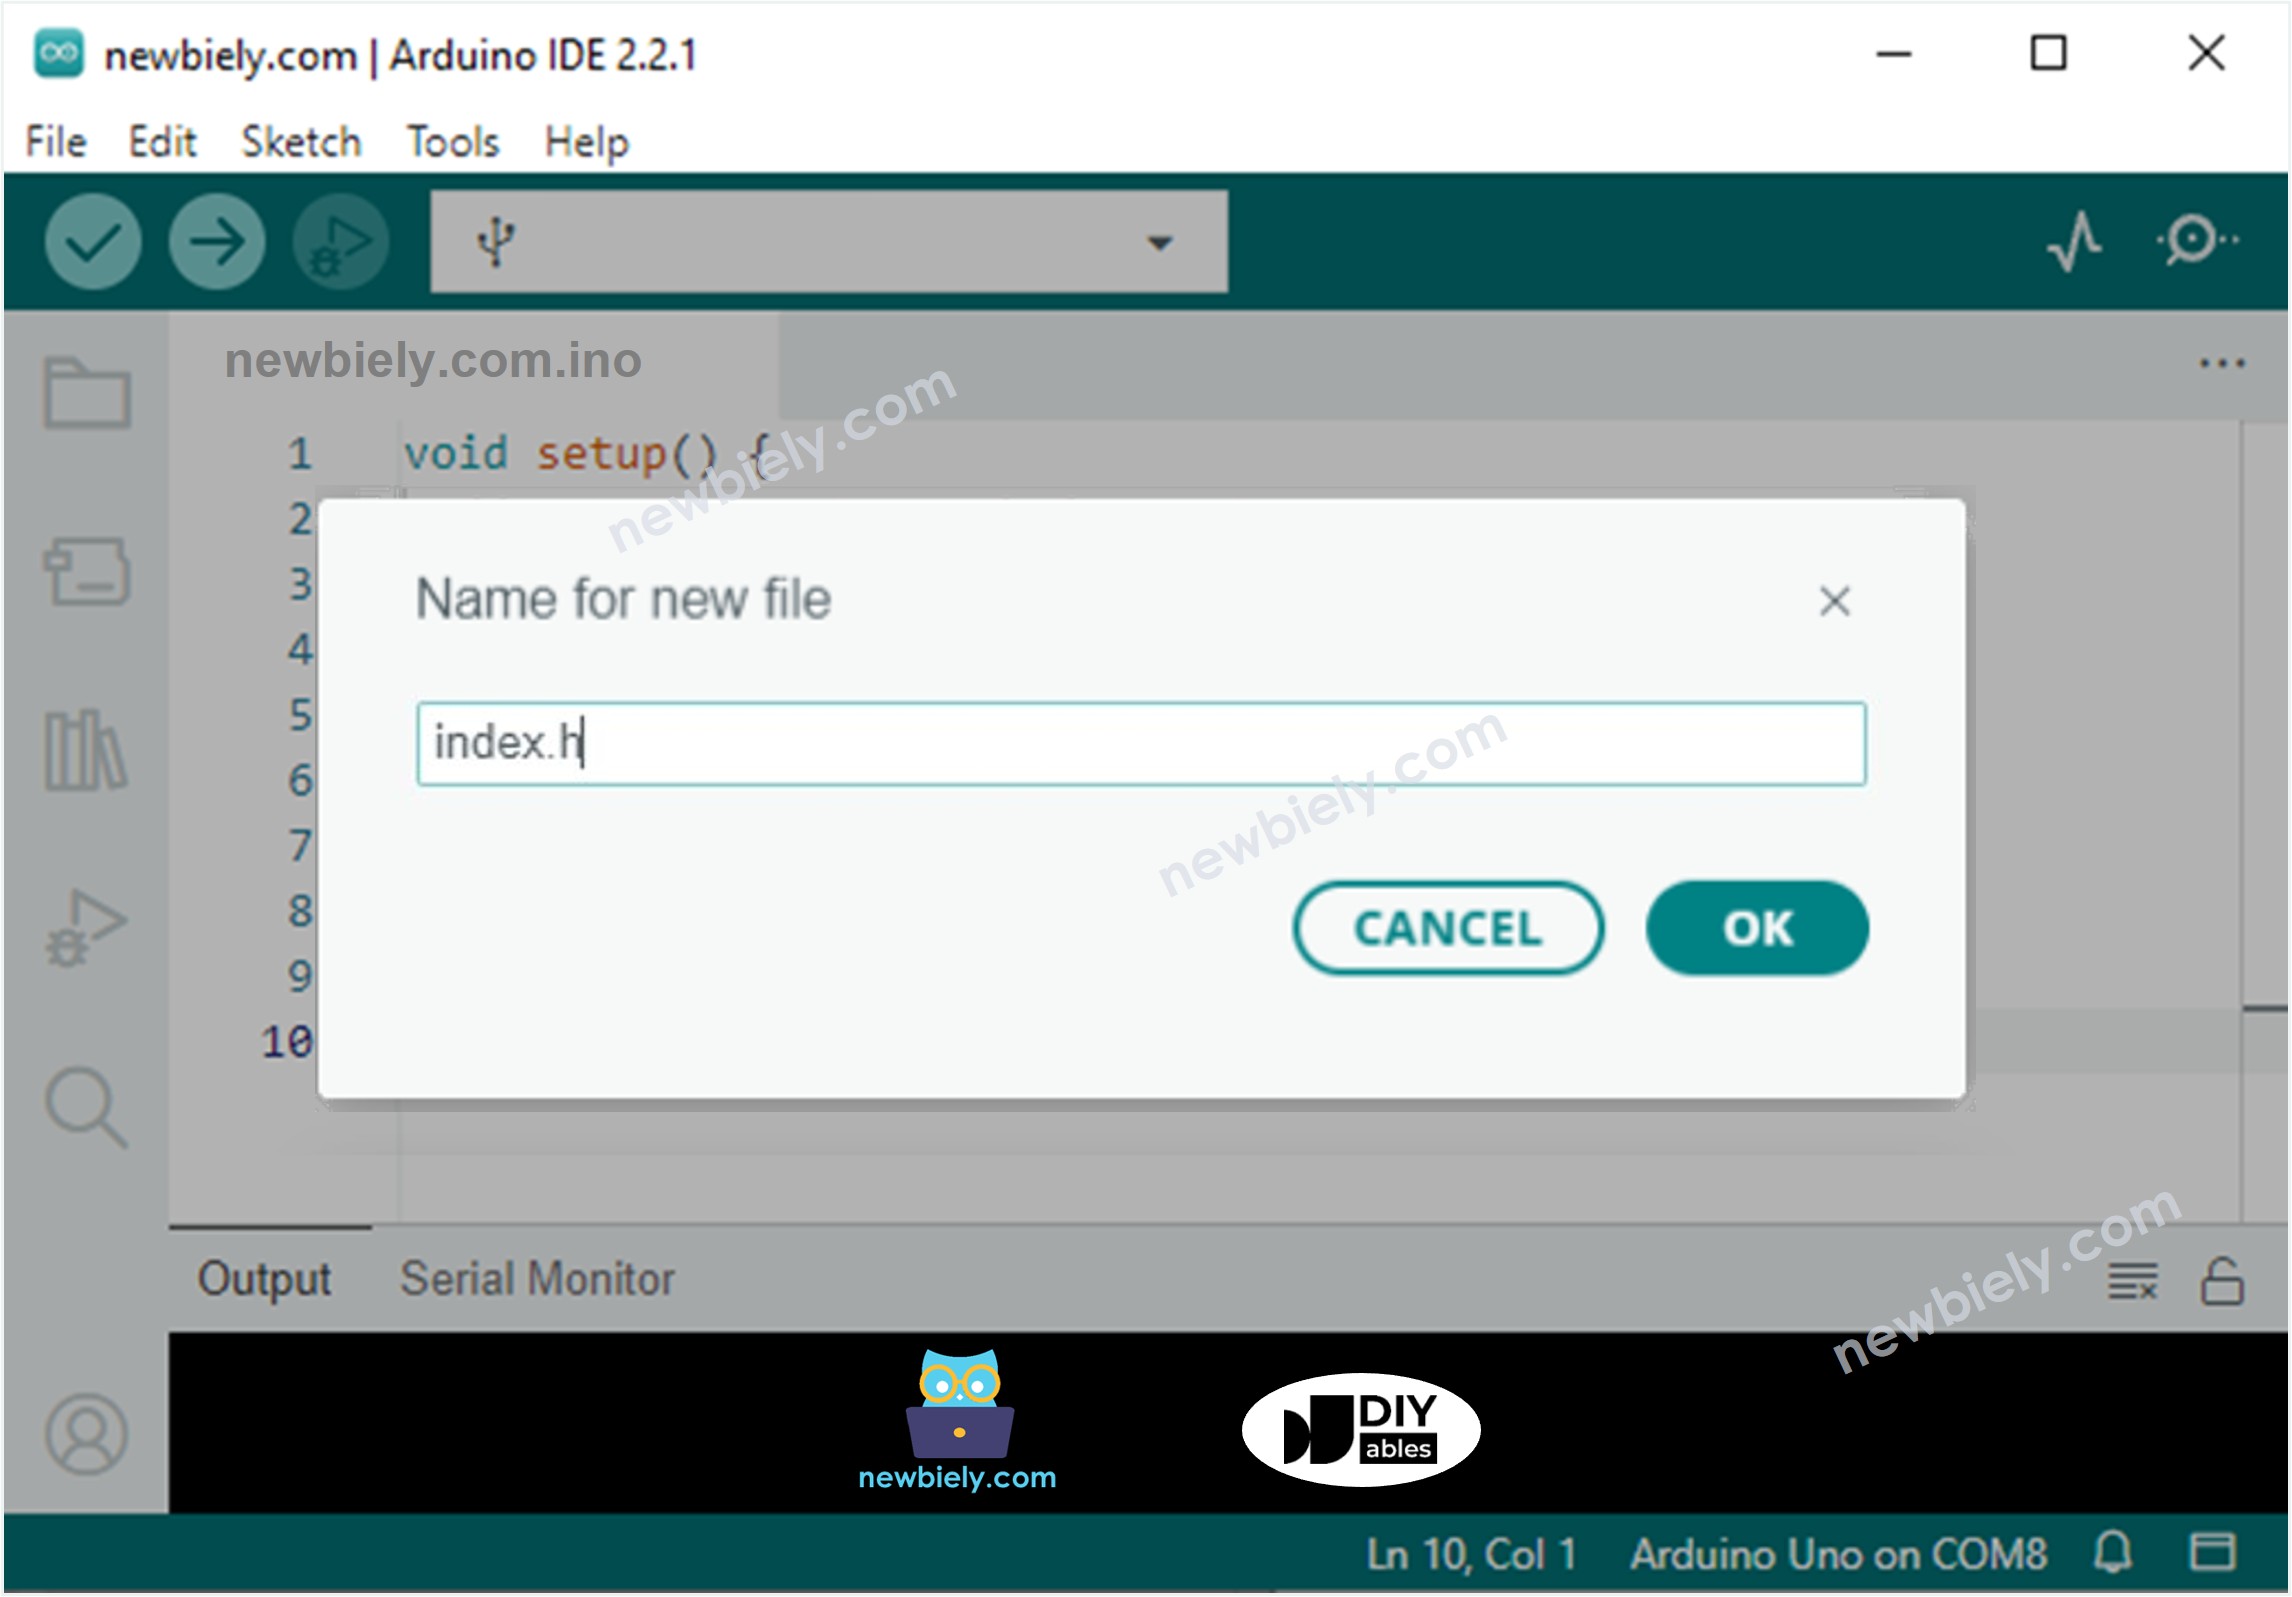
Crea el archivo index.h en el IDE de Arduino haciendo:
const char *HTML_CONTENT_HOME = R"=====(
<!DOCTYPE html>
<html lang="en">
<head>
<meta charset="UTF-8">
<meta name="viewport" content="width=device-width, initial-scale=1.0">
<link rel="icon" href="data:,">
<title>Home Page</title>
</head>
<body>
<h1>Welcome to the Home Page</h1>
<ul>
<li><a href="/led.html">LED Page</a></li>
<li><a href="/temperature.html">Temperature Page</a></li>
</ul>
</body>
</html>
)=====";
const char *HTML_CONTENT_LED = R"=====(
<!DOCTYPE html>
<html lang="en">
<head>
<meta charset="UTF-8">
<meta name="viewport" content="width=device-width, initial-scale=1.0">
<link rel="icon" href="data:,">
<title>LED Page</title>
</head>
<body>
<h1>LED Page</h1>
<p>LED State: <span style="color: red;">%LED_STATE%</span></p>
<a href='/led.html?state=on'>Turn ON</a>
<br><br>
<a href='/led.html?state=off'>Turn OFF</a>
</body>
</html>
)=====";
const char *HTML_CONTENT_TEMPERATURE = R"=====(
<!DOCTYPE html>
<html>
<head>
<title>ESP8266 - Web Temperature</title>
<meta name="viewport" content="width=device-width, initial-scale=0.7, maximum-scale=0.7">
<meta charset="utf-8">
<link rel="icon" href="https://diyables.io/images/page/diyables.svg">
<style>
body { font-family: "Georgia"; text-align: center; font-size: width/2pt;}
h1 { font-weight: bold; font-size: width/2pt;}
h2 { font-weight: bold; font-size: width/2pt;}
button { font-weight: bold; font-size: width/2pt;}
</style>
<script>
var cvs_width = 200, cvs_height = 450;
function init() {
var canvas = document.getElementById("cvs");
canvas.width = cvs_width;
canvas.height = cvs_height + 50;
var ctx = canvas.getContext("2d");
ctx.translate(cvs_width/2, cvs_height - 80);
update_view(%TEMPERATURE_VALUE%);
}
function update_view(temp) {
var canvas = document.getElementById("cvs");
var ctx = canvas.getContext("2d");
var radius = 70;
var offset = 5;
var width = 45;
var height = 330;
ctx.clearRect(-cvs_width/2, -350, cvs_width, cvs_height);
ctx.strokeStyle="blue";
ctx.fillStyle="blue";
var x = -width/2;
ctx.lineWidth=2;
for (var i = 0; i <= 100; i+=5) {
var y = -(height - radius)*i/100 - radius - 5;
ctx.beginPath();
ctx.lineTo(x, y);
ctx.lineTo(x - 20, y);
ctx.stroke();
}
ctx.lineWidth=5;
for (var i = 0; i <= 100; i+=20) {
var y = -(height - radius)*i/100 - radius - 5;
ctx.beginPath();
ctx.lineTo(x, y);
ctx.lineTo(x - 25, y);
ctx.stroke();
ctx.font="20px Georgia";
ctx.textBaseline="middle";
ctx.textAlign="right";
ctx.fillText(i.toString(), x - 35, y);
}
ctx.lineWidth=16;
ctx.beginPath();
ctx.arc(0, 0, radius, 0, 2 * Math.PI);
ctx.stroke();
ctx.beginPath();
ctx.rect(-width/2, -height, width, height);
ctx.stroke();
ctx.beginPath();
ctx.arc(0, -height, width/2, 0, 2 * Math.PI);
ctx.stroke();
ctx.fillStyle="#e6e6ff";
ctx.beginPath();
ctx.arc(0, 0, radius, 0, 2 * Math.PI);
ctx.fill();
ctx.beginPath();
ctx.rect(-width/2, -height, width, height);
ctx.fill();
ctx.beginPath();
ctx.arc(0, -height, width/2, 0, 2 * Math.PI);
ctx.fill();
ctx.fillStyle="#ff1a1a";
ctx.beginPath();
ctx.arc(0, 0, radius - offset, 0, 2 * Math.PI);
ctx.fill();
temp = Math.round(temp * 100) / 100;
var y = (height - radius)*temp/100.0 + radius + 5;
ctx.beginPath();
ctx.rect(-width/2 + offset, -y, width - 2*offset, y);
ctx.fill();
ctx.fillStyle="red";
ctx.font="bold 34px Georgia";
ctx.textBaseline="middle";
ctx.textAlign="center";
ctx.fillText(temp.toString() + "°C", 0, 100);
}
window.onload = init;
</script>
</head>
<body>
<h1>ESP8266 - Web Temperature</h1>
<canvas id="cvs"></canvas>
</body>
</html>
)=====";
const char *HTML_CONTENT_404 = R"=====(
<!DOCTYPE html>
<html lang="en">
<head>
<meta charset="UTF-8">
<meta name="viewport" content="width=device-width, initial-scale=1.0">
<link rel="icon" href="data:,">
<title>404 - Page Not Found</title>
<style>
h1 {color: #ff4040;}
</style>
</head>
<body>
<h1>404</h1>
<p>Oops! The page you are looking for could not be found on Esp32 Web Server.</p>
<p>Please check the URL or go back to the <a href="/">homepage</a>.</p>
<p>Or check <a href="https://esp32io.com/tutorials/esp32-web-server-multiple-pages"> Esp32 Web Server</a> tutorial.</p>
</body>
</html>
)=====";
const char *HTML_CONTENT_405 = R"=====(
<!DOCTYPE html>
<html lang="en">
<head>
<meta charset="UTF-8">
<meta name="viewport" content="width=device-width, initial-scale=1.0">
<link rel="icon" href="data:,">
<title>405 - Method Not Allowed</title>
<style>
h1 {color: #ff4040;}
</style>
</head>
<body>
<h1>405 - Method Not Allowed</h1>
<p>Oops! The requested method is not allowed for this resource.</p>
<p>Please check your request or go back to the <a href="/">homepage</a>.</p>
<p>Or check <a href="https://esp32io.com/tutorials/esp32-web-server-multiple-pages"> Esp32 Web Server</a> tutorial.</p>
</body>
</html>
)=====";
Haga clic en el botón Subir en el IDE de Arduino para subir código al ESP8266
Acceda a las páginas web de la placa ESP8266 a través del navegador web una por una como antes. Verá todas las páginas web como se muestran a continuación:
※ NUESTROS MENSAJES
No dude en compartir el enlace de este tutorial. Sin embargo, por favor no use nuestro contenido en otros sitios web. Hemos invertido mucho esfuerzo y tiempo en crear el contenido, ¡por favor respete nuestro trabajo!