ESP8266 - Temperatura a través de la Web

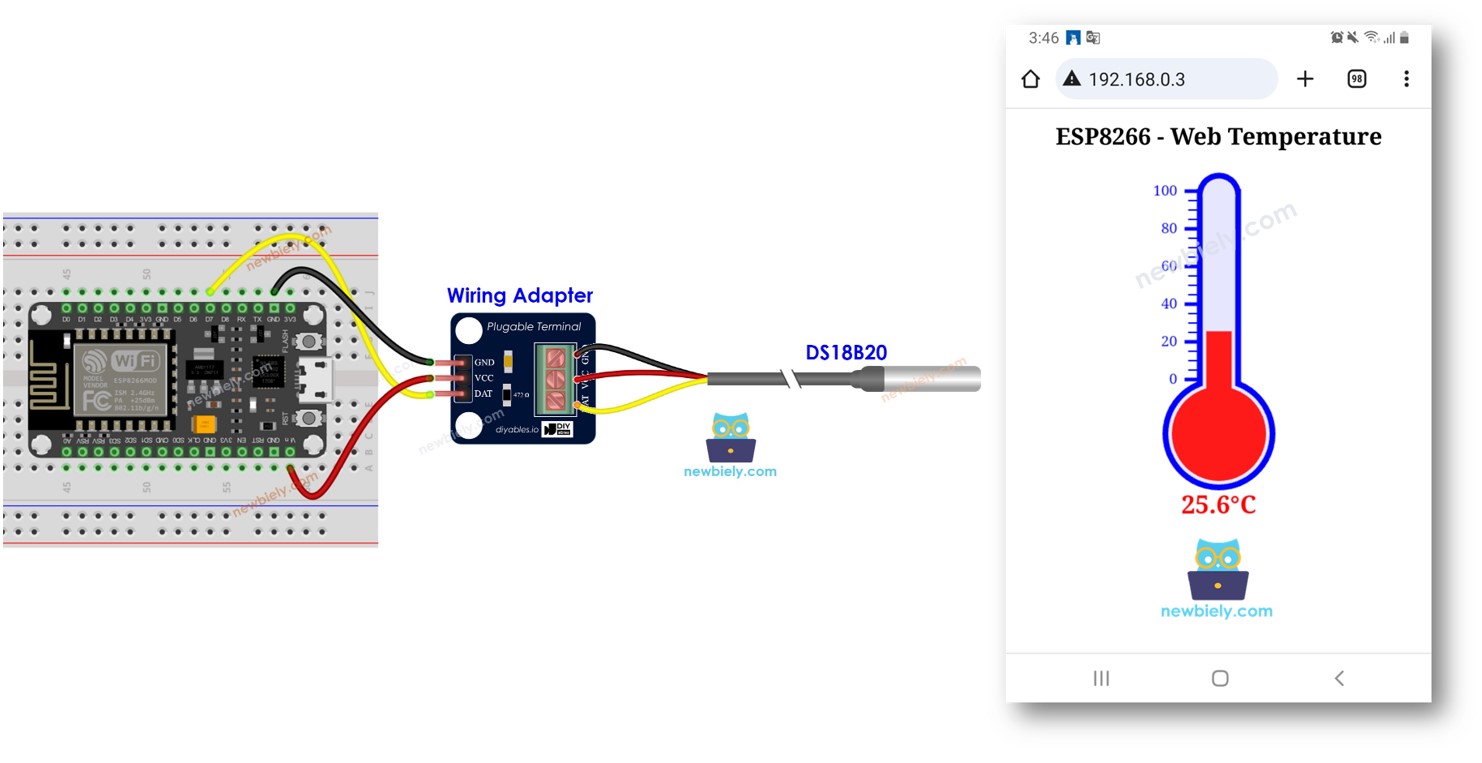
Este tutorial explica cómo programar el ESP8266 para que se convierta en un servidor web, permitiéndote acceder a los datos de temperatura a través de una interfaz web. Usando un sensor de temperatura DS18B20 conectado, puedes consultar fácilmente la temperatura actual utilizando tu teléfono inteligente o PC para visitar la página web servida por el ESP8266. A continuación se muestra un breve resumen de cómo funciona:

Servidor web de sensor de temperatura DS18B20 para ESP8266 NodeMCU

Vamos a revisar dos códigos de ejemplo:

Hardware Requerido

1×ESP8266 NodeMCU
1×Cable USB Tipo-A a Tipo-C (para PC USB-A)
1×Cable USB Tipo-C a Tipo-C (para PC USB-C)
1×Sensor de Temperatura DS18B20 (con Adaptador)
1×Sensor de Temperatura DS18B20 (sin Adaptador)
1×Cables Puente
1×(Recomendado) Placa de Expansión de Terminales de Tornillo para ESP8266
1×(Recomendado) Divisor de Alimentación para ESP8266 Tipo-C

Or you can buy the following kits:

1×DIYables Sensor Kit (30 sensors/displays)
1×DIYables Sensor Kit (18 sensors/displays)
Divulgación: Algunos de los enlaces proporcionados en esta sección son enlaces de afiliado de Amazon. Podemos recibir una comisión por las compras realizadas a través de estos enlaces sin costo adicional para usted. Apreciamos su apoyo.

Buy Note: Many DS18B20 sensors available in the market are unreliable. We strongly recommend buying the sensor from the DIYables brand using the link provided above. We tested it, and it worked reliably.

Acerca del servidor web ESP8266 y del sensor de temperatura DS18B20

Si no conoces el servidor web ESP8266 y el sensor de temperatura DS18B20 (diagrama de pines, cómo funciona, cómo programarlo ...), aprende sobre ellos en los siguientes tutoriales:

Diagrama de Cableado

Esquema de cableado del sensor de temperatura DS18B20 para servidor web ESP8266 NodeMCU

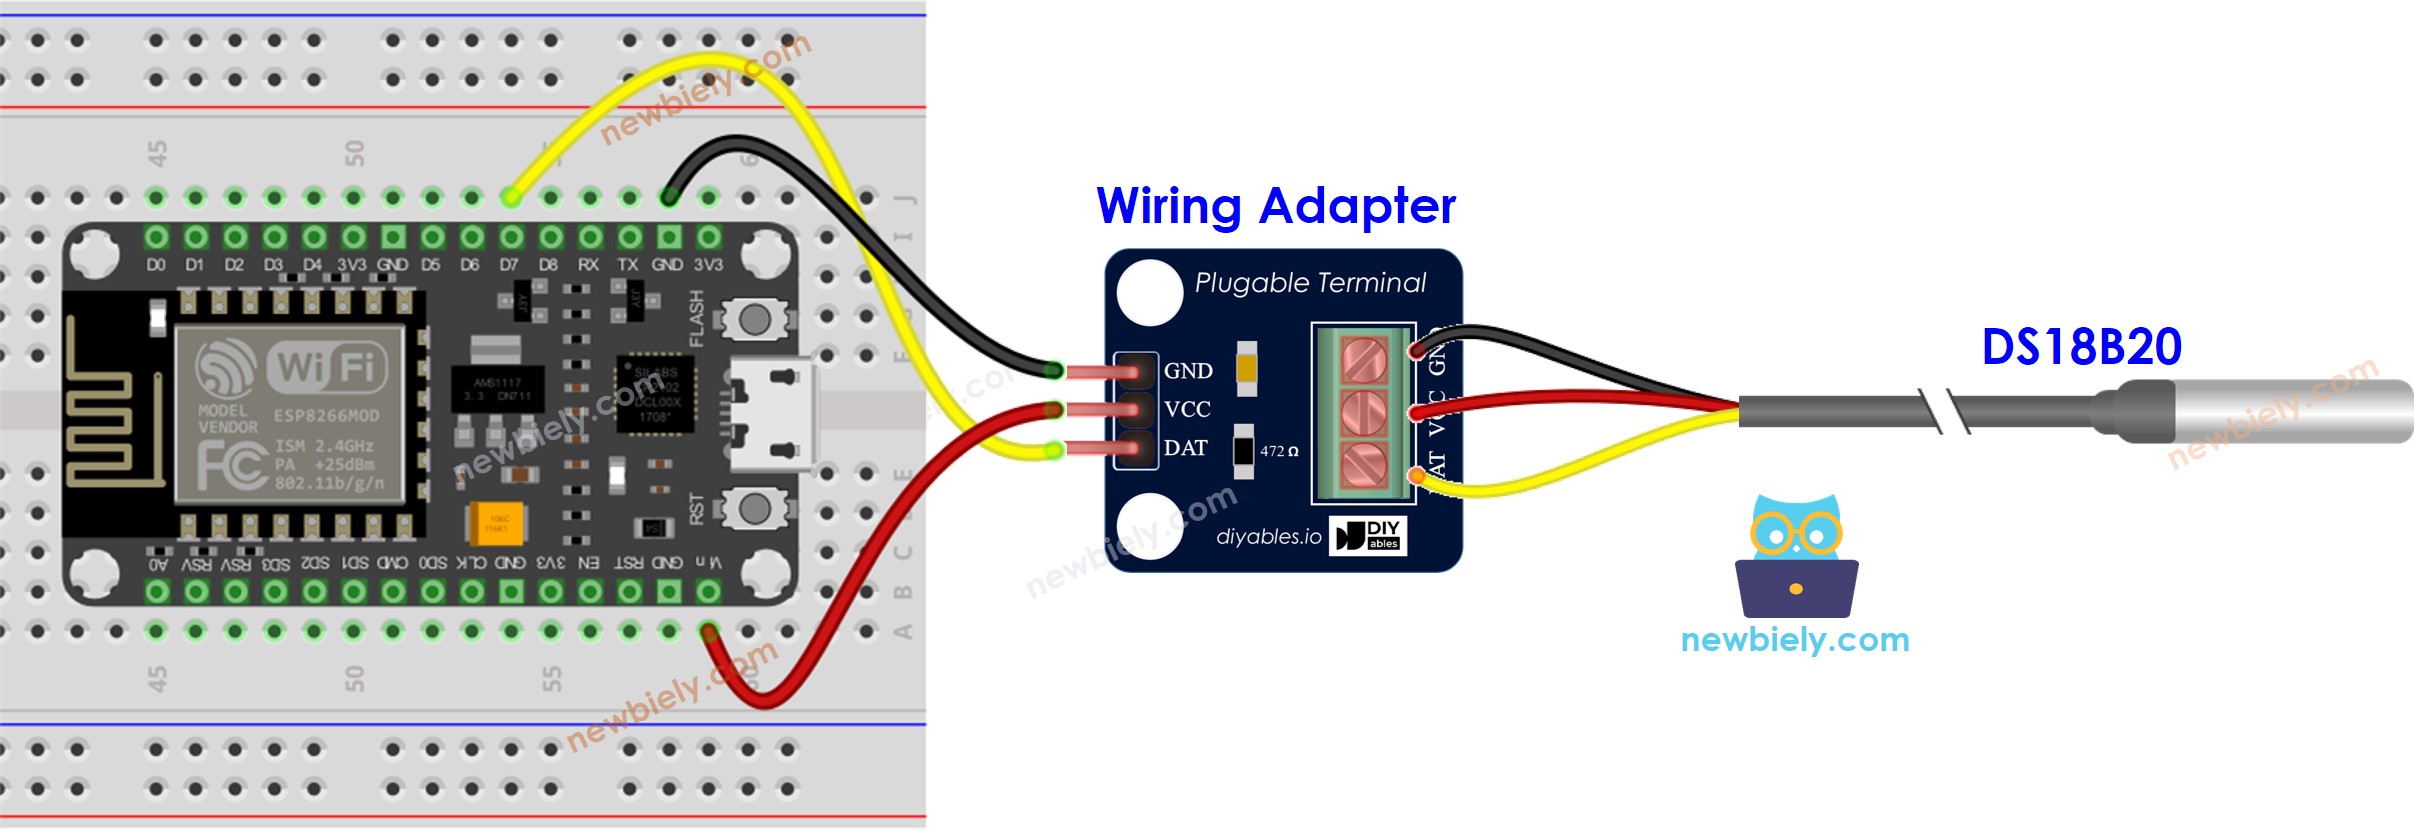
This image is created using Fritzing. Click to enlarge image

Para obtener m\u00e1s informaci\u00f3n, consulte Pines del ESP8266 y c\u00f3mo alimentar ESP8266 y otros componentes.

Código ESP8266 - Página Web Simple

/* * Este código de ESP8266 NodeMCU fue desarrollado por es.newbiely.com * Este código de ESP8266 NodeMCU se proporciona al público sin ninguna restricción. * Para tutoriales completos y diagramas de cableado, visite: * https://es.newbiely.com/tutorials/esp8266/esp8266-temperature-via-web */ #include <ESP8266WiFi.h> #include <ESP8266WebServer.h> #include <OneWire.h> #include <DallasTemperature.h> #define SENSOR_PIN D7 // The ESP8266 pin connected to DS18B20 sensor's DATA pin const char* ssid = "YOUR_WIFI_SSID"; // CHANGE IT const char* password = "YOUR_WIFI_PASSWORD"; // CHANGE IT OneWire oneWire(SENSOR_PIN); // setup a oneWire instance DallasTemperature DS18B20(&oneWire); // pass oneWire to DallasTemperature library ESP8266WebServer server(80); // Web server on port 80 float getTemperature() { DS18B20.requestTemperatures(); // send the command to get temperatures float temperature_C = DS18B20.getTempCByIndex(0); // read temperature in °C return temperature_C; } void setup() { Serial.begin(9600); DS18B20.begin(); // initialize the DS18B20 sensor // Connect to Wi-Fi WiFi.begin(ssid, password); while (WiFi.status() != WL_CONNECTED) { delay(1000); Serial.println("Connecting to WiFi..."); } Serial.println("Connected to WiFi"); // Print the ESP8266's IP address Serial.print("ESP8266 Web Server's IP address: "); Serial.println(WiFi.localIP()); // Define a route to serve the HTML page server.on("/", HTTP_GET, []() { Serial.println("ESP8266 Web Server: New request received:"); // for debugging Serial.println("GET /"); // for debugging // get temperature from sensor float temperature = getTemperature(); // Format the temperature with two decimal places String temperatureStr = String(temperature, 2); String html = "<!DOCTYPE HTML>"; html += "<html>"; html += "<head>"; html += "<link rel=\"icon\" href=\"data:,\">"; html += "</head>"; html += "<p>"; html += "Temperature: <span style=\"color: red;\">"; html += temperature; html += "&deg;C</span>"; html += "</p>"; html += "</html>"; server.send(200, "text/html", html); }); // Start the server server.begin(); } void loop() { // Handle client requests server.handleClient(); // Your code here }

Pasos R\u00e1pidos

Para empezar con ESP8266 en el IDE de Arduino, siga estos pasos:

  • Consulta el cómo configurar el entorno para ESP8266 en Arduino IDE tutorial si es la primera vez que usas ESP8266.
  • Conecta los componentes tal como se muestra en el diagrama.
  • Conecta la placa ESP8266 a tu computadora usando un cable USB.
  • Abre Arduino IDE en tu computadora.
  • Elige la placa ESP8266 correcta, como (por ejemplo NodeMCU 1.0 (ESP-12E Module)), y su puerto COM respectivo.
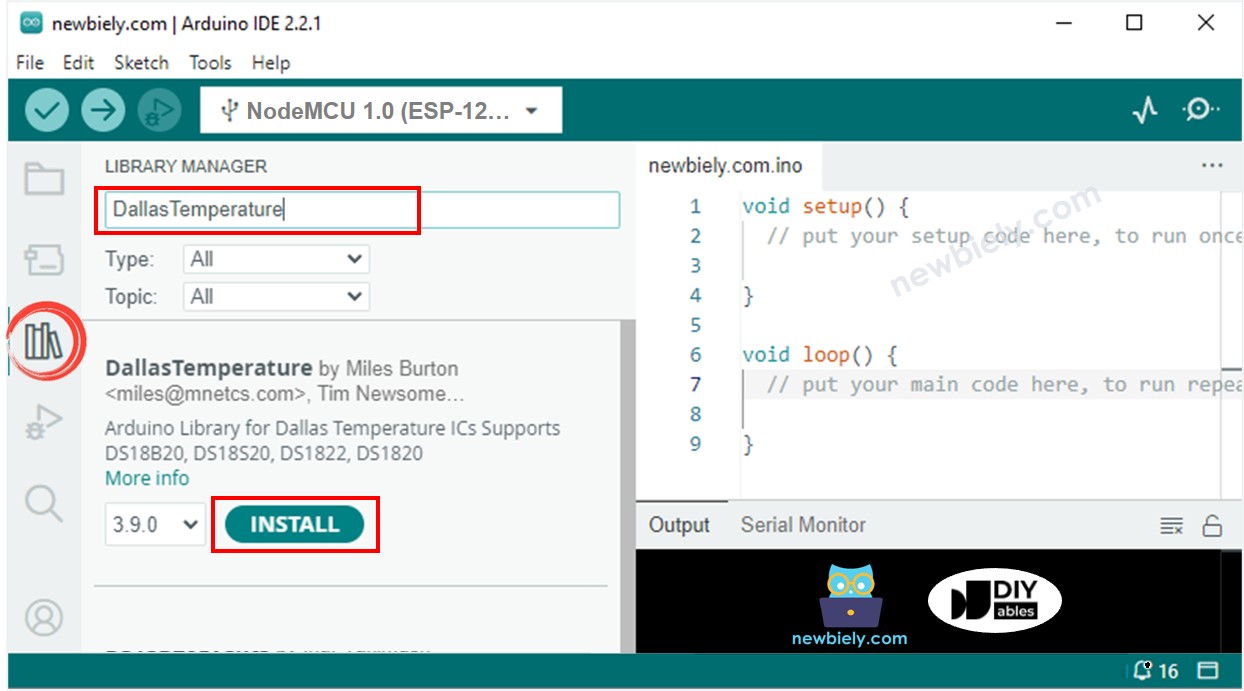
  • Haz clic en el icono Bibliotecas en la barra izquierda del Arduino IDE.
  • Escribe “Dallas” en la caja de búsqueda, luego busca la librería DallasTemperature de Miles Burton.
  • Haz clic en el botón Instalar para instalar la librería DallasTemperature.
Biblioteca Dallas Temperature para ESP8266 NodeMCU
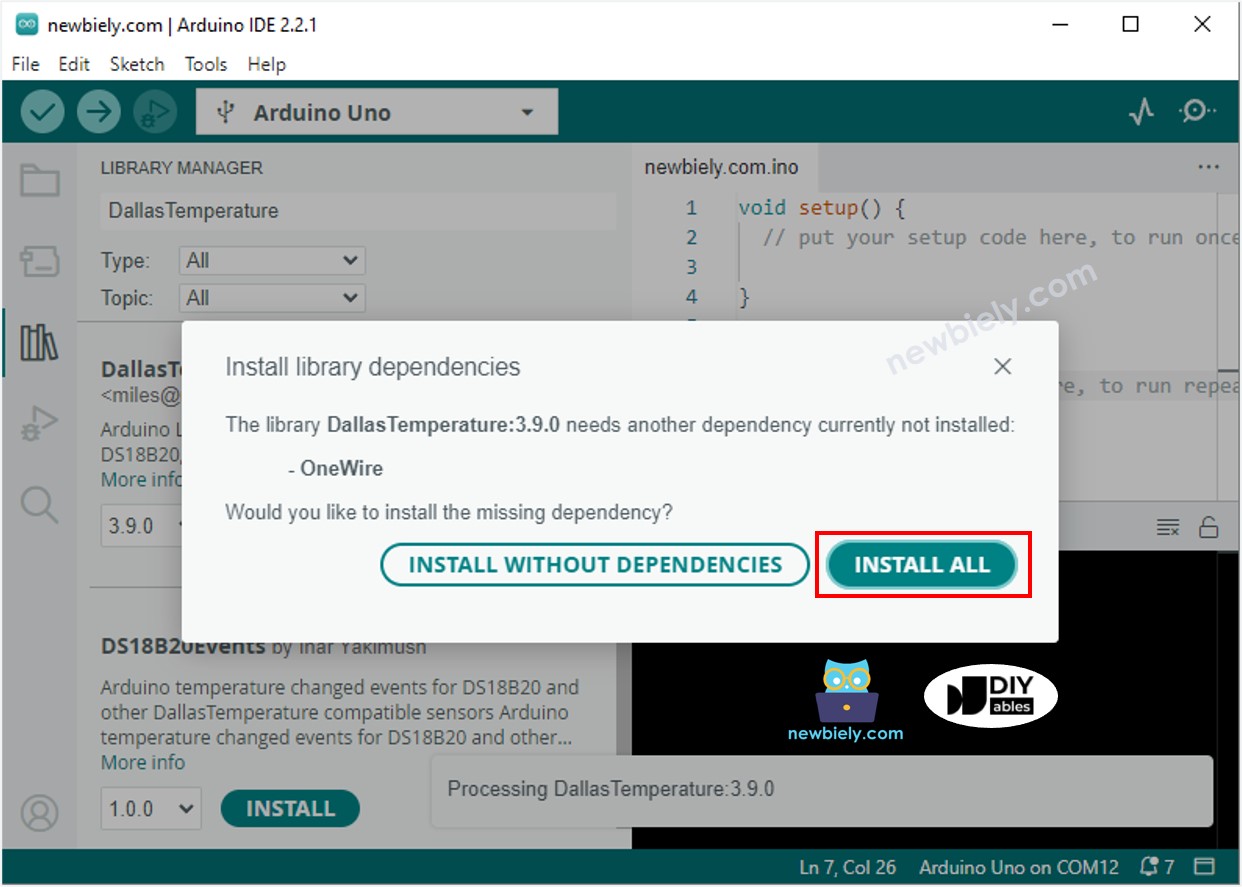
  • Se le pedirá que instale la dependencia. Haga clic en el botón Instalar Todo para instalar la biblioteca OneWire.
Librería OneWire para ESP8266 NodeMCU
  • Copia el código anterior y ábrelo con Arduino IDE
  • Cambia la información de Wi-Fi (SSID y contraseña) en el código para que coincida con la tuya
  • Haz clic en el botón Subir en Arduino IDE para subir el código al ESP8266
  • Abre el Monitor Serial
  • Consulta el resultado en el Monitor Serial
COM6
Send
Connecting to WiFi... Connected to WiFi ESP8266 Web Server's IP address: 192.168.0.5
Autoscroll Show timestamp
Clear output
9600 baud  
Newline  
  • Encontrarás una dirección IP. Escribe esta dirección IP en la barra de direcciones de un navegador web en tu teléfono inteligente o PC.
  • Verás la siguiente salida en el Monitor Serial.
COM6
Send
Connecting to WiFi... Connected to WiFi ESP8266 Web Server's IP address: 192.168.0.5 ESP8266 Web Server: New request received: GET /
Autoscroll Show timestamp
Clear output
9600 baud  
Newline  
  • Verás una página web muy simple de la placa ESP8266 en el navegador web, como se muestra a continuación:
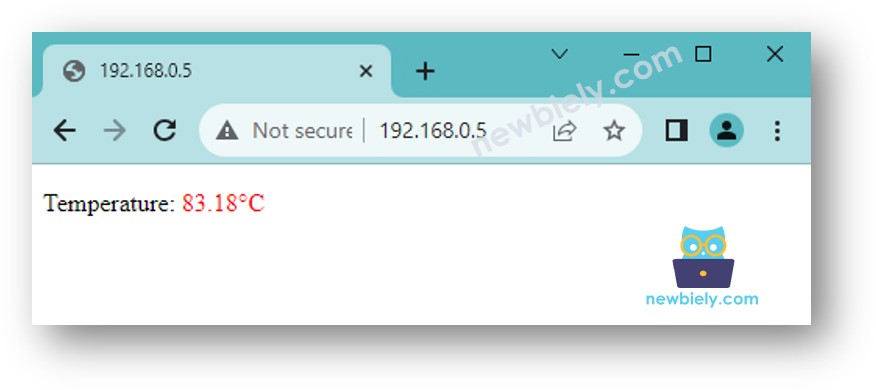
Servidor web de temperatura para ESP8266 NodeMCU

※ Nota:

Con el código proporcionado arriba, para obtener la actualización de la temperatura, tienes que recargar la página en el navegador. En una próxima parte, aprenderemos cómo hacer que la página web actualice el valor de la temperatura en segundo plano sin recargar la página.

Código ESP8266 - Página web gráfica

Como una página web gráfica contiene una gran cantidad de contenido HTML, incrustarla en el código ESP8266 como antes resulta inconveniente. Para abordar esto, necesitamos separar el código ESP8266 y el código HTML en archivos diferentes:

  • El código ESP8266 se colocará en un archivo .ino.
  • El código HTML (incluyendo HTML, CSS y Javascript) se colocará en un archivo .h.

Para obtener detalles sobre cómo separar el código HTML del código ESP8266, consulte el tutorial ESP8266 - Web Server.

Pasos R\u00e1pidos

  • Abre Arduino IDE y crea un nuevo sketch. Dale un nombre, por ejemplo, newbiely.com.ino
  • Copia el código a continuación y ábrelo con Arduino IDE
/* * Este código de ESP8266 NodeMCU fue desarrollado por es.newbiely.com * Este código de ESP8266 NodeMCU se proporciona al público sin ninguna restricción. * Para tutoriales completos y diagramas de cableado, visite: * https://es.newbiely.com/tutorials/esp8266/esp8266-temperature-via-web */ #include <ESP8266WiFi.h> #include <ESP8266WebServer.h> #include "index.h" // Include the index.h file #include <OneWire.h> #include <DallasTemperature.h> #define SENSOR_PIN D7 // The ESP8266 pin connected to DS18B20 sensor's DATA pin const char* ssid = "YOUR_WIFI_SSID"; // CHANGE IT const char* password = "YOUR_WIFI_PASSWORD"; // CHANGE IT OneWire oneWire(SENSOR_PIN); // setup a oneWire instance DallasTemperature DS18B20(&oneWire); // pass oneWire to DallasTemperature library ESP8266WebServer server(80); // Web server on port 80 float getTemperature() { DS18B20.requestTemperatures(); // send the command to get temperatures float temperature_C = DS18B20.getTempCByIndex(0); // read temperature in °C return temperature_C; } void setup() { Serial.begin(9600); DS18B20.begin(); // initialize the DS18B20 sensor // Connect to Wi-Fi WiFi.begin(ssid, password); while (WiFi.status() != WL_CONNECTED) { delay(1000); Serial.println("Connecting to WiFi..."); } Serial.println("Connected to WiFi"); // Print the ESP8266's IP address Serial.print("ESP8266 Web Server's IP address: "); Serial.println(WiFi.localIP()); // Serve the HTML page from the file server.on("/", HTTP_GET, []() { Serial.println("ESP8266 Web Server: New request received:"); // for debugging Serial.println("GET /"); // for debugging server.send(200, "text/html", webpage); // webpage is from index.h file }); // Define a route to get the temperature data server.on("/temperature", HTTP_GET, []() { Serial.println("ESP8266 Web Server: New request received:"); // for debugging Serial.println("GET /temperature"); // for debugging float temperature = getTemperature(); // Format the temperature with two decimal places String temperatureStr = String(temperature, 2); server.send(200, "text/plain", temperatureStr); }); // Start the server server.begin(); } void loop() { // Handle client requests server.handleClient(); // Your code here }
  • Cambia la información de WiFi (SSID y contraseña) en el código por la tuya
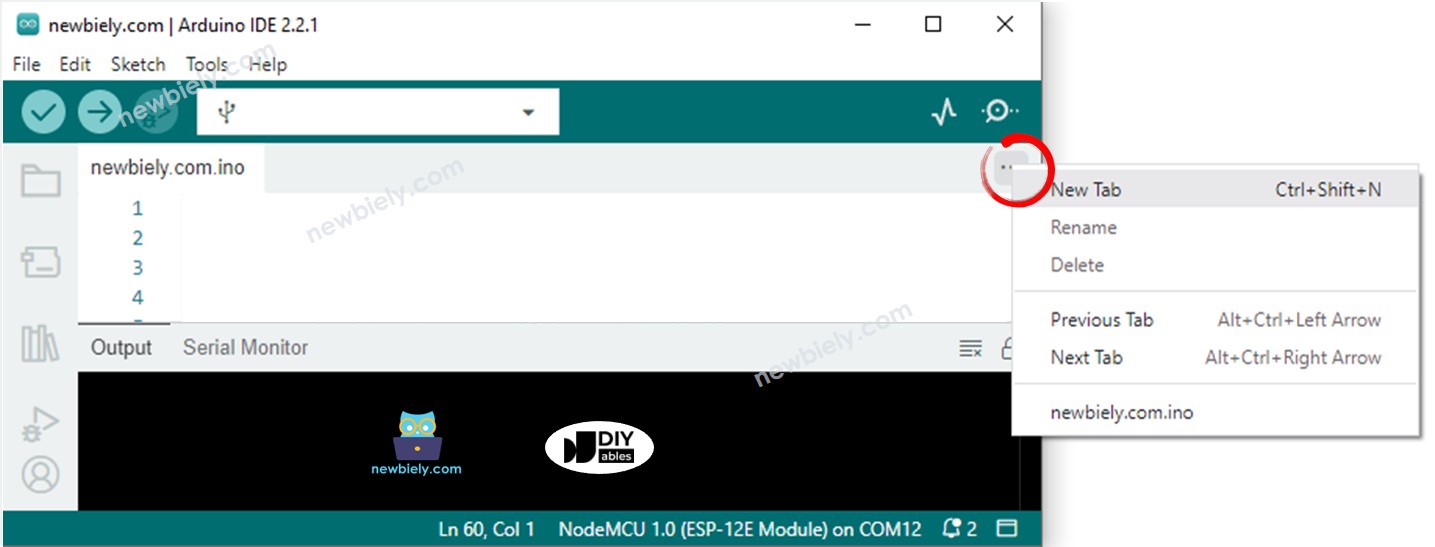
  • Crea el archivo index.h en Arduino IDE mediante:
    • Haz clic en el botón justo debajo del icono del monitor serie y elige Nueva pestaña, o usa las teclas Ctrl+Shift+N.
    Arduino IDE 2 añade un archivo
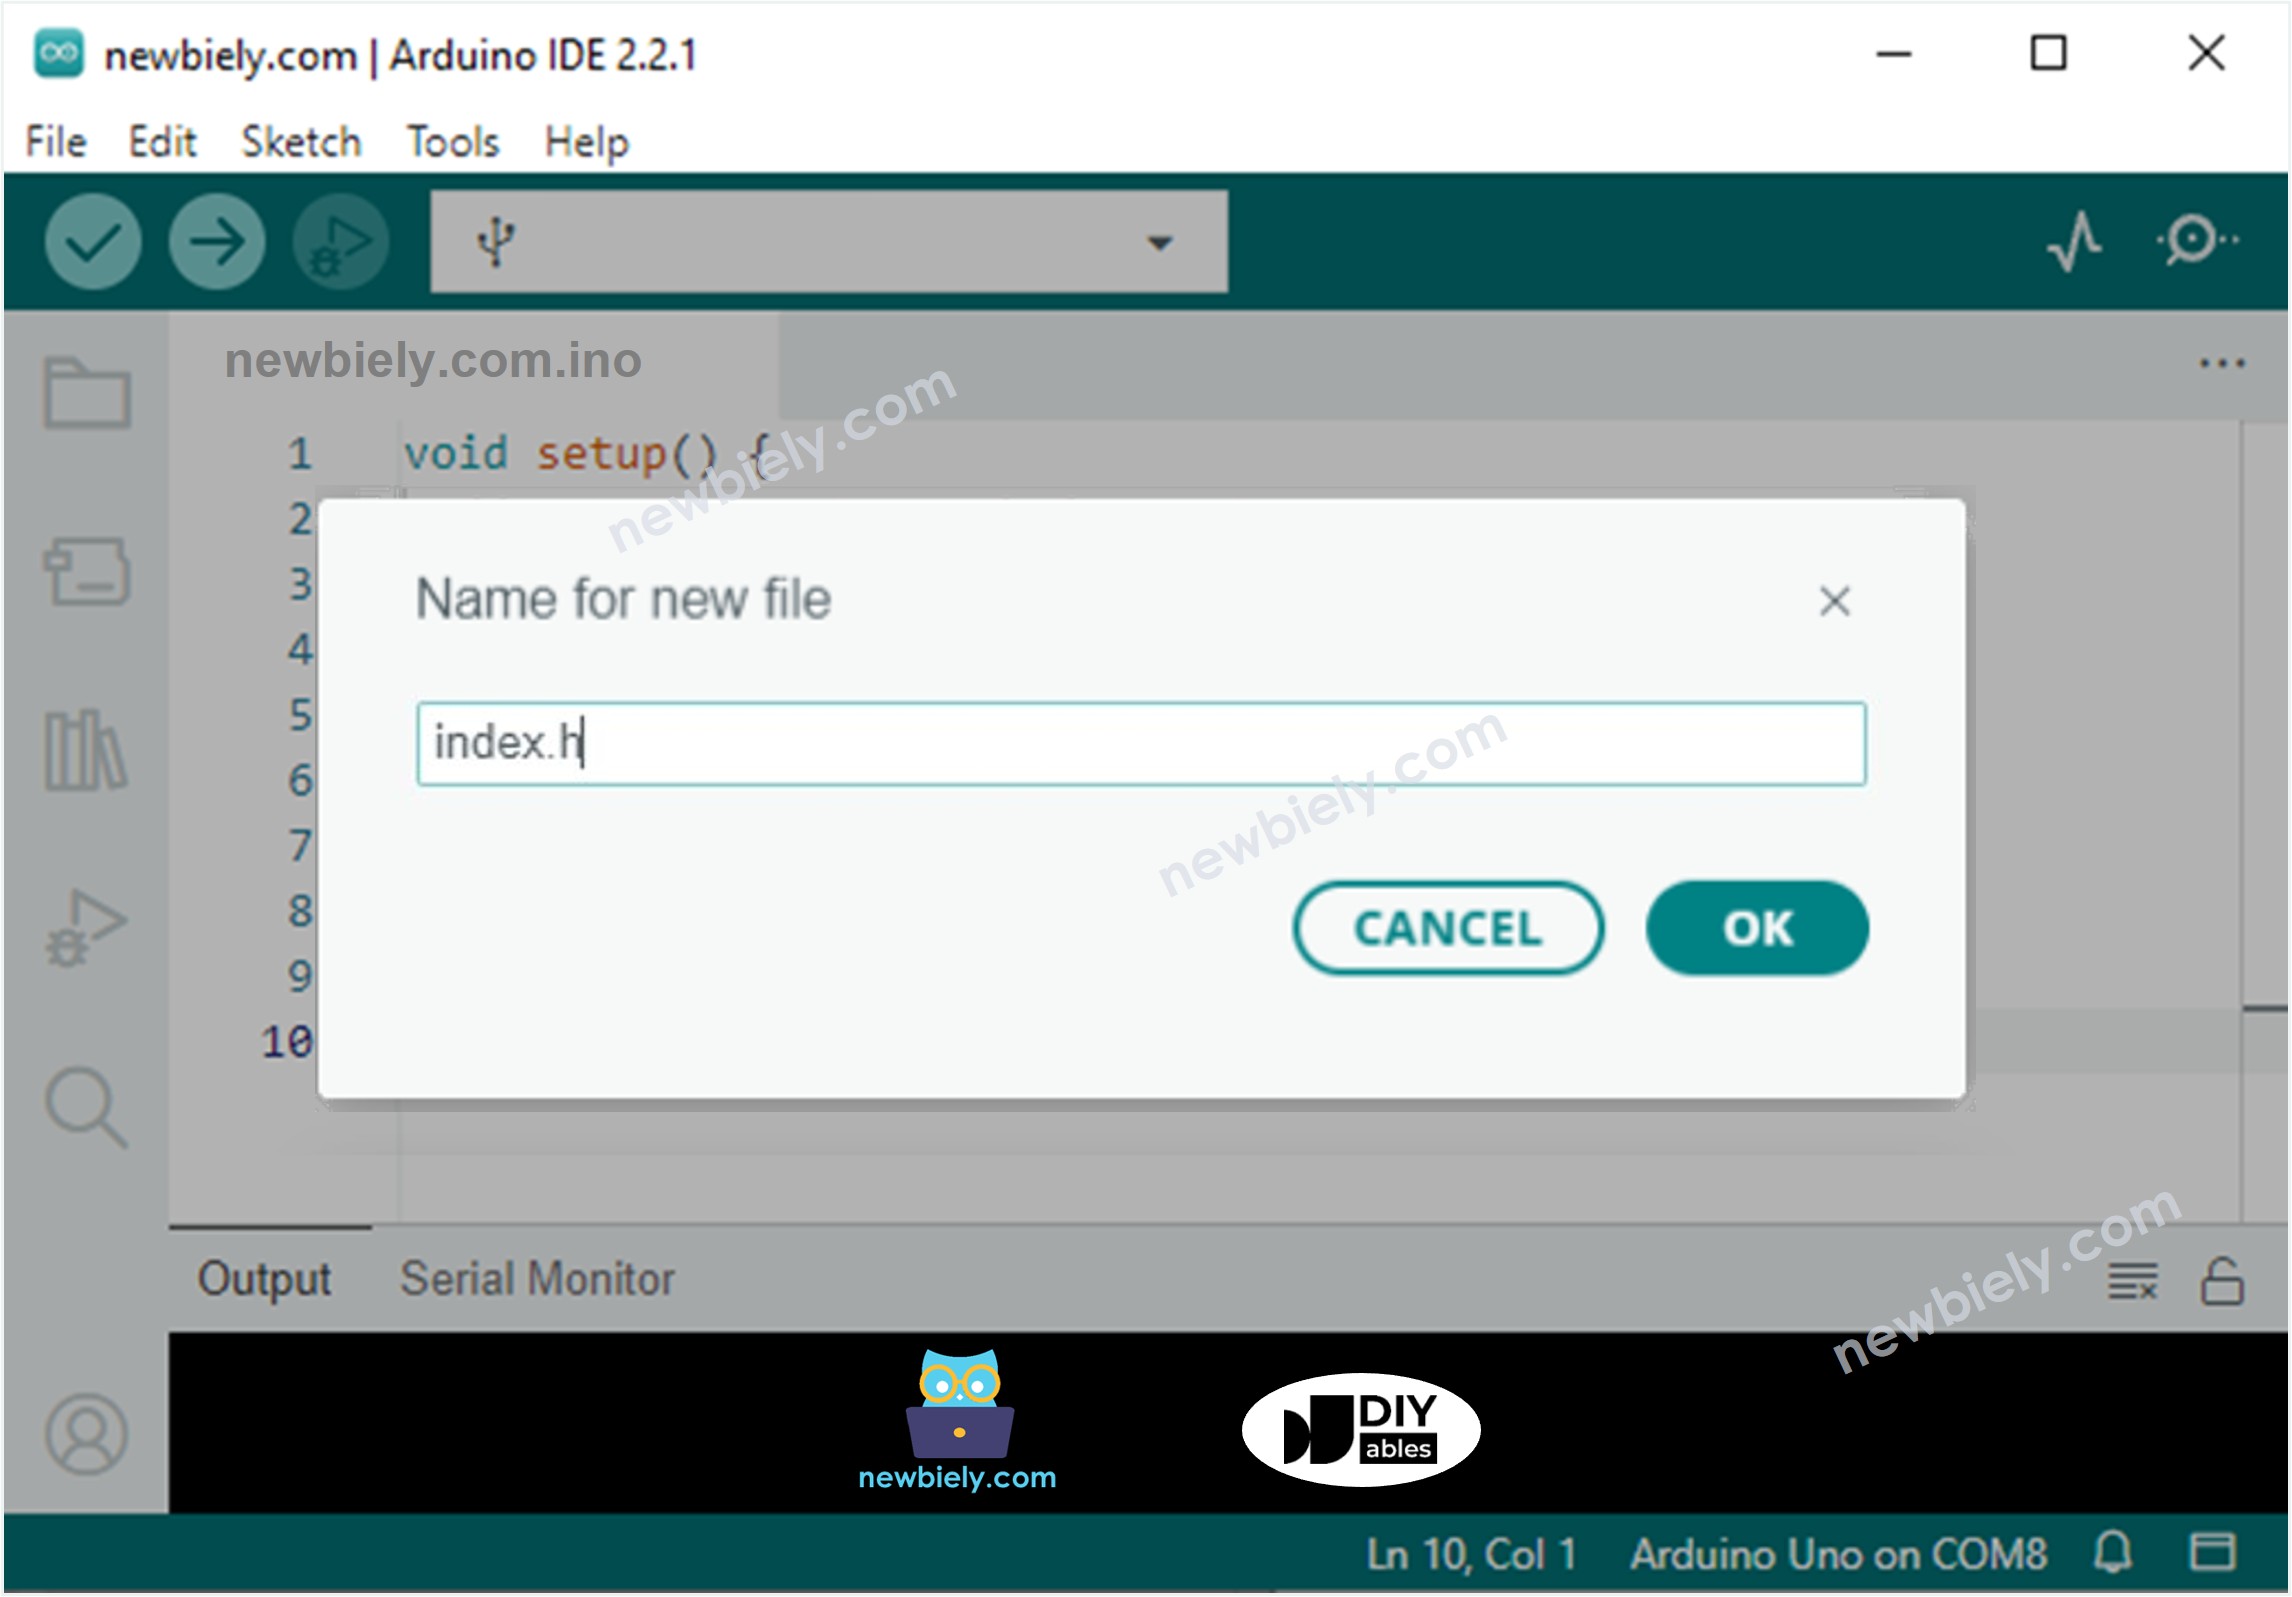
    • Escriba el nombre del archivo index.h y haga clic en el botón OK
    Arduino IDE 2 añade el archivo index.h
    • Copie el código de abajo y péguelo en index.h.
    /* * Este código de ESP8266 NodeMCU fue desarrollado por es.newbiely.com * Este código de ESP8266 NodeMCU se proporciona al público sin ninguna restricción. * Para tutoriales completos y diagramas de cableado, visite: * https://es.newbiely.com/tutorials/esp8266/esp8266-temperature-via-web */ #ifndef WEBPAGE_H #define WEBPAGE_H const char* webpage = R"=====( <!DOCTYPE html> <html> <head> <title>ESP8266 - Web Temperature</title> <meta name="viewport" content="width=device-width, initial-scale=0.7, maximum-scale=0.7"> <meta charset="utf-8"> <link rel="icon" href="https://diyables.io/images/page/diyables.svg"> <style> body { font-family: "Georgia"; text-align: center; font-size: width/2pt;} h1 { font-weight: bold; font-size: width/2pt;} h2 { font-weight: bold; font-size: width/2pt;} button { font-weight: bold; font-size: width/2pt;} </style> <script> var cvs_width = 200, cvs_height = 450; function init() { var canvas = document.getElementById("cvs"); canvas.width = cvs_width; canvas.height = cvs_height + 50; var ctx = canvas.getContext("2d"); ctx.translate(cvs_width/2, cvs_height - 80); fetchTemperature(); setInterval(fetchTemperature, 4000); // Update temperature every 4 seconds } function fetchTemperature() { fetch("/temperature") .then(response => response.text()) .then(data => {update_view(data);}); } function update_view(temp) { var canvas = document.getElementById("cvs"); var ctx = canvas.getContext("2d"); var radius = 70; var offset = 5; var width = 45; var height = 330; ctx.clearRect(-cvs_width/2, -cvs_height + 80, cvs_width, cvs_height + 50); ctx.strokeStyle="blue"; ctx.fillStyle="blue"; //5-step Degree var x = -width/2; ctx.lineWidth=2; for (var i = 0; i <= 100; i+=5) { var y = -(height - radius)*i/100 - radius - 5; ctx.beginPath(); ctx.lineTo(x, y); ctx.lineTo(x - 20, y); ctx.stroke(); } //20-step Degree ctx.lineWidth=5; for (var i = 0; i <= 100; i+=20) { var y = -(height - radius)*i/100 - radius - 5; ctx.beginPath(); ctx.lineTo(x, y); ctx.lineTo(x - 25, y); ctx.stroke(); ctx.font="20px Georgia"; ctx.textBaseline="middle"; ctx.textAlign="right"; ctx.fillText(i.toString(), x - 35, y); } // shape ctx.lineWidth=16; ctx.beginPath(); ctx.arc(0, 0, radius, 0, 2 * Math.PI); ctx.stroke(); ctx.beginPath(); ctx.rect(-width/2, -height, width, height); ctx.stroke(); ctx.beginPath(); ctx.arc(0, -height, width/2, 0, 2 * Math.PI); ctx.stroke(); ctx.fillStyle="#e6e6ff"; ctx.beginPath(); ctx.arc(0, 0, radius, 0, 2 * Math.PI); ctx.fill(); ctx.beginPath(); ctx.rect(-width/2, -height, width, height); ctx.fill(); ctx.beginPath(); ctx.arc(0, -height, width/2, 0, 2 * Math.PI); ctx.fill(); ctx.fillStyle="#ff1a1a"; ctx.beginPath(); ctx.arc(0, 0, radius - offset, 0, 2 * Math.PI); ctx.fill(); temp = Math.round(temp * 100) / 100; var y = (height - radius)*temp/100.0 + radius + 5; ctx.beginPath(); ctx.rect(-width/2 + offset, -y, width - 2*offset, y); ctx.fill(); ctx.fillStyle="red"; ctx.font="bold 34px Georgia"; ctx.textBaseline="middle"; ctx.textAlign="center"; ctx.fillText(temp.toString() + "°C", 0, 100); } window.onload = init; </script> </head> <body> <h1>ESP8266 - Web Temperature</h1> <canvas id="cvs"></canvas> </body> </html> )====="; #endif
    • Ahora tienes el código en dos archivos: newbiely.com.ino y index.h
    • Haz clic en el botón Cargar en el IDE de Arduino para cargar el código al ESP8266
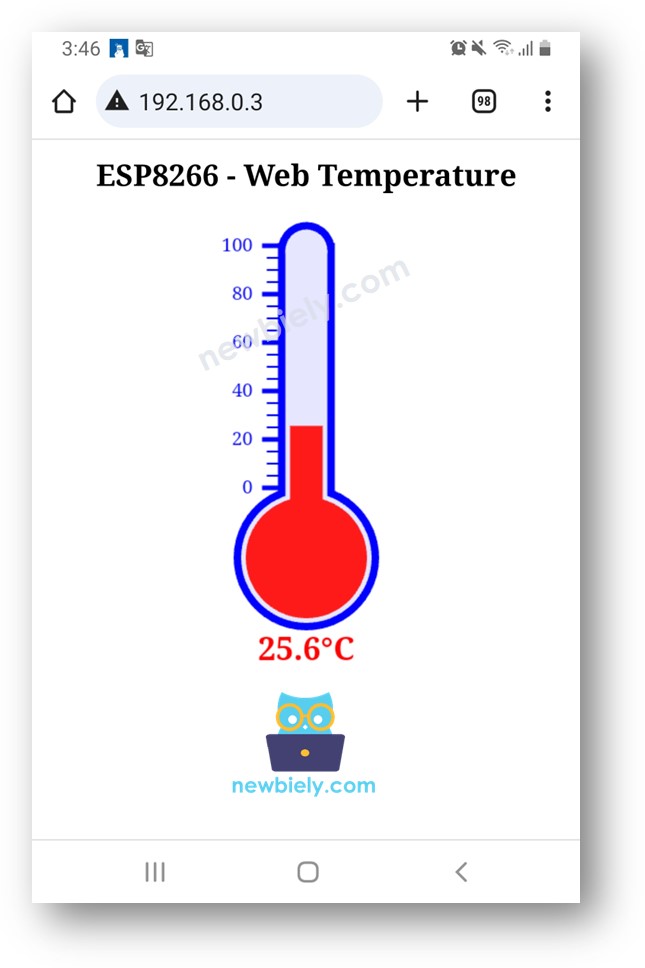
    • Accede a la página web de la placa ESP8266 a través del navegador en tu PC o teléfono móvil como antes. La verás como se muestra a continuación:
    Servidor web de temperatura del ESP8266 NodeMCU

    ※ Nota:

    • Si modificas el contenido HTML en el index.h y no tocas nada en el archivo newbiely.com.ino, cuando compiles y cargues el código en ESP8266, el IDE de Arduino no actualizará el contenido HTML.
    • Para que el IDE de Arduino actualice el contenido HTML en este caso, realiza un cambio en el archivo newbiely.com.ino (por ejemplo, agregar una línea vacía, añadir un comentario...).

※ NUESTROS MENSAJES

  • No dude en compartir el enlace de este tutorial. Sin embargo, por favor no use nuestro contenido en otros sitios web. Hemos invertido mucho esfuerzo y tiempo en crear el contenido, ¡por favor respete nuestro trabajo!