Arduino Nano - Servidor web

En esta guía, te mostraremos cómo programar una placa Arduino Nano con un módulo Ethernet para actuar como servidor web. Podrás ver datos y controlar el Arduino Nano a través de páginas web accesibles desde tu computadora o teléfono inteligente. Empezaremos con tareas simples y pasaremos a tareas más avanzadas, como se describe a continuación:

Arduino Nano relé navegador web

Hardware Requerido

1×Official Arduino Nano
1×Alternatively, DIYables ATMEGA328P Nano Development Board
1×Cable USB A a Mini-B
1×W5500 Ethernet Module
1×Ethernet Cable
1×Cables Puente
1×Protoboard
1×(Recomendado) Placa de Expansión de Terminales de Tornillo para Arduino Nano
1×(Recomendado) Placa de Expansión Breakout para Arduino Nano
1×(Recomendado) Divisor de Alimentación para Arduino Nano

Or you can buy the following kits:

1×DIYables Sensor Kit (30 sensors/displays)
1×DIYables Sensor Kit (18 sensors/displays)
Divulgación: Algunos de los enlaces proporcionados en esta sección son enlaces de afiliado de Amazon. Podemos recibir una comisión por las compras realizadas a través de estos enlaces sin costo adicional para usted. Apreciamos su apoyo.

Diagrama de cableado entre Arduino Nano y el módulo Ethernet W5500

Diagrama de cableado del módulo Ethernet para Arduino Nano

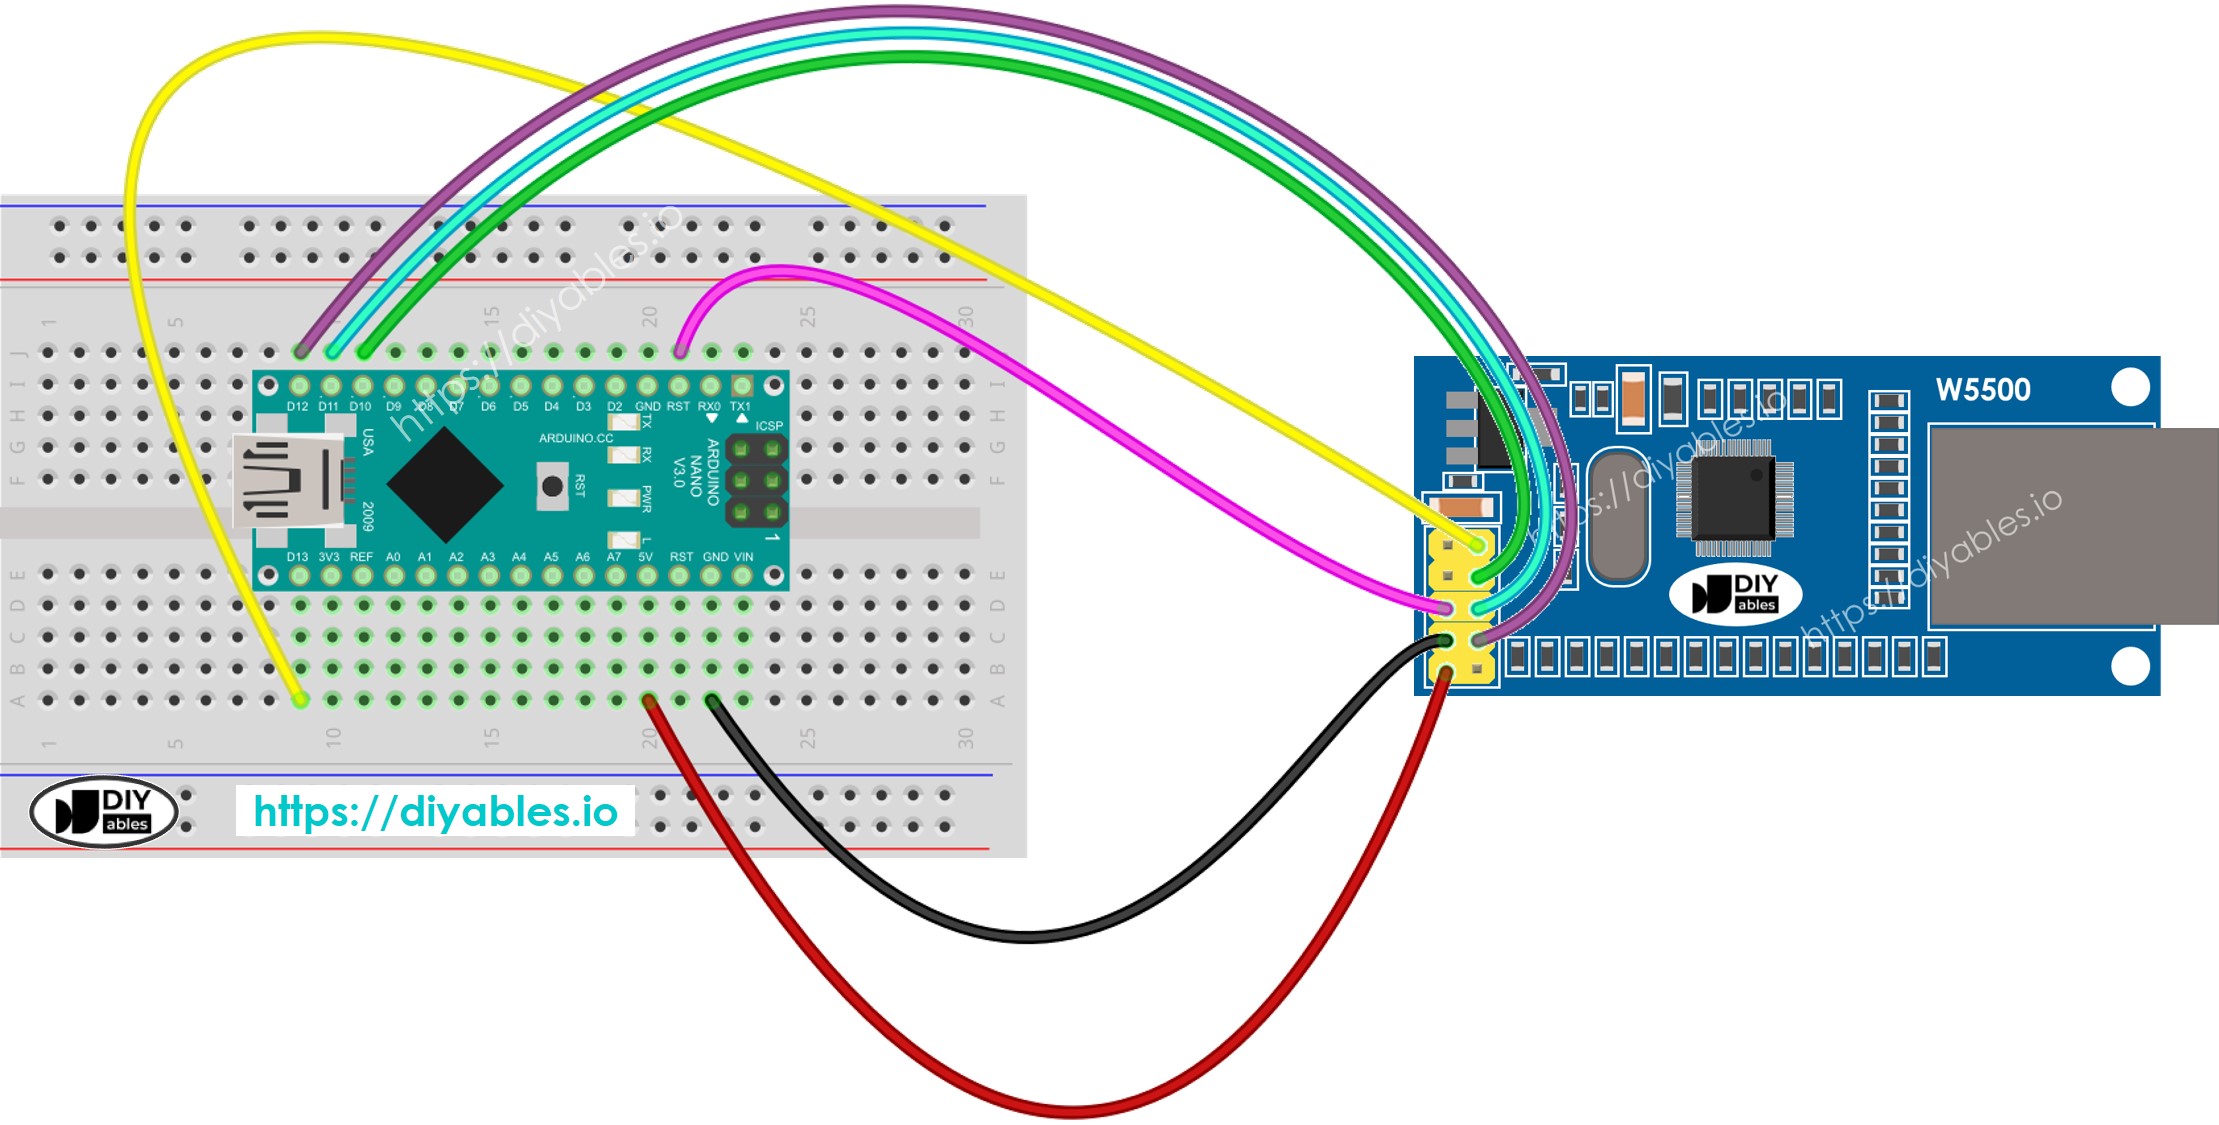
This image is created using Fritzing. Click to enlarge image

Ver La mejor forma de alimentar Arduino Nano y otros componentes.

image source: diyables.io

Servidor Web de Arduino Nano - Hola Mundo

Esto es relativamente simple. El código para Arduino Nano realiza las siguientes tareas:

  • Crear un servidor web que escuche solicitudes HTTP desde un navegador web.
  • Al recibir una solicitud de un navegador web, el Arduino Nano responde con la siguiente información:
    • Cabecera HTTP
    • Cuerpo HTTP: incluye "Hello World!".

    A continuación se muestra el código de Arduino Nano que realiza las tareas anteriores:

    /* * Este código de Arduino Nano fue desarrollado por es.newbiely.com * Este código de Arduino Nano se proporciona al público sin ninguna restricción. * Para tutoriales completos y diagramas de cableado, visite: * https://es.newbiely.com/tutorials/arduino-nano/arduino-nano-web-server */ #include <SPI.h> #include <Ethernet.h> // MAC address for the Ethernet module, you can modify it as needed byte mac[] = { 0xDE, 0xAD, 0xBE, 0xEF, 0xFE, 0xED }; IPAddress ip(192, 168, 1, 177); // Set a static IP address EthernetServer server(80); // Create an Ethernet server that listens on port 80 void setup() { //Initialize serial communication: Serial.begin(9600); // Start the Ethernet connection: if (Ethernet.begin(mac) == 0) { Serial.println(F("Failed to configure Ethernet using DHCP")); // Try with a static IP: Ethernet.begin(mac, ip); } // Start the server: server.begin(); // Print the Ethernet board's IP address: Serial.print(F("Arduino Nano Web Server's IP address: ")); Serial.println(Ethernet.localIP()); } void loop() { // Listen for incoming clients EthernetClient client = server.available(); if (client) { // read the HTTP request header line by line while (client.connected()) { if (client.available()) { String HTTP_header = client.readStringUntil('\n'); // read the header line of HTTP request if (HTTP_header.equals("\r")) // the end of HTTP request break; Serial.print(F("<< ")); Serial.println(HTTP_header); // print HTTP request to Serial Monitor } } // send the HTTP response // send the HTTP response header client.println(F("HTTP/1.1 200 OK")); client.println(F("Content-Type: text/html")); client.println(F("Connection: close")); // the connection will be closed after completion of the response client.println(); // the separator between HTTP header and body // send the HTTP response body client.println(F("<!DOCTYPE HTML>")); client.println(F("<html>")); client.println(F("<head>")); client.println(F("<link rel=\"icon\" href=\"data:,\">")); client.println(F("</head>")); client.println(F("<p>")); client.println(F("Hello World!")); client.println(F("</p>")); client.println(F("</html>")); client.flush(); // give the web browser time to receive the data delay(10); // close the connection: client.stop(); } }

    Pasos R\u00e1pidos

    • Conecta el Arduino Nano al módulo Ethernet según el diagrama de cableado anterior.
    • Conecta un cable Ethernet al módulo Ethernet.
    • Conecta el Arduino Nano a un PC usando un cable USB.
    • Abre el IDE de Arduino en tu PC.
    • Selecciona la placa Arduino Nano y el puerto COM correspondiente
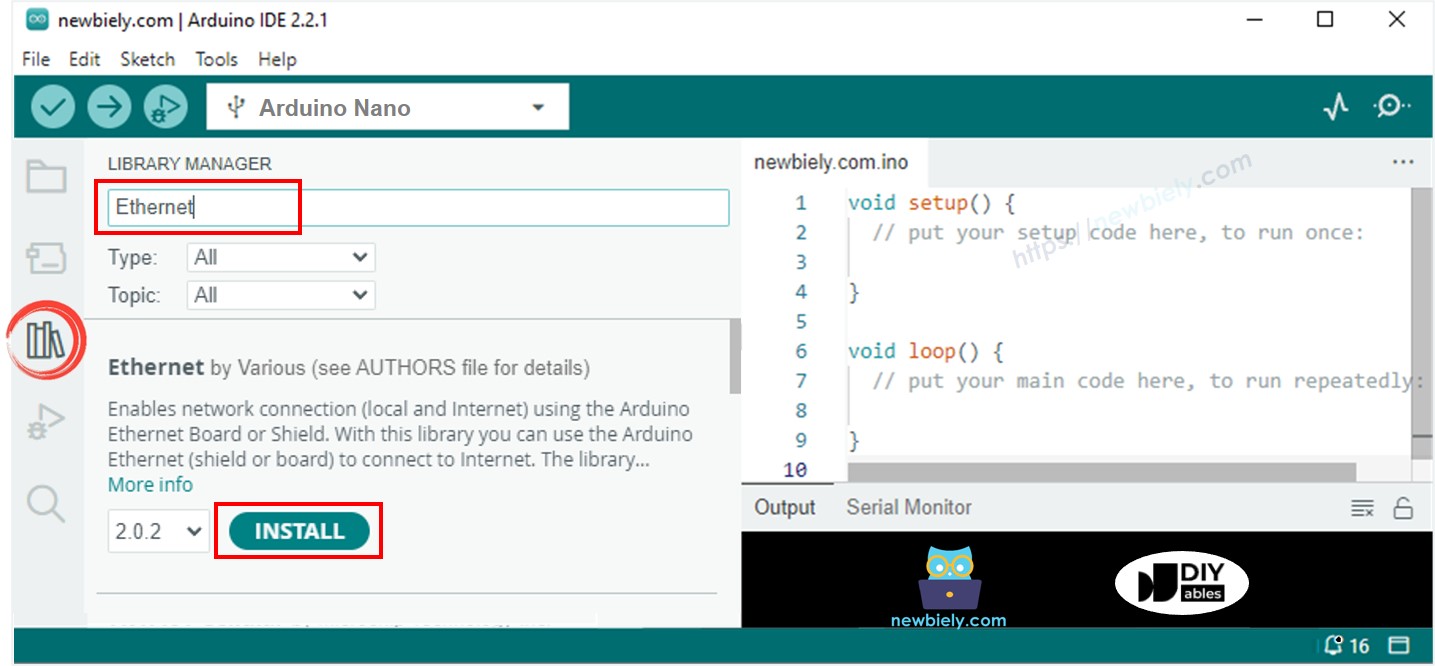
    • Haz clic en el icono Bibliotecas en la barra izquierda del IDE de Arduino.
    • Busca “Ethernet”, luego encuentra la librería Ethernet de Various
    • Haz clic en el botón Instalar para instalar la biblioteca Ethernet.
    Biblioteca Ethernet para Arduino Nano
    • Copia el código anterior y ábrelo con Arduino IDE
    • Haz clic en el botón Subir en Arduino IDE para cargar el código al Arduino Nano
    • Abre el Monitor Serial
    • Revisa el resultado en el Monitor Serial.
    COM6
    Send
    Arduino Nano Web Server's IP address: 192.168.0.3
    Autoscroll Show timestamp
    Clear output
    9600 baud  
    Newline  
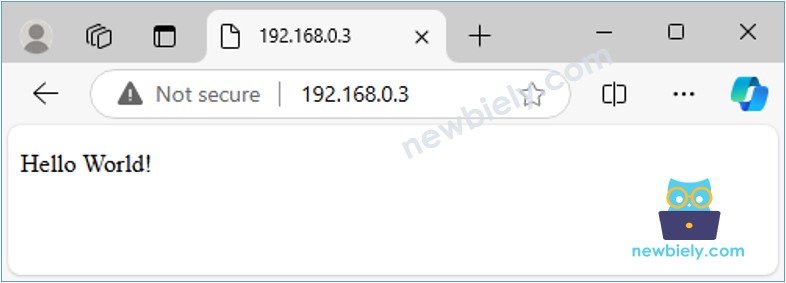
    • Anota la dirección IP que se muestra e introduce la dirección IP en la barra de direcciones de un navegador web en tu teléfono inteligente o PC.
    • A continuación verás la siguiente salida en el Monitor Serial.
    COM6
    Send
    Arduino Nano Web Server's IP address: 192.168.0.3 << GET / HTTP/1.1 << Host: 192.168.0.3 << Connection: keep-alive << Upgrade-Insecure-Requests: 1 << User-Agent: Mozilla/5.0 (Windows NT 10.0; Win64; x64) AppleWebKit/537.36 (KHTML, like Gecko) Chrome/129.0.0.0 Safari/537.36 Edg/129.0.0.0 << Accept: text/html,application/xhtml+xml,application/xml;q=0.9,image/avif,image/webp,image/apng,*/*;q=0.8,application/signed-exchange;v=b3;q=0.7 << Accept-Encoding: gzip, deflate << Accept-Language: en-US,en;q=0.9,ko;q=0.8
    Autoscroll Show timestamp
    Clear output
    9600 baud  
    Newline  
    • Una vez que accedas al navegador web usando la dirección IP, verás una página web simple que mostrará "¡Hola, mundo!". La página se verá así:
    Servidor web de Arduino Nano Hola Mundo

Arduino Nano Servidor Web - Monitoreo de valores de sensores a través de una página web.

El código de Arduino Nano a continuación realiza las siguientes tareas:

  • Crear un servidor web que escuche las solicitudes HTTP de un navegador web.
  • Al recibir una solicitud de un navegador web, el Arduino Nano responde con la siguiente información:
    • Cabecera HTTP
    • Cuerpo HTTP: Esto incluye contenido HTML y CSS y el valor leído desde el sensor.
    /* * Este código de Arduino Nano fue desarrollado por es.newbiely.com * Este código de Arduino Nano se proporciona al público sin ninguna restricción. * Para tutoriales completos y diagramas de cableado, visite: * https://es.newbiely.com/tutorials/arduino-nano/arduino-nano-web-server */ #include <SPI.h> #include <Ethernet.h> // MAC address for the Ethernet module, you can modify it as needed byte mac[] = { 0xDE, 0xAD, 0xBE, 0xEF, 0xFE, 0xED }; IPAddress ip(192, 168, 1, 177); // Set a static IP address EthernetServer server(80); // Create an Ethernet server that listens on port 80 float getTemperature() { // YOUR SENSOR IMPLEMENTATION HERE // simulate the temperature value float temp_x100 = random(0, 10000); // a random value from 0 to 10000 return temp_x100 / 100; // return the simulated temperature value from 0 to 100 in float } void setup() { //Initialize serial communication: Serial.begin(9600); // Start the Ethernet connection: if (Ethernet.begin(mac) == 0) { Serial.println(F("Failed to configure Ethernet using DHCP")); // Try with a static IP: Ethernet.begin(mac, ip); } // Start the server: server.begin(); // Print the Ethernet board's IP address: Serial.print(F("Server is at: ")); Serial.println(Ethernet.localIP()); } void loop() { // Listen for incoming clients EthernetClient client = server.available(); if (client) { // read the HTTP request header line by line while (client.connected()) { if (client.available()) { String HTTP_header = client.readStringUntil('\n'); // read the header line of HTTP request if (HTTP_header.equals("\r")) // the end of HTTP request break; Serial.print(F("<< ")); Serial.println(HTTP_header); // print HTTP request to Serial Monitor } } // send the HTTP response // send the HTTP response header client.println(F("HTTP/1.1 200 OK")); client.println(F("Content-Type: text/html")); client.println(F("Connection: close")); // the connection will be closed after completion of the response client.println(); // the separator between HTTP header and body // send the HTTP response body client.println(F("<!DOCTYPE HTML>")); client.println(F("<html>")); client.println(F("<head>")); client.println(F("<link rel=\"icon\" href=\"data:,\">")); client.println(F("</head>")); client.println(F("<p>")); client.print(F("Temperature: <span style=\"color: red;\">")); float temperature = getTemperature(); client.print(temperature, 2); client.println(F("&deg;C</span>")); client.println(F("</p>")); client.println(F("</html>")); client.flush(); // give the web browser time to receive the data delay(10); // close the connection: client.stop(); } }

    Pasos R\u00e1pidos

    • Copia el código anterior y ábrelo en el IDE de Arduino.
    • Haz clic en el botón Subir en el IDE de Arduino para subir el código al Arduino Nano.
    • Recarga la página web anterior (Ctrl + F5), y la verás como se muestra a continuación:
    Monitoreo del servidor web de Arduino Nano

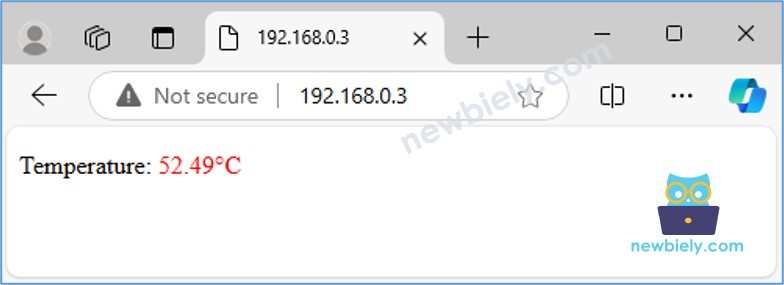
    Con el código proporcionado, para actualizar la temperatura, necesitas recargar la página en el navegador web. En la próxima sección, aprendamos cómo hacer que la página web actualice automáticamente el valor de la temperatura en segundo plano sin recargarla.

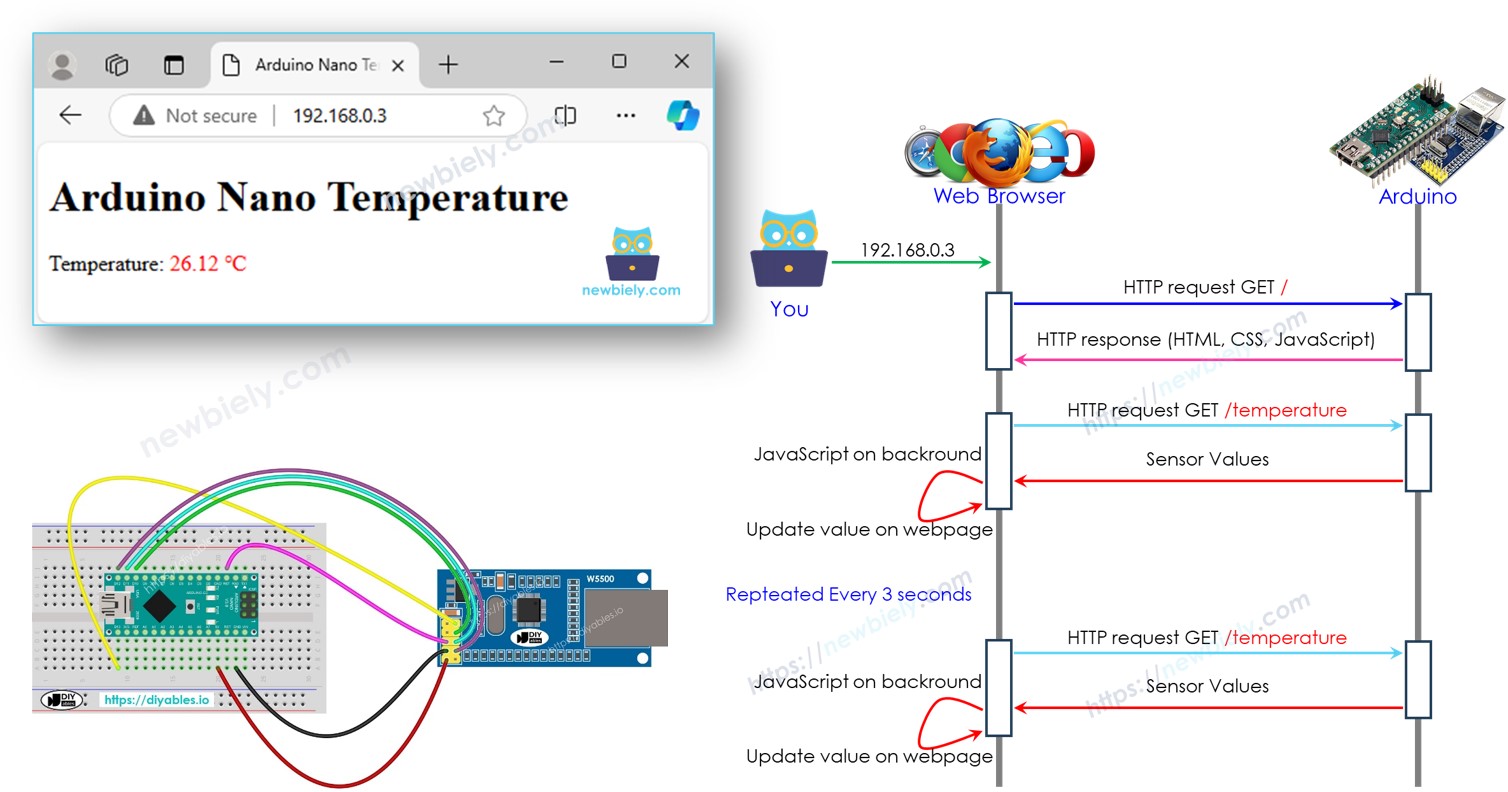
Servidor Web de Arduino Nano - Valores que se actualizan automáticamente en la página web

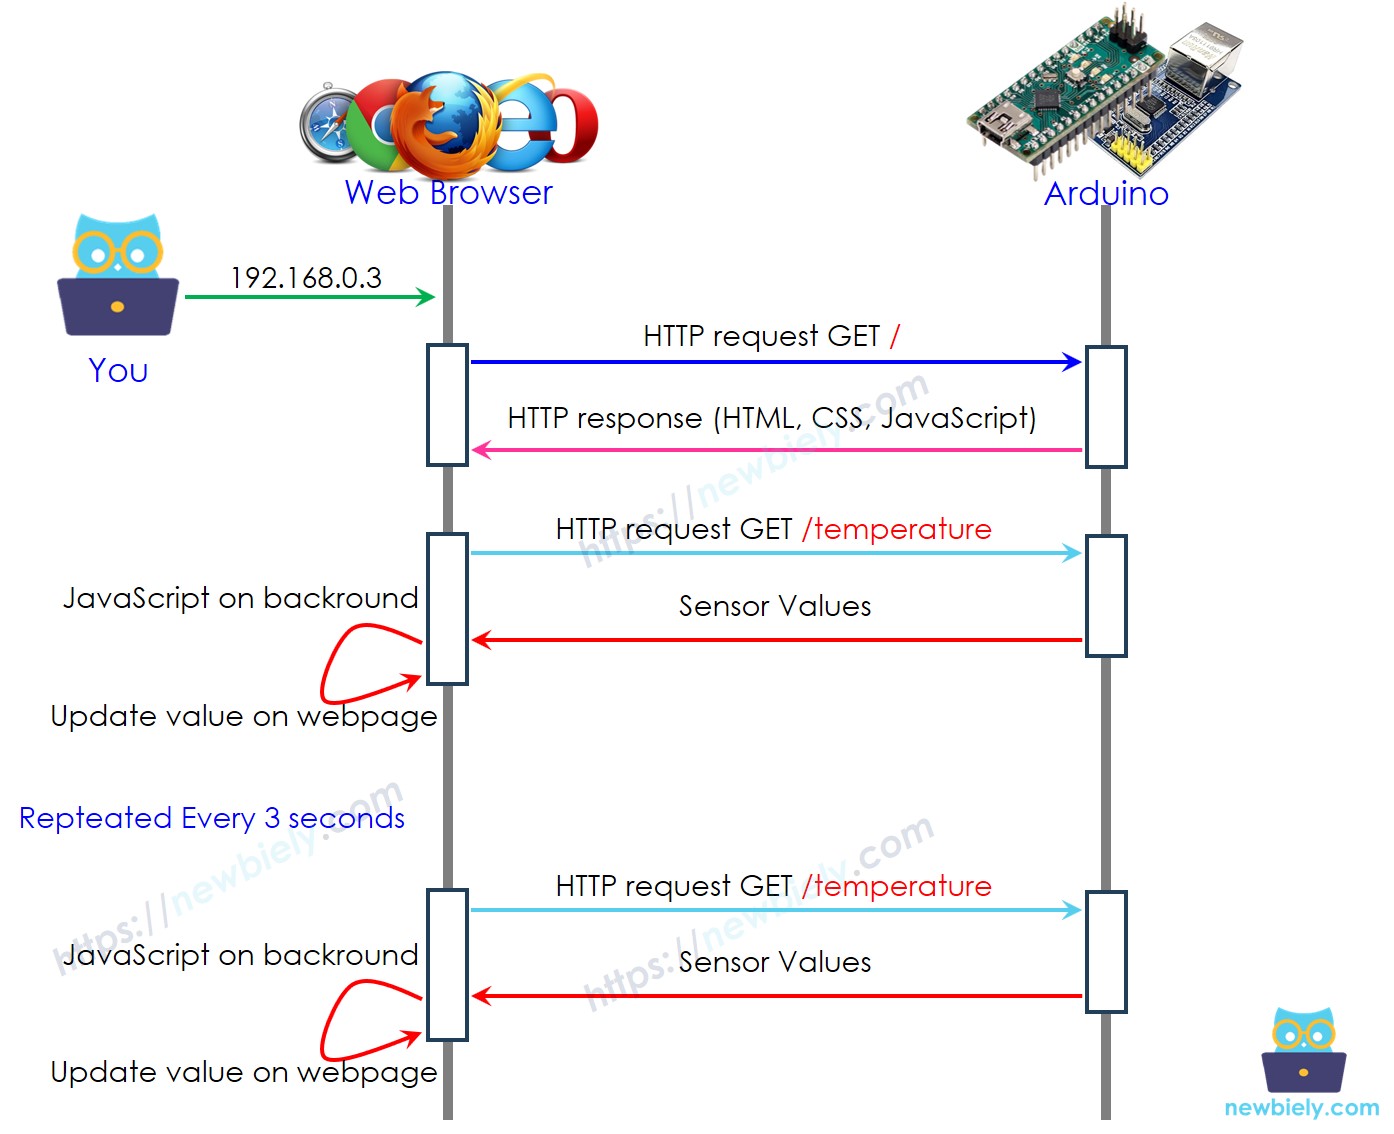
Cómo funciona la actualización automática

  1. El usuario ingresa la dirección IP del Arduino Nano en el navegador web.
  2. El navegador envía una solicitud HTTP a la página de inicio del Arduino Nano (/).
  3. El Arduino responde con HTML, CSS y JavaScript.
  4. El navegador muestra la página web utilizando el HTML y CSS recibidos.
  5. Cada 3 segundos, el navegador ejecuta el código JavaScript, que realiza una solicitud HTTP al punto final /temperature.
  6. El Arduino lee el valor del sensor y lo envía de vuelta como respuesta.
  7. El navegador recibe el valor del sensor y actualiza la página web en consecuencia.
Servidor web de Arduino Nano: cómo funciona

A continuación se muestra el código de Arduino Nano que realiza las tareas anteriores:

/* * Este código de Arduino Nano fue desarrollado por es.newbiely.com * Este código de Arduino Nano se proporciona al público sin ninguna restricción. * Para tutoriales completos y diagramas de cableado, visite: * https://es.newbiely.com/tutorials/arduino-nano/arduino-nano-web-server */ #include <SPI.h> #include <Ethernet.h> // MAC address and IP address for the Ethernet module (modify if necessary) byte mac[] = { 0xDE, 0xAD, 0xBE, 0xEF, 0xFE, 0xED }; IPAddress ip(192, 168, 1, 177); // Static IP address for the Arduino Nano EthernetServer server(80); // Set up the Ethernet server to listen on port 80 const char* HTML_CONTENT = R"=====( <!DOCTYPE html> <html> <head> <title>Arduino Nano Temperature</title> </head> <body> <h1>Arduino Nano Temperature</h1> <p>Temperature: <span style="color: red;"><span id="temperature">Loading...</span> &#8451;</span></p> <script> function fetchTemperature() { fetch("/temperature") .then(response => response.text()) .then(data => { document.getElementById("temperature").textContent = data; }); } fetchTemperature(); setInterval(fetchTemperature, 3000); // Update temperature every 3 seconds </script> </body> </html> )====="; float getTemperature() { // YOUR SENSOR IMPLEMENTATION HERE // simulate the temperature value float temp_x100 = random(0, 10000); // a random value from 0 to 10000 return temp_x100 / 100; // return the simulated temperature value from 0 to 100 in float } void setup() { // Start serial communication Serial.begin(9600); // Start Ethernet connection if (Ethernet.begin(mac) == 0) { Serial.println(F("Failed to configure Ethernet using DHCP")); // Try with a static IP address if DHCP fails Ethernet.begin(mac, ip); } // Start the server server.begin(); // Print the Arduino Nano's IP address Serial.print(F("Arduino Nano Web Server's IP address: ")); Serial.println(Ethernet.localIP()); } void loop() { // Listen for incoming clients EthernetClient client = server.available(); if (client) { Serial.println(F("Client connected")); // Wait until the client sends some data while (client.connected()) { if (client.available()) { // Read the first line of the HTTP request String request = client.readStringUntil('\r'); Serial.print(F("Request: ")); Serial.println(request); client.flush(); // Serve the HTML page from the index.h file if the request is "/" if (request.indexOf("GET / ") >= 0) { client.println(F("HTTP/1.1 200 OK")); client.println(F("Content-Type: text/html")); client.println(F("Connection: close")); // Connection will be closed after the response client.println(); client.println(HTML_CONTENT); // Send the HTML page from index.h } // Serve the temperature data if the request is "/temperature" else if (request.indexOf("GET /temperature") >= 0) { float temperature = getTemperature(); client.println(F("HTTP/1.1 200 OK")); client.println(F("Content-Type: text/plain")); client.println(F("Connection: close")); // Connection will be closed after the response client.println(); client.print(temperature, 2); // Send the temperature as plain text } // Close the connection client.stop(); Serial.println(F("Client disconnected")); } } } }

Pasos R\u00e1pidos

  • Copia el código anterior y ábrelo en el IDE de Arduino.
  • Haz clic en el botón Subir en el IDE de Arduino para subir el código al Arduino Nano.
  • Recarga la página web anterior (Ctrl + F5), y la verás como se muestra a continuación:
Recarga automática del servidor web de Arduino Nano

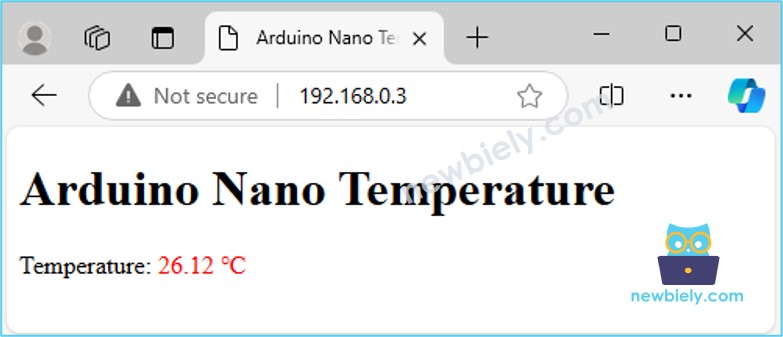
Verás que el valor se actualiza automáticamente cada 3 segundos.

Separar contenido HTML en otro archivo en el IDE de Arduino

Si quieres crear una página web simple con contenido mínimo, puedes incrustar el código HTML directamente en el código para Arduino Nano, como se explicó anteriormente.

Sin embargo, para páginas web más complejas y ricas en funciones, incrustar todo el HTML, CSS y JavaScript directamente en el código del Arduino Nano puede volverse engorroso. En tales casos, es mejor utilizar un enfoque diferente para gestionar el código:

  • El código de Arduino Nano seguirá almacenándose en un archivo .ino como de costumbre.
  • El contenido de la página web (HTML, CSS, JavaScript) se colocará en un archivo .h separado. Esta separación facilita la gestión y actualización de la página web sin desordenar el código de Arduino.

Pasos R\u00e1pidos

  • Abre el IDE de Arduino y crea un nuevo sketch. Ponle un nombre, por ejemplo, newbiely.com.ino.
  • Copia el código proporcionado a continuación y pégalo en el archivo creado.
/* * Este código de Arduino Nano fue desarrollado por es.newbiely.com * Este código de Arduino Nano se proporciona al público sin ninguna restricción. * Para tutoriales completos y diagramas de cableado, visite: * https://es.newbiely.com/tutorials/arduino-nano/arduino-nano-web-server */ #include <SPI.h> #include <Ethernet.h> #include "index.h" // Include the index.h file // MAC address and IP address for the Ethernet module (modify if necessary) byte mac[] = { 0xDE, 0xAD, 0xBE, 0xEF, 0xFE, 0xED }; IPAddress ip(192, 168, 1, 177); // Static IP address for the Arduino Nano EthernetServer server(80); // Set up the Ethernet server to listen on port 80 float getTemperature() { // YOUR SENSOR IMPLEMENTATION HERE // simulate the temperature value float temp_x100 = random(0, 10000); // a random value from 0 to 10000 return temp_x100 / 100; // return the simulated temperature value from 0 to 100 in float } void setup() { // Start serial communication Serial.begin(9600); // Start Ethernet connection if (Ethernet.begin(mac) == 0) { Serial.println(F("Failed to configure Ethernet using DHCP")); // Try with a static IP address if DHCP fails Ethernet.begin(mac, ip); } // Start the server server.begin(); // Print the Arduino Nano's IP address Serial.print(F("Arduino Nano Web Server's IP address: ")); Serial.println(Ethernet.localIP()); } void loop() { // Listen for incoming clients EthernetClient client = server.available(); if (client) { Serial.println(F("Client connected")); // Wait until the client sends some data while (client.connected()) { if (client.available()) { // Read the first line of the HTTP request String request = client.readStringUntil('\r'); Serial.print(F("Request: ")); Serial.println(request); client.flush(); // Serve the HTML page from the index.h file if the request is "/" if (request.indexOf("GET / ") >= 0) { client.println(F("HTTP/1.1 200 OK")); client.println(F("Content-Type: text/html")); client.println(F("Connection: close")); // Connection will be closed after the response client.println(); client.println(HTML_CONTENT); // Send the HTML page from index.h } // Serve the temperature data if the request is "/temperature" else if (request.indexOf("GET /temperature") >= 0) { float temperature = getTemperature(); client.println(F("HTTP/1.1 200 OK")); client.println(F("Content-Type: text/plain")); client.println(F("Connection: close")); // Connection will be closed after the response client.println(); client.print(temperature, 2); // Send the temperature as plain text } // Close the connection client.stop(); Serial.println(F("Client disconnected")); } } } }
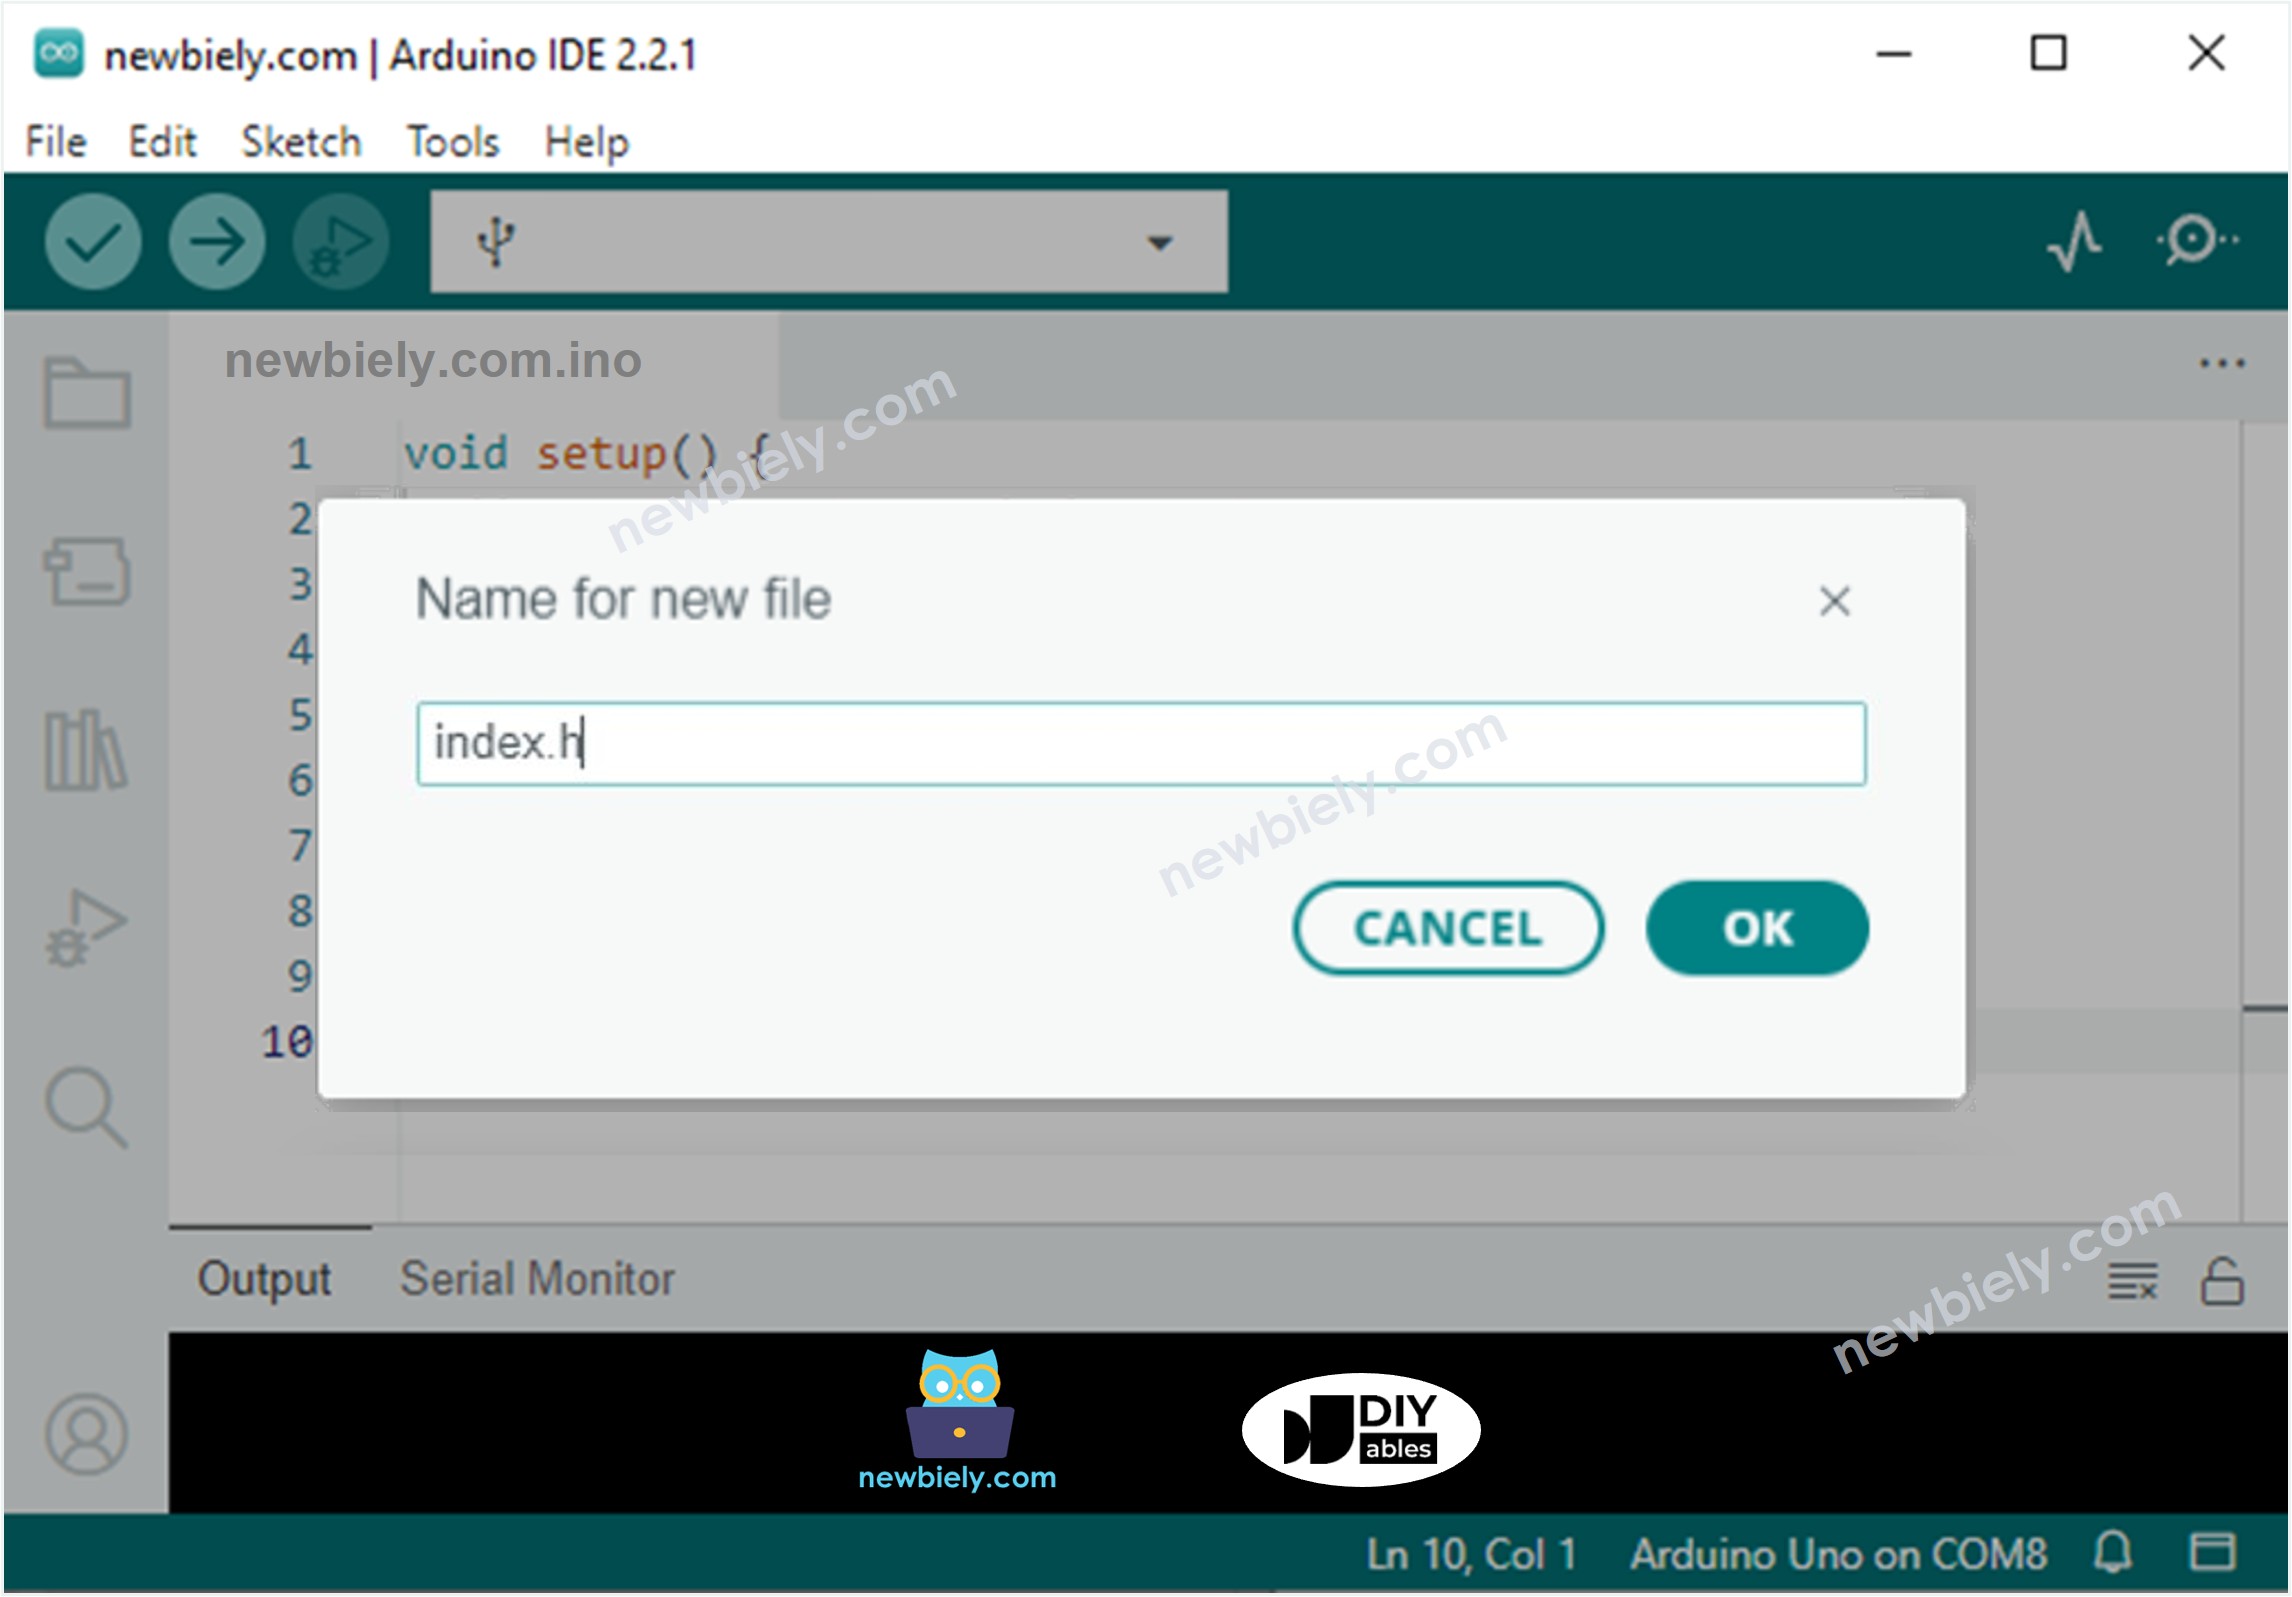
  • Crea el archivo index.h en el IDE de Arduino mediante:
Arduino IDE 2 añade un archivo
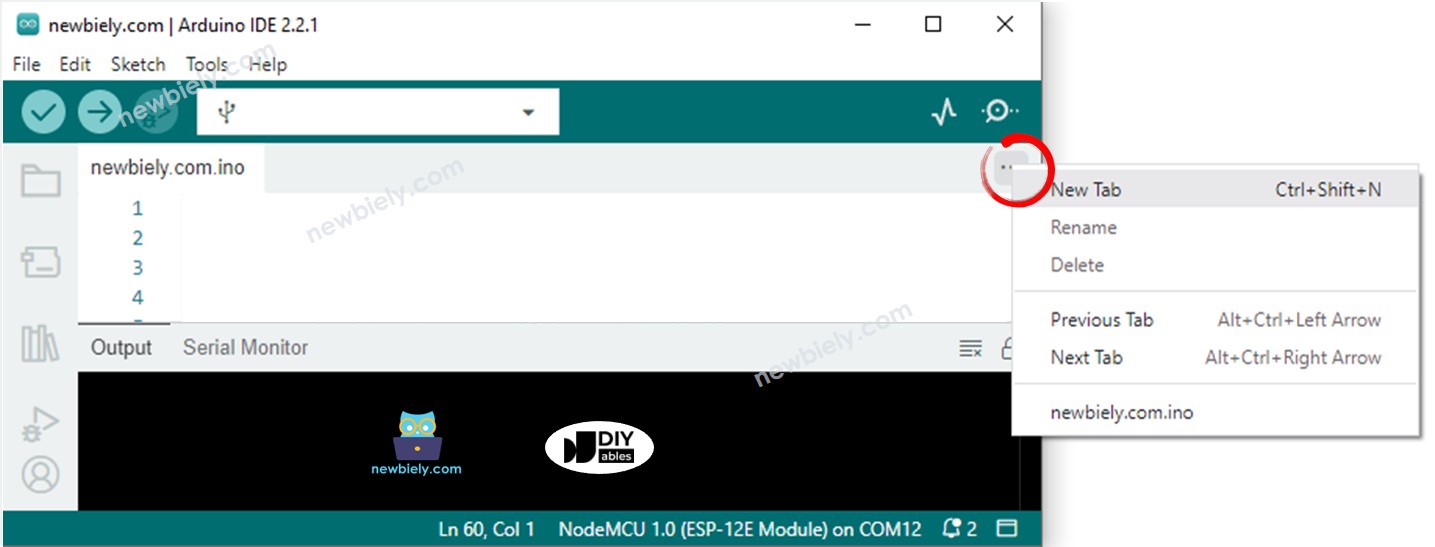
  • Haz clic en el botón justo debajo del icono del monitor serie y elige Nueva pestaña, o usa las teclas Ctrl+Shift+N.
  • Indica el nombre del archivo index.h y haz clic en el botón Aceptar
Arduino IDE 2 añade el archivo index.h
  • Copia el código que aparece a continuación y pégalo en el index.h.
/* * Este código de Arduino Nano fue desarrollado por es.newbiely.com * Este código de Arduino Nano se proporciona al público sin ninguna restricción. * Para tutoriales completos y diagramas de cableado, visite: * https://es.newbiely.com/tutorials/arduino-nano/arduino-nano-web-server */ /* * This Arduino Nano code was developed by newbiely.com * * This Arduino Nano code is made available for public use without any restriction * * For comprehensive instructions and wiring diagrams, please visit: * http://localhost/web/newbiely.com/public/tutorials/arduino-nano-esp32/arduino-nano-esp32-web-server */ #ifndef WEBPAGE_H #define WEBPAGE_H const char* HTML_CONTENT = R"=====( <!DOCTYPE html> <html> <head> <title>Arduino Nano Temperature</title> </head> <body> <h1>Arduino Nano Temperature</h1> <p>Temperature: <span style="color: red;"><span id="temperature">Loading...</span> &#8451;</span></p> <script> function fetchTemperature() { fetch("/temperature") .then(response => response.text()) .then(data => { document.getElementById("temperature").textContent = data; }); } fetchTemperature(); setInterval(fetchTemperature, 3000); // Update temperature every 3 seconds </script> </body> </html> )====="; #endif
  • Ahora tienes el código en dos archivos: newbiely.com.ino y index.h
  • Haz clic en el botón Subir en el IDE de Arduino para subir el código al Arduino Nano
  • Recarga la página web (usando Ctrl + F5), y se verá igual que antes

※ Nota:

  • Si actualizas el contenido HTML en el archivo index.h sin cambiar nada en el archivo newbiely.com.ino, el IDE de Arduino no actualizará ni incluirá el contenido HTML actualizado cuando compiles y cargues el código al Arduino Nano.
  • Para asegurar que el IDE de Arduino actualice el contenido HTML, debes hacer un pequeño cambio en el archivo newbiely.com.ino, como añadir una línea en blanco o un comentario. Esto obliga al IDE a detectar los cambios, asegurando que el contenido HTML actualizado se incluya en la subida.

Controlando el Arduino Nano a través de la web

Controlar algo conectado al Arduino Nano es un poco más desafiante que simplemente leer un valor. Eso se debe a que Arduino Nano tiene que entender la solicitud que recibe del navegador web para saber qué acción tomar.

Para un ejemplo más completo y detallado, recomiendo consultar los tutoriales que se enumeran a continuación:

Tutoriales Relacionados

※ NUESTROS MENSAJES

  • No dude en compartir el enlace de este tutorial. Sin embargo, por favor no use nuestro contenido en otros sitios web. Hemos invertido mucho esfuerzo y tiempo en crear el contenido, ¡por favor respete nuestro trabajo!