Arduino Nano - Conteo de botones - OLED

Este tutorial explica cómo usar Arduino Nano y un botón para contar los eventos de pulsación y luego mostrar el valor en una pantalla OLED. En detalle:

En este tutorial, eliminaremos el rebote del botón sin usar la función delay(). Para obtener más información, consulte ¿Por qué necesitamos el anti-rebote?

Puedes modificar esto para que funcione con diferentes sensores en lugar del botón.

Acerca de OLED y Botón

Si no estás familiarizado con la pantalla OLED y con un botón (conexión de pines, funcionalidad, programación, etc.), los siguientes tutoriales pueden ayudar:

Diagrama de Cableado

Diagrama de cableado de Arduino Nano con botón y OLED

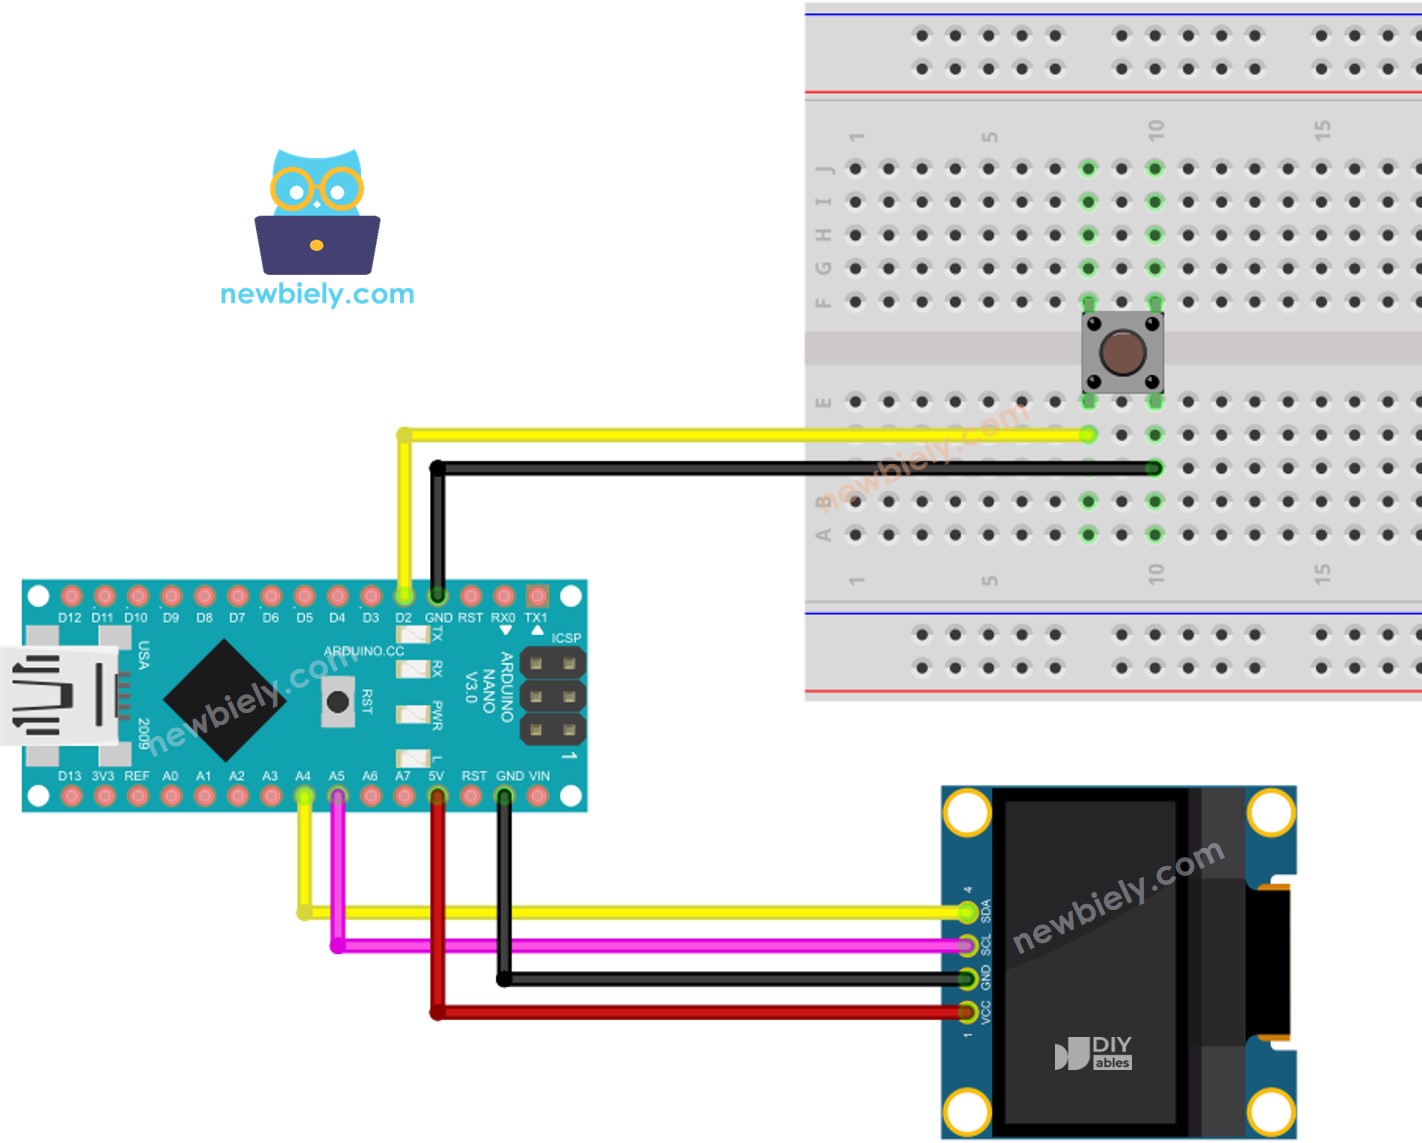
This image is created using Fritzing. Click to enlarge image

Ver La mejor forma de alimentar Arduino Nano y otros componentes.

Código de Arduino Nano - mostrando el conteo de botones en OLED

/* * Este código de Arduino Nano fue desarrollado por es.newbiely.com * Este código de Arduino Nano se proporciona al público sin ninguna restricción. * Para tutoriales completos y diagramas de cableado, visite: * https://es.newbiely.com/tutorials/arduino-nano/arduino-nano-button-count-oled */ #include <Wire.h> #include <Adafruit_GFX.h> #include <Adafruit_SSD1306.h> #include <ezButton.h> #define OLED_WIDTH 128 // OLED display width, in pixels #define OLED_HEIGHT 64 // OLED display height, in pixels Adafruit_SSD1306 oled(OLED_WIDTH, OLED_HEIGHT, &Wire, -1); // create SSD1306 display object connected to I2C ezButton button(2); // create ezButton object for pin D2 unsigned long prev_count = 0; void setup() { Serial.begin(9600); // initialize OLED display with address 0x3C for 128x64 if (!oled.begin(SSD1306_SWITCHCAPVCC, 0x3C)) { Serial.println(F("SSD1306 allocation failed")); while (true); } delay(2000); // wait for initializing oled.clearDisplay(); // clear display oled.setTextSize(2); // text size oled.setTextColor(WHITE); // text color oled.setCursor(0, 10); // position to display button.setDebounceTime(50); // set debounce time to 50 milliseconds button.setCountMode(COUNT_FALLING); } void loop() { button.loop(); // MUST call the loop() function first unsigned long count = button.getCount(); if (prev_count != count) { Serial.println(count); // print count to Serial Monitor oled.clearDisplay(); // clear display oled.println(count); // display count oled.display(); // show on OLED prev_count != count; } }

Pasos R\u00e1pidos

  • Haz clic en el icono de Bibliotecas en la barra izquierda del IDE de Arduino.
  • Busca “ezButton”, luego localiza la biblioteca de botones creada por ArduinoGetStarted.
  • Pulsa el botón Instalar para instalar la biblioteca ezButton.
Librería de botones para Arduino Nano
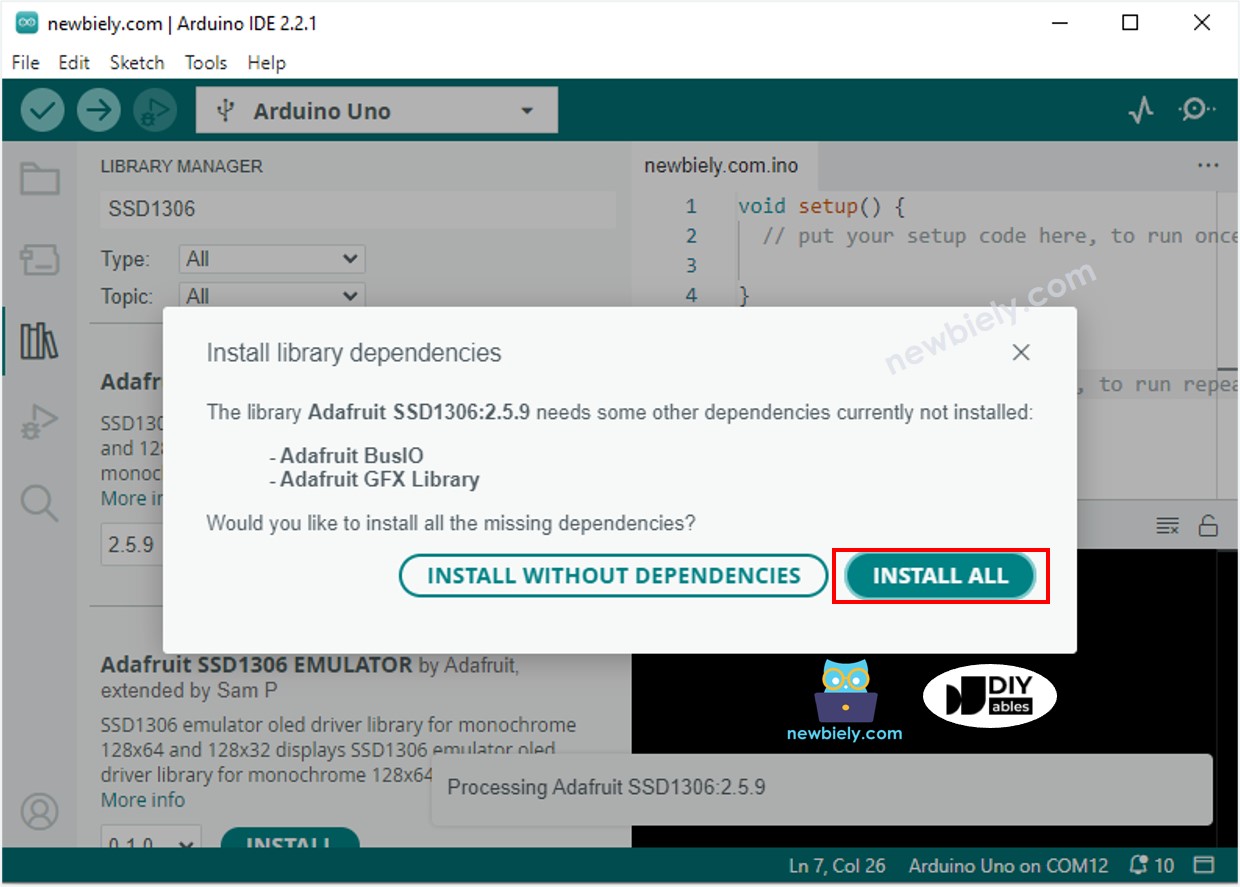
  • Busca “SSD1306” y localiza la biblioteca SSD1306 creada por Adafruit.
  • Luego, pulsa el botón Instalar para completar la instalación.
Biblioteca OLED para Arduino Nano
  • Se le pedirá que instale dependencias de bibliotecas adicionales.
  • Para instalarlas todas, haga clic en el botón Instalar todo.
Biblioteca de sensores Adafruit GFX para Arduino Nano
  • Copia el código y ábrelo en el IDE de Arduino.
  • Luego, haz clic en el botón Subir para transferir el código al Arduino Nano.
  • Después, presiona el botón varias veces.
  • Finalmente, observa el contador que va cambiando en el OLED.

El código anterior muestra el número de pulsaciones del botón en la esquina superior izquierda. ¡Cambiémoslo para que aparezca en el centro!

Código de Arduino Nano - Alineación vertical y horizontal al centro en OLED

/* * Este código de Arduino Nano fue desarrollado por es.newbiely.com * Este código de Arduino Nano se proporciona al público sin ninguna restricción. * Para tutoriales completos y diagramas de cableado, visite: * https://es.newbiely.com/tutorials/arduino-nano/arduino-nano-button-count-oled */ #include <Wire.h> #include <Adafruit_GFX.h> #include <Adafruit_SSD1306.h> #include <ezButton.h> #define OLED_WIDTH 128 // OLED display width, in pixels #define OLED_HEIGHT 64 // OLED display height, in pixels Adafruit_SSD1306 oled(OLED_WIDTH, OLED_HEIGHT, &Wire, -1); // create SSD1306 display object connected to I2C ezButton button(2); // create ezButton object for pin D2 unsigned long prev_count = 0; void setup() { Serial.begin(9600); // initialize OLED display with address 0x3C for 128x64 if (!oled.begin(SSD1306_SWITCHCAPVCC, 0x3C)) { Serial.println(F("SSD1306 allocation failed")); while (true); } delay(2000); // wait for initializing oled.clearDisplay(); // clear display oled.setTextSize(2); // text size oled.setTextColor(WHITE); // text color oled.setCursor(0, 10); // position to display button.setDebounceTime(50); // set debounce time to 50 milliseconds button.setCountMode(COUNT_FALLING); } void loop() { button.loop(); // MUST call the loop() function first unsigned long count = button.getCount(); if (prev_count != count) { Serial.println(count); // print count to Serial Monitor String text = String(count); oled_display_center(text); prev_count != count; } } void oled_display_center(String text) { int16_t x1; int16_t y1; uint16_t width; uint16_t height; oled.getTextBounds(text, 0, 0, &x1, &y1, &width, &height); // center the display both horizontally and vertically oled.clearDisplay(); // clear display oled.setCursor((OLED_WIDTH - width) / 2, (OLED_HEIGHT - height) / 2); oled.println(text); // text to display oled.display(); }

※ Nota:

El código a continuación centrará horizontal y verticalmente el texto en una pantalla OLED. Para obtener más información, por favor consulte Cómo centrar vertical y horizontalmente el texto en OLED.

Video Tutorial

Estamos considerando crear tutoriales en video. Si considera que los tutoriales en video son importantes, suscríbase a nuestro canal de YouTube para motivarnos a crear los videos.

※ NUESTROS MENSAJES

  • No dude en compartir el enlace de este tutorial. Sin embargo, por favor no use nuestro contenido en otros sitios web. Hemos invertido mucho esfuerzo y tiempo en crear el contenido, ¡por favor respete nuestro trabajo!