Arduino Nano - Módulo RTC DS1307
Este tutorial le enseña cómo usar Arduino Nano para leer la fecha y la hora desde el módulo RTC DS1307. En detalle, aprenderemos:
Cómo conectar el módulo DS1307 RTC al Arduino Nano.
Cómo programar el Arduino Nano para leer la fecha y la hora (segundo, minuto, hora, día de la semana, día del mes, mes y año) desde el módulo RTC DS1307.
Cómo programar el Arduino Nano para crear horarios diarios usando el módulo DS1307 RTC.
Cómo programar el Arduino Nano para crear horarios semanales usando el módulo DS1307 RTC.
Cómo programar el Arduino Nano para crear horarios en una fecha específica usando el módulo DS1307 RTC.
Or you can buy the following kits:
Divulgación: Algunos de los enlaces proporcionados en esta sección son enlaces de afiliado de Amazon. Podemos recibir una comisión por las compras realizadas a través de estos enlaces sin costo adicional para usted. Apreciamos su apoyo.
Arduino Nano incluye algunas funciones relacionadas con el tiempo, como millis() y micros(). Sin embargo, estas no proporcionan información de fecha y hora (segundos, minutos, horas, día, fecha, mes y año). Para obtener estos datos, debemos usar un módulo de Reloj en Tiempo Real (RTC), como DS3231 o DS1370. El módulo DS3231 es más preciso que el DS1370. Vea DS3231 vs DS1307 para más detalles.
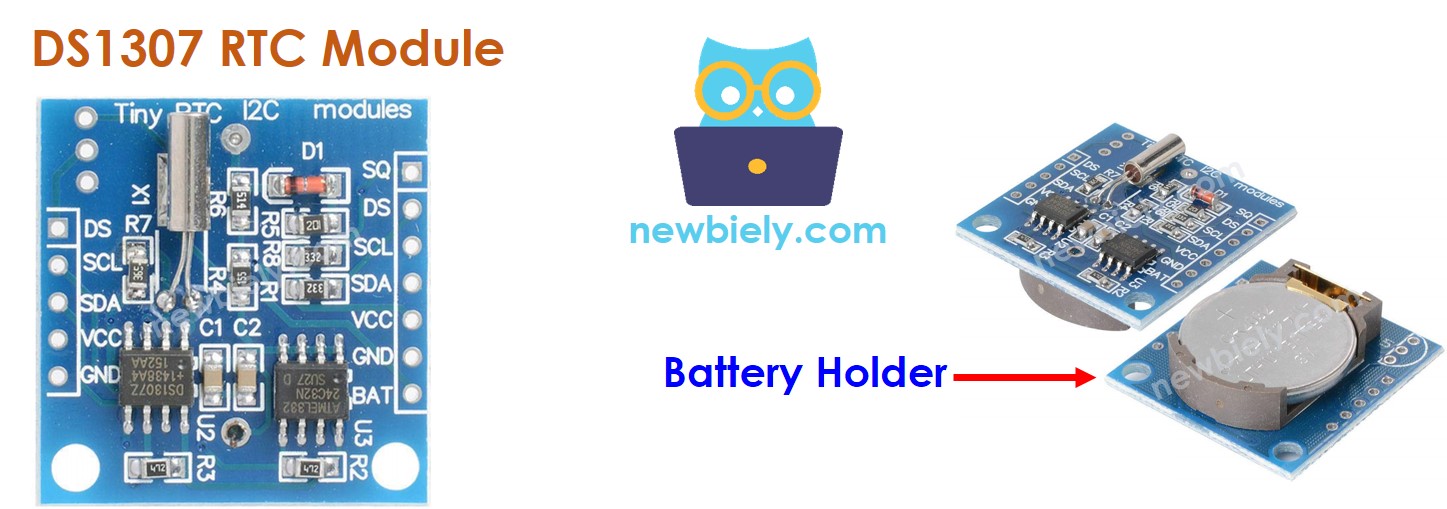
La placa de reloj en tiempo real DS1307 tiene 12 pines, pero solo 4 de ellos son necesarios para su uso normal: SCL, SDA, VCC y GND.
Pin SCL: Este es un pin de reloj serial para la interfaz I2C.
Pin SDA: Este es un pin de datos serial para la interfaz I2C.
Pin VCC: Este suministra energía al módulo y puede ir de 3.3V a 5.5V.
Pin GND: Este es el pin de tierra.
El módulo DS1307 tiene un portapilas para una pila CR2032.
Si se inserta la batería, la hora en el módulo permanecerá incluso cuando se desconecte la alimentación principal.
Si la batería no está insertada, la información de la hora se perderá si se desconecta la alimentación principal y deberá restablecerse.
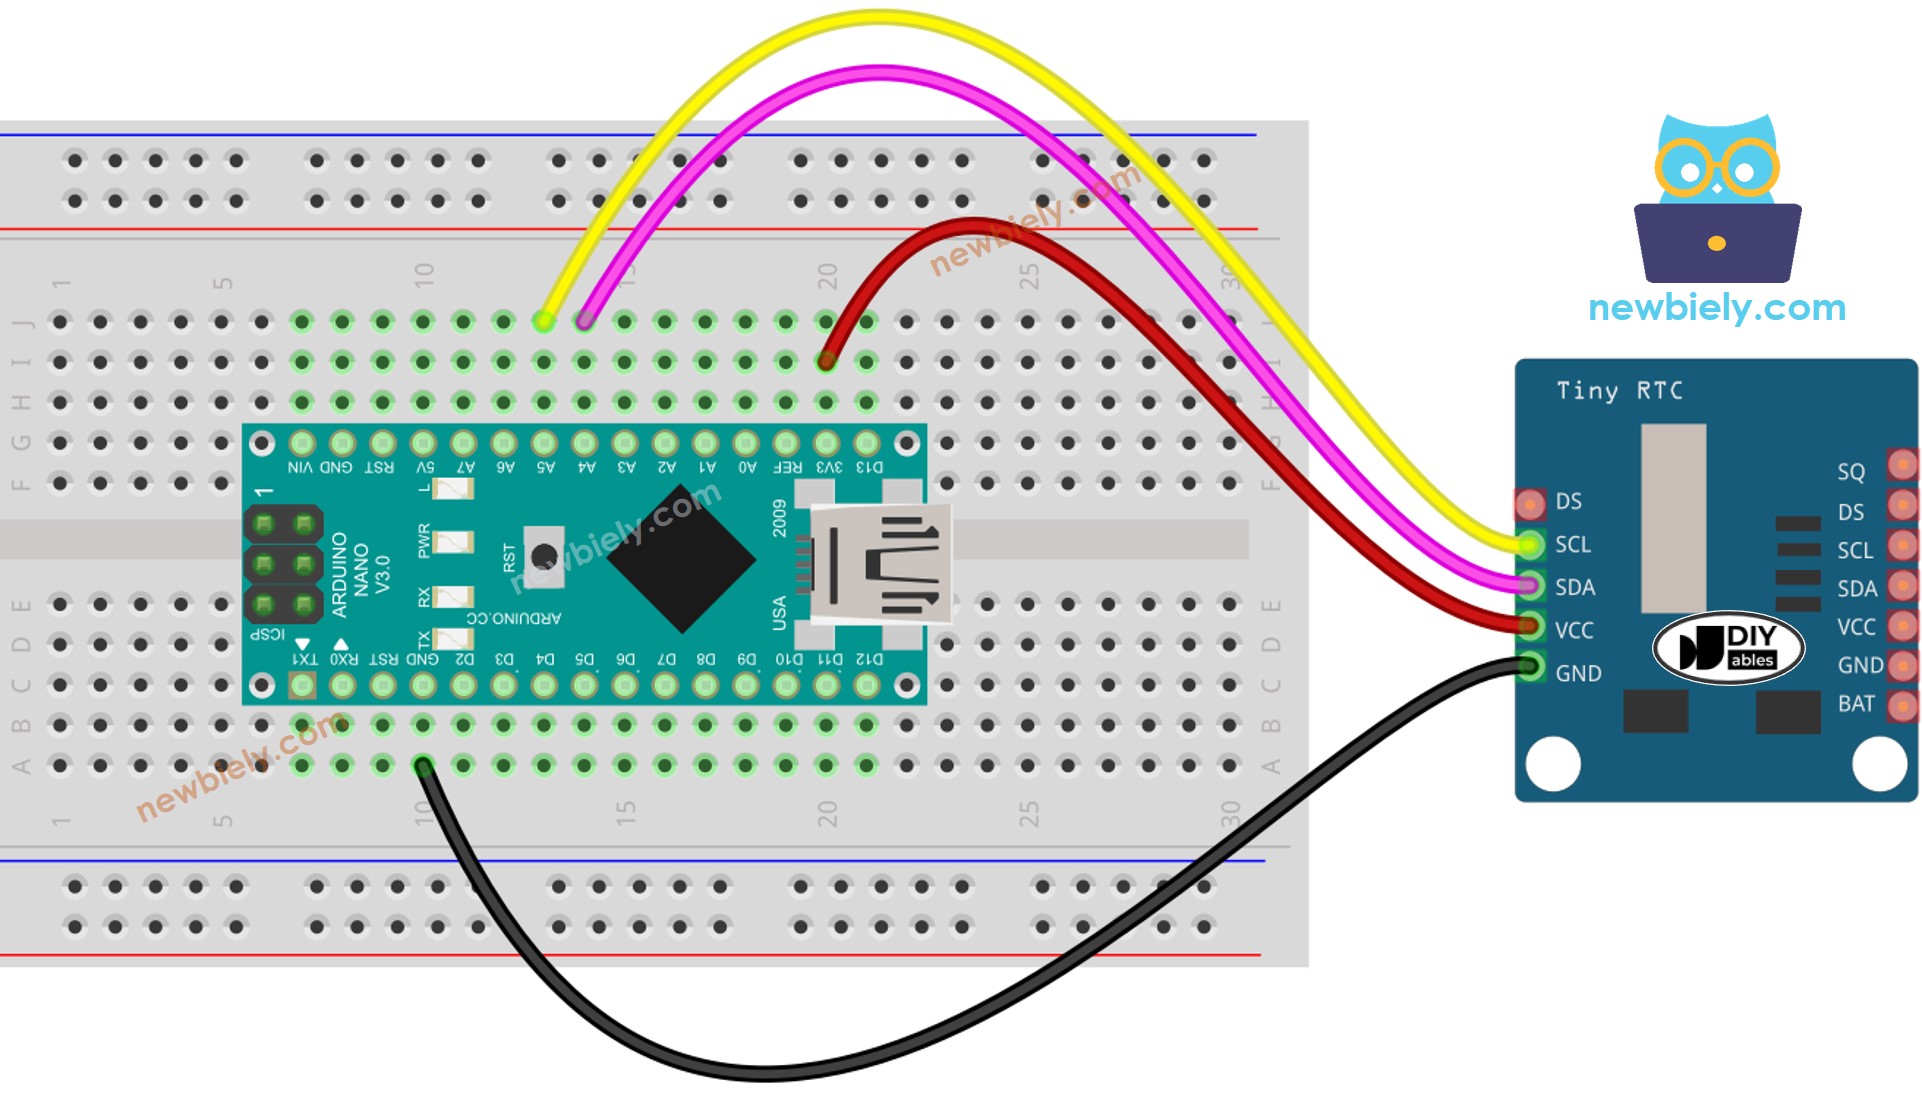
This image is created using Fritzing. Click to enlarge image
Ver La mejor forma de alimentar Arduino Nano y otros componentes.
| DS1307 RTC Module | Arduino Nano |
|---|
| Vin | 3.3V |
| GND | GND |
| SDA | A4 |
| SCL | A5 |
if (! rtc.begin()) {
Serial.println("Couldn't find RTC");
while (1);
}
rtc.adjust(DateTime(F(__DATE__), F(__TIME__)));
DateTime now = rtc.now();
Serial.print("Date & Time: ");
Serial.print(now.year(), DEC);
Serial.print('/');
Serial.print(now.month(), DEC);
Serial.print('/');
Serial.print(now.day(), DEC);
Serial.print(" (");
Serial.print(now.dayOfTheWeek());
Serial.print(") ");
Serial.print(now.hour(), DEC);
Serial.print(':');
Serial.print(now.minute(), DEC);
Serial.print(':');
Serial.println(now.second(), DEC);
#include <RTClib.h>
RTC_DS1307 rtc;
char daysOfTheWeek[7][12] = {
"Sunday",
"Monday",
"Tuesday",
"Wednesday",
"Thursday",
"Friday",
"Saturday"
};
void setup () {
Serial.begin(9600);
if (! rtc.begin()) {
Serial.println("Couldn't find RTC");
Serial.flush();
while (1);
}
rtc.adjust(DateTime(F(__DATE__), F(__TIME__)));
}
void loop () {
DateTime now = rtc.now();
Serial.print("Date & Time: ");
Serial.print(now.year(), DEC);
Serial.print('/');
Serial.print(now.month(), DEC);
Serial.print('/');
Serial.print(now.day(), DEC);
Serial.print(" (");
Serial.print(daysOfTheWeek[now.dayOfTheWeek()]);
Serial.print(") ");
Serial.print(now.hour(), DEC);
Serial.print(':');
Serial.print(now.minute(), DEC);
Serial.print(':');
Serial.println(now.second(), DEC);
delay(1000);
}
Haz clic en el icono de Bibliotecas en la barra izquierda del IDE de Arduino.
Busca la “RTClib” y localiza la biblioteca RTC de Adafruit.
Pulsa el botón Instalar para instalar la biblioteca RTC.
Copia el código y ábrelo con Arduino IDE.
Haz clic en el botón Subir para enviar el código a Arduino Nano.
Abre el Monitor Serial.
Revisa el resultado en el Monitor Serial.
Date & Time: 2021/10/6 (Wednesday) 9:9:35
Date & Time: 2021/10/6 (Wednesday) 9:9:36
Date & Time: 2021/10/6 (Wednesday) 9:9:37
Date & Time: 2021/10/6 (Wednesday) 9:9:38
Date & Time: 2021/10/6 (Wednesday) 9:9:39
Date & Time: 2021/10/6 (Wednesday) 9:9:40
Date & Time: 2021/10/6 (Wednesday) 9:9:41
Date & Time: 2021/10/6 (Wednesday) 9:9:42
Date & Time: 2021/10/6 (Wednesday) 9:9:43
Date & Time: 2021/10/6 (Wednesday) 9:9:44
#include <RTClib.h>
uint8_t DAILY_EVENT_START_HH = 13;
uint8_t DAILY_EVENT_START_MM = 50;
uint8_t DAILY_EVENT_END_HH = 14;
uint8_t DAILY_EVENT_END_MM = 10;
RTC_DS1307 rtc;
char daysOfTheWeek[7][12] = {
"Sunday",
"Monday",
"Tuesday",
"Wednesday",
"Thursday",
"Friday",
"Saturday"
};
void setup () {
Serial.begin(9600);
if (! rtc.begin()) {
Serial.println("Couldn't find RTC");
while (1);
}
rtc.adjust(DateTime(F(__DATE__), F(__TIME__)));
}
void loop () {
DateTime now = rtc.now();
if (now.hour() >= DAILY_EVENT_START_HH &&
now.minute() >= DAILY_EVENT_START_MM &&
now.hour() < DAILY_EVENT_END_HH &&
now.minute() < DAILY_EVENT_END_MM) {
Serial.println("It is on scheduled time");
} else {
Serial.println("It is NOT on scheduled time");
}
printTime(now);
}
void printTime(DateTime time) {
Serial.print("TIME: ");
Serial.print(time.year(), DEC);
Serial.print('/');
Serial.print(time.month(), DEC);
Serial.print('/');
Serial.print(time.day(), DEC);
Serial.print(" (");
Serial.print(daysOfTheWeek[time.dayOfTheWeek()]);
Serial.print(") ");
Serial.print(time.hour(), DEC);
Serial.print(':');
Serial.print(time.minute(), DEC);
Serial.print(':');
Serial.println(time.second(), DEC);
}
#include <RTClib.h>
#define SUNDAY 0
#define MONDAY 1
#define TUESDAY 2
#define WEDNESDAY 3
#define THURSDAY 4
#define FRIDAY 5
#define SATURDAY 6
uint8_t WEEKLY_EVENT_DAY = MONDAY;
uint8_t WEEKLY_EVENT_START_HH = 13;
uint8_t WEEKLY_EVENT_START_MM = 50;
uint8_t WEEKLY_EVENT_END_HH = 14;
uint8_t WEEKLY_EVENT_END_MM = 10;
RTC_DS1307 rtc;
char daysOfTheWeek[7][12] = {
"Sunday",
"Monday",
"Tuesday",
"Wednesday",
"Thursday",
"Friday",
"Saturday"
};
void setup () {
Serial.begin(9600);
if (! rtc.begin()) {
Serial.println("Couldn't find RTC");
while (1);
}
rtc.adjust(DateTime(F(__DATE__), F(__TIME__)));
}
void loop () {
DateTime now = rtc.now();
if (now.dayOfTheWeek() == WEEKLY_EVENT_DAY &&
now.hour() >= WEEKLY_EVENT_START_HH &&
now.minute() >= WEEKLY_EVENT_START_MM &&
now.hour() < WEEKLY_EVENT_END_HH &&
now.minute() < WEEKLY_EVENT_END_MM) {
Serial.println("It is on scheduled time");
} else {
Serial.println("It is NOT on scheduled time");
}
printTime(now);
}
void printTime(DateTime time) {
Serial.print("TIME: ");
Serial.print(time.year(), DEC);
Serial.print('/');
Serial.print(time.month(), DEC);
Serial.print('/');
Serial.print(time.day(), DEC);
Serial.print(" (");
Serial.print(daysOfTheWeek[time.dayOfTheWeek()]);
Serial.print(") ");
Serial.print(time.hour(), DEC);
Serial.print(':');
Serial.print(time.minute(), DEC);
Serial.print(':');
Serial.println(time.second(), DEC);
}
#include <RTClib.h>
#define SUNDAY 0
#define MONDAY 1
#define TUESDAY 2
#define WEDNESDAY 3
#define THURSDAY 4
#define FRIDAY 5
#define SATURDAY 6
#define JANUARY 1
#define FEBRUARY 2
#define MARCH 3
#define APRIL 4
#define MAY 5
#define JUNE 6
#define JULY 7
#define AUGUST 8
#define SEPTEMBER 9
#define OCTOBER 10
#define NOVEMBER 11
#define DECEMBER 12
DateTime EVENT_START(2021, AUGUST, 15, 13, 50);
DateTime EVENT_END(2021, SEPTEMBER, 29, 14, 10);
RTC_DS1307 rtc;
char daysOfTheWeek[7][12] = {
"Sunday",
"Monday",
"Tuesday",
"Wednesday",
"Thursday",
"Friday",
"Saturday"
};
void setup () {
Serial.begin(9600);
if (! rtc.begin()) {
Serial.println("Couldn't find RTC");
Serial.flush();
while (1);
}
rtc.adjust(DateTime(F(__DATE__), F(__TIME__)));
}
void loop () {
DateTime now = rtc.now();
if (now.secondstime() >= EVENT_START.secondstime() &&
now.secondstime() < EVENT_END.secondstime()) {
Serial.println("It is on scheduled time");
} else {
Serial.println("It is NOT on scheduled time");
}
printTime(now);
}
void printTime(DateTime time) {
Serial.print("TIME: ");
Serial.print(time.year(), DEC);
Serial.print('/');
Serial.print(time.month(), DEC);
Serial.print('/');
Serial.print(time.day(), DEC);
Serial.print(" (");
Serial.print(daysOfTheWeek[time.dayOfTheWeek()]);
Serial.print(") ");
Serial.print(time.hour(), DEC);
Serial.print(':');
Serial.print(time.minute(), DEC);
Serial.print(':');
Serial.println(time.second(), DEC);
}
Estamos considerando crear tutoriales en video. Si considera que los tutoriales en video son importantes, suscríbase a nuestro canal de YouTube para motivarnos a crear los videos.
※ NUESTROS MENSAJES
No dude en compartir el enlace de este tutorial. Sin embargo, por favor no use nuestro contenido en otros sitios web. Hemos invertido mucho esfuerzo y tiempo en crear el contenido, ¡por favor respete nuestro trabajo!