Este ejemplo demuestra cómo usar varias aplicaciones web de forma simultánea con la biblioteca DIYables WebApps. Muestra la integración de varias interfaces web interactivas—como monitoreo, control y comunicación—dentro de un único proyecto. Diseñado para Arduino Uno R4 WiFi y la plataforma IoT STEM V4 de DIYables, este ejemplo es ideal para aprender a combinar y gestionar múltiples características basadas en la web al mismo tiempo, proporcionando una base sólida para proyectos IoT avanzados.
Sigue estas instrucciones paso a paso:
Conecta la placa Arduino Uno R4/DIYables STEM V4 IoT a tu computadora usando un cable USB.
Inicia el IDE de Arduino en tu computadora.
Selecciona la placa Arduino Uno R4 adecuada (p. ej., Arduino Uno R4 WiFi) y el puerto COM.
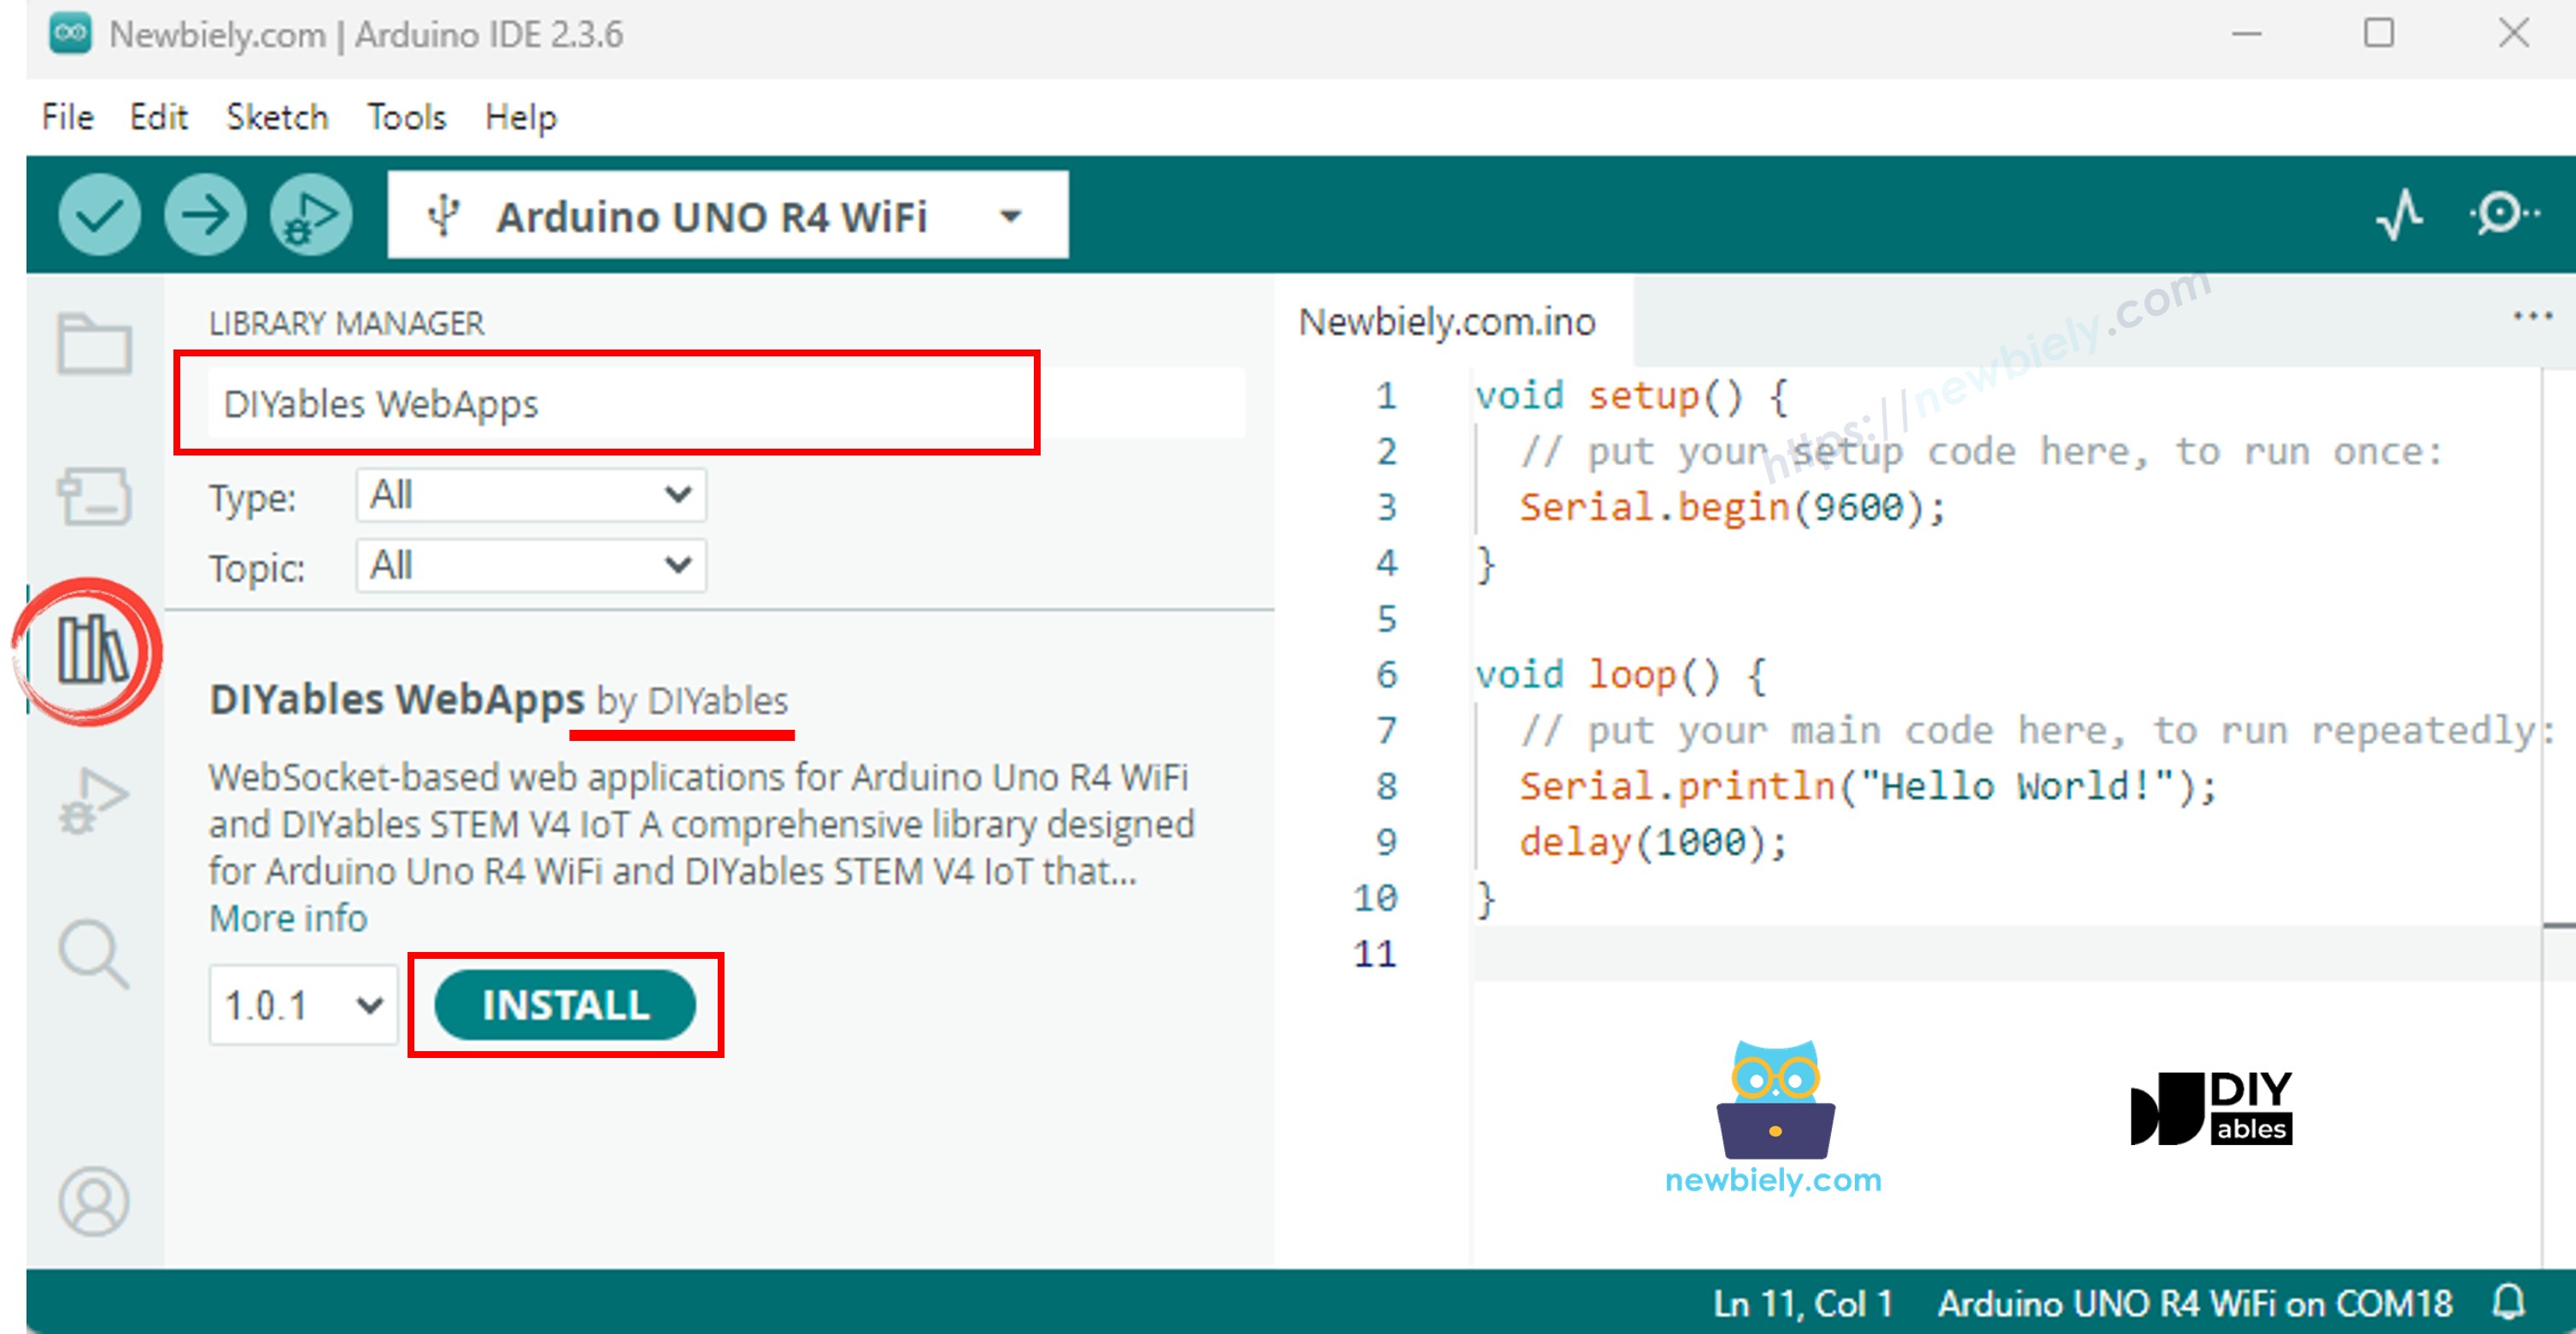
Ve al icono Bibliotecas en la barra izquierda del IDE de Arduino.
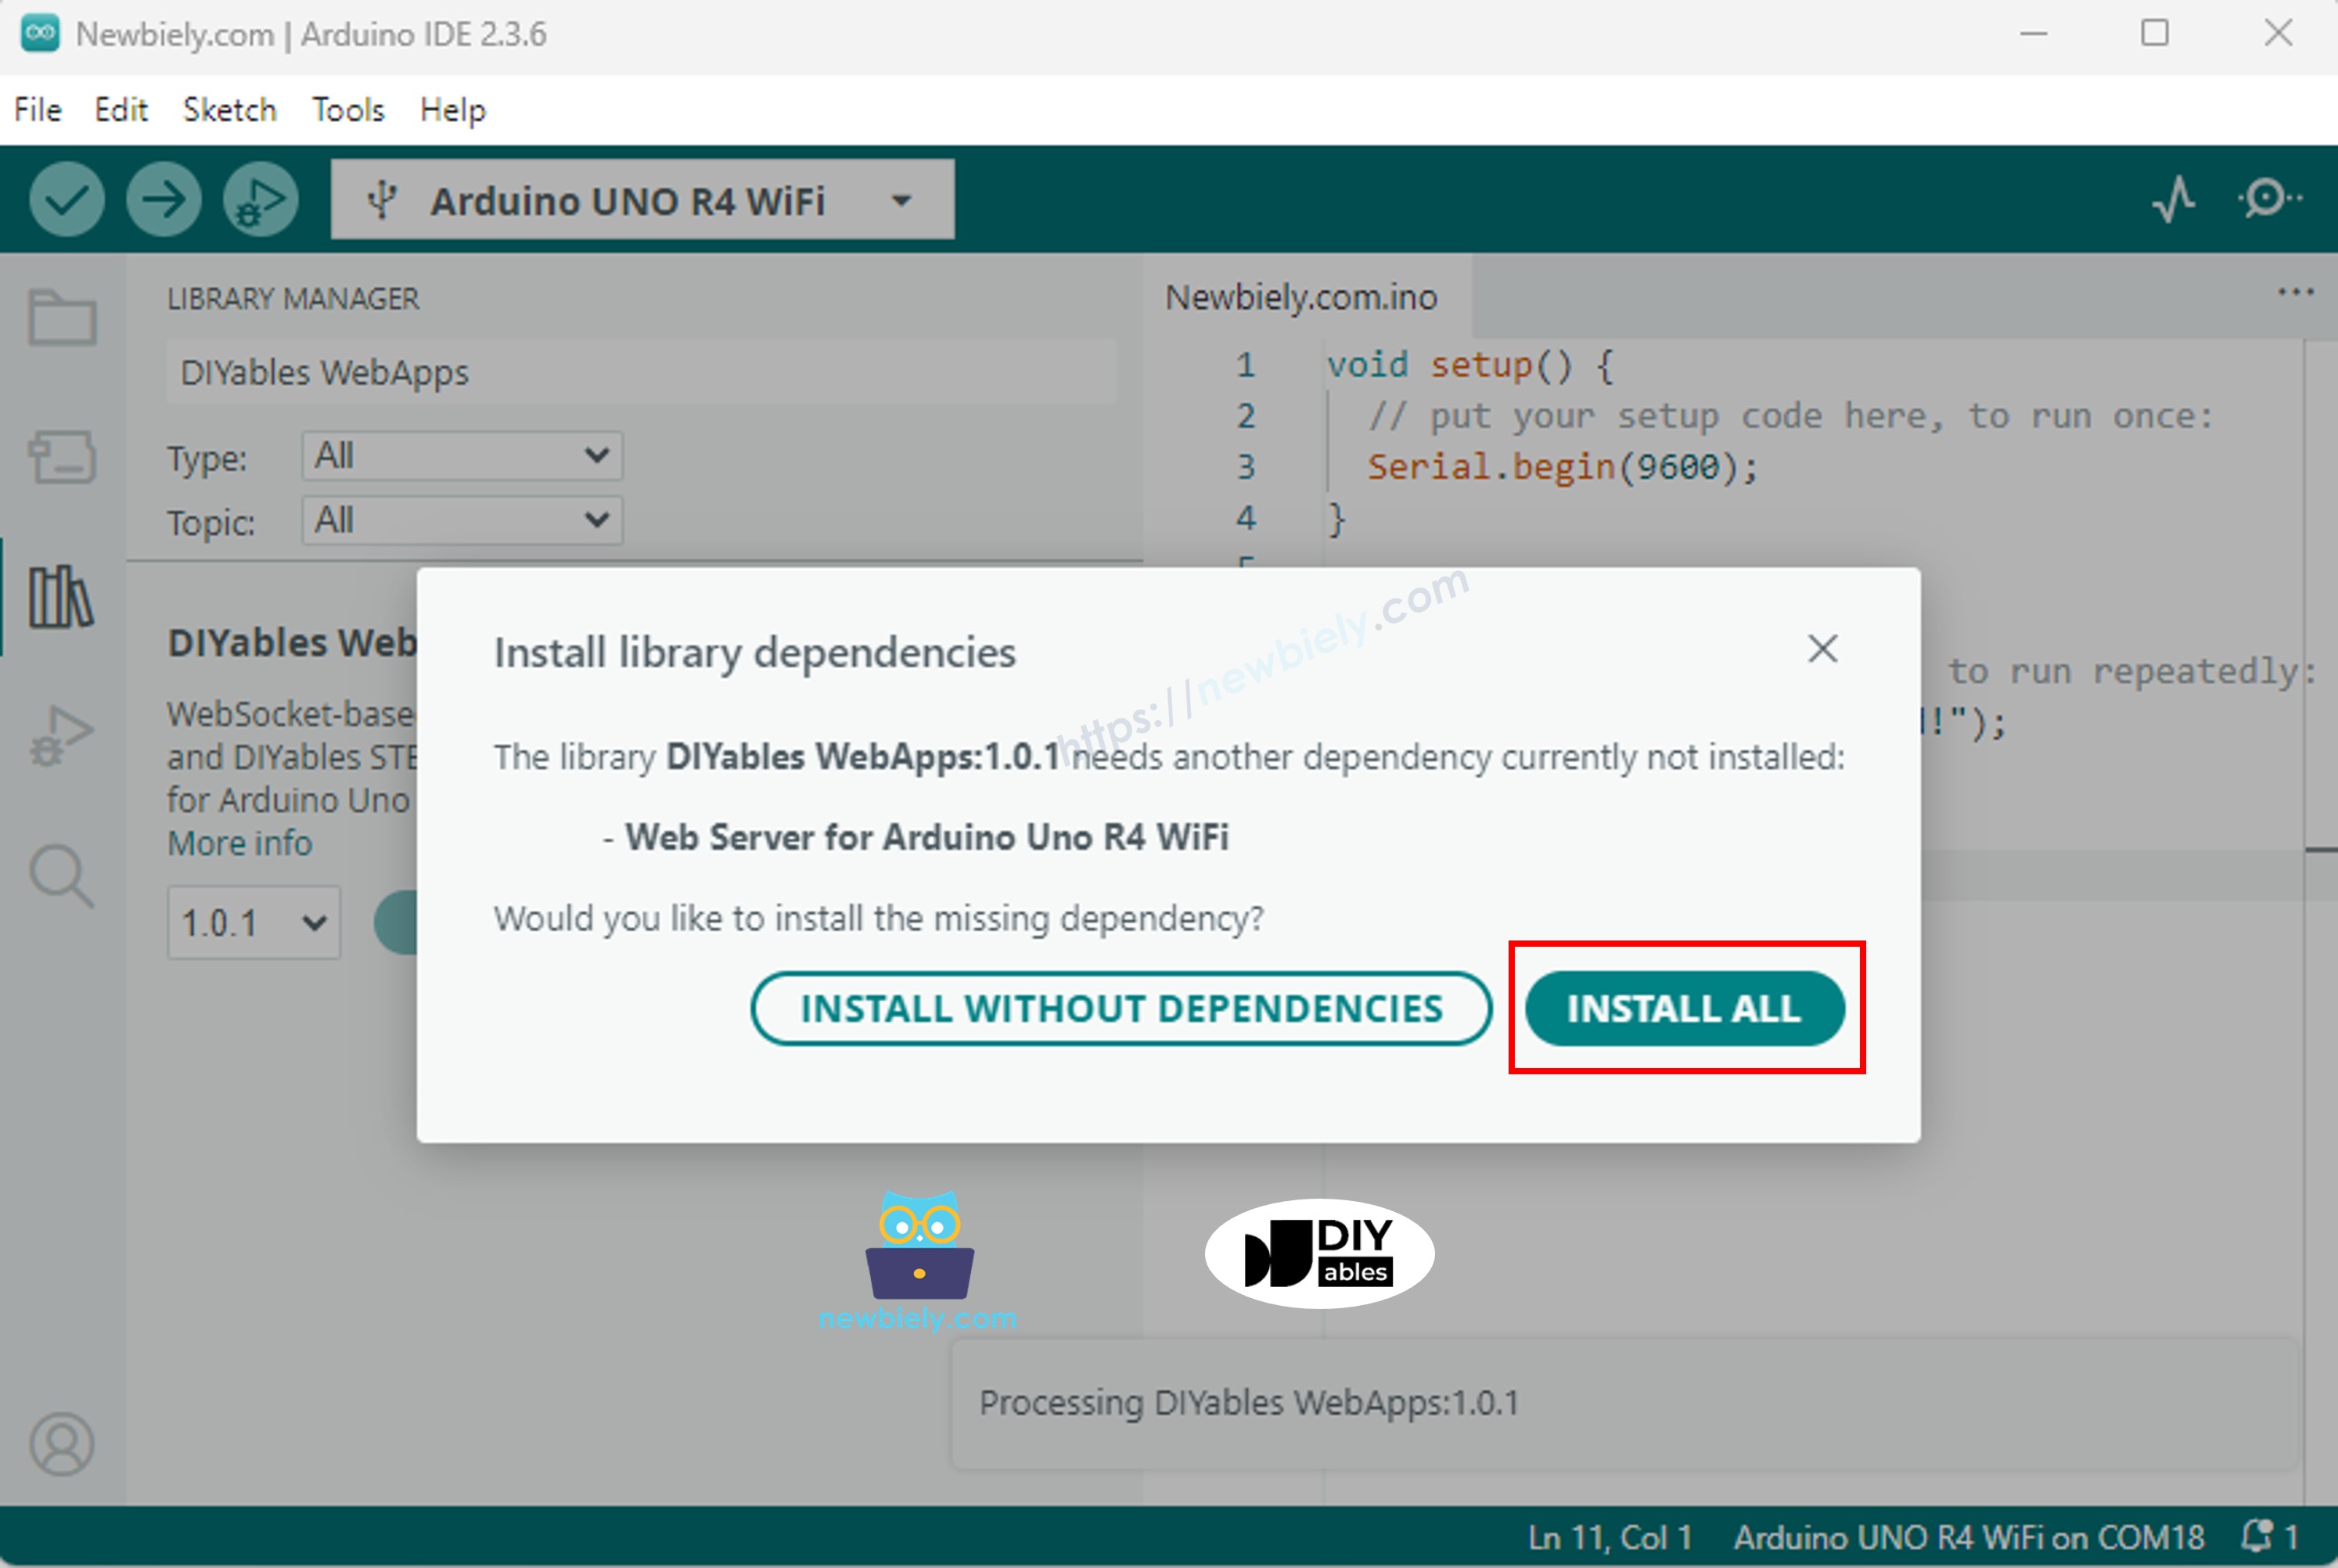
Busca "DIYables WebApps", luego encuentra la biblioteca DIYables WebApps de DIYables
Haz clic en el botón Instalar para instalar la biblioteca.
#include <DIYablesWebApps.h>
const char WIFI_SSID[] = "YOUR_WIFI_SSID";
const char WIFI_PASSWORD[] = "YOUR_WIFI_PASSWORD";
UnoR4ServerFactory factory;
DIYablesWebAppServer webAppsServer(factory, 80, 81);
DIYablesHomePage homePage;
DIYablesWebMonitorPage webMonitorPage;
DIYablesWebSliderPage webSliderPage;
DIYablesWebJoystickPage webJoystickPage(false, 5);
DIYablesWebRotatorPage webRotatorPage(ROTATOR_MODE_CONTINUOUS);
DIYablesWebAnalogGaugePage webAnalogGaugePage(0.0, 100.0, "%");
DIYablesWebTablePage webTablePage;
int currentSlider1 = 64;
int currentSlider2 = 128;
int currentJoystickX = 0;
int currentJoystickY = 0;
int currentRotatorAngle = 0;
float currentGaugeValue = 50.0;
void setup() {
Serial.begin(9600);
delay(1000);
Serial.println("DIYables WebApp - Multiple Apps Example");
webAppsServer.addApp(&homePage);
webAppsServer.addApp(&webMonitorPage);
webAppsServer.addApp(&webSliderPage);
webAppsServer.addApp(&webJoystickPage);
webAppsServer.addApp(&webRotatorPage);
webAppsServer.addApp(&webAnalogGaugePage);
webAppsServer.addApp(&webTablePage);
webAppsServer.setNotFoundPage(DIYablesNotFoundPage());
webTablePage.addRow("Arduino Status");
webTablePage.addRow("WiFi Connected");
webTablePage.addRow("Uptime");
webTablePage.addRow("Slider 1");
webTablePage.addRow("Slider 2");
webTablePage.addRow("Joystick X");
webTablePage.addRow("Joystick Y");
webTablePage.addRow("Rotator Angle");
webTablePage.addRow("Gauge Value");
if (!webAppsServer.begin(WIFI_SSID, WIFI_PASSWORD)) {
while (1) {
Serial.println("Failed to start WebApp server!");
delay(1000);
}
}
setupCallbacks();
}
void setupCallbacks() {
webMonitorPage.onWebMonitorMessage([](const String& message) {
Serial.println("Web Monitor: " + message);
webMonitorPage.sendToWebMonitor("Arduino received: " + message);
});
webSliderPage.onSliderValueFromWeb([](int slider1, int slider2) {
currentSlider1 = slider1;
currentSlider2 = slider2;
Serial.print("Slider 1: ");
Serial.print(slider1);
Serial.print(", Slider 2: ");
Serial.println(slider2);
webTablePage.sendValueUpdate("Slider 1", String(slider1));
webTablePage.sendValueUpdate("Slider 2", String(slider2));
currentGaugeValue = map(slider1, 0, 255, 0, 100);
webAnalogGaugePage.sendToWebAnalogGauge(currentGaugeValue);
char gaugeStr[16];
snprintf(gaugeStr, sizeof(gaugeStr), "%.1f%%", currentGaugeValue);
webTablePage.sendValueUpdate("Gauge Value", String(gaugeStr));
});
webSliderPage.onSliderValueToWeb([]() {
webSliderPage.sendToWebSlider(currentSlider1, currentSlider2);
});
webJoystickPage.onJoystickValueFromWeb([](int x, int y) {
currentJoystickX = x;
currentJoystickY = y;
Serial.print("Joystick - X: ");
Serial.print(x);
Serial.print(", Y: ");
Serial.println(y);
Serial.print(x);
Serial.print(", Y: ");
Serial.println(y);
webTablePage.sendValueUpdate("Joystick X", String(x));
webTablePage.sendValueUpdate("Joystick Y", String(y));
}
});
webJoystickPage.onJoystickValueToWeb([]() {
webJoystickPage.sendToWebJoystick(currentJoystickX, currentJoystickY);
});
webRotatorPage.onRotatorAngleFromWeb([](float angle) {
currentRotatorAngle = (int)angle;
Serial.println("Rotator angle: " + String(angle) + "°");
webTablePage.sendValueUpdate("Rotator Angle", String(angle, 0) + "°");
});
webAnalogGaugePage.onGaugeValueRequest([]() {
webAnalogGaugePage.sendToWebAnalogGauge(currentGaugeValue);
});
webTablePage.onTableValueRequest([]() {
webTablePage.sendValueUpdate("Arduino Status", "Running");
webTablePage.sendValueUpdate("WiFi Connected", "Yes");
webTablePage.sendValueUpdate("Uptime", "0 seconds");
webTablePage.sendValueUpdate("Slider 1", String(currentSlider1));
webTablePage.sendValueUpdate("Slider 2", String(currentSlider2));
webTablePage.sendValueUpdate("Joystick X", String(currentJoystickX));
webTablePage.sendValueUpdate("Joystick Y", String(currentJoystickY));
webTablePage.sendValueUpdate("Rotator Angle", String(currentRotatorAngle) + "°");
webTablePage.sendValueUpdate("Gauge Value", String(currentGaugeValue, 1) + "%");
});
}
void loop() {
webAppsServer.loop();
static unsigned long lastUptimeUpdate = 0;
if (millis() - lastUptimeUpdate > 5000) {
lastUptimeUpdate = millis();
unsigned long uptimeSeconds = millis() / 1000;
String uptimeStr = String(uptimeSeconds) + " seconds";
if (uptimeSeconds >= 60) {
uptimeStr = String(uptimeSeconds / 60) + "m " + String(uptimeSeconds % 60) + "s";
}
webTablePage.sendValueUpdate("Uptime", uptimeStr);
}
static unsigned long lastSensorUpdate = 0;
if (millis() - lastSensorUpdate > 3000) {
lastSensorUpdate = millis();
float sensorValue = 50.0 + 30.0 * sin(millis() / 10000.0);
currentGaugeValue = sensorValue;
webAnalogGaugePage.sendToWebAnalogGauge(currentGaugeValue);
webTablePage.sendValueUpdate("Gauge Value", String(currentGaugeValue, 1) + "%");
}
delay(10);
}
const char WIFI_SSID[] = "YOUR_WIFI_NETWORK";
const char WIFI_PASSWORD[] = "YOUR_WIFI_PASSWORD";
DIYables WebApp - Multiple Apps Example
INFO: Added app /
INFO: Added app /web-monitor
INFO: Added app /web-slider
INFO: Added app /web-joystick
INFO: Added app /web-rotator
INFO: Added app /web-gauge
INFO: Added app /web-table
DIYables WebApp Library
Platform: Arduino Uno R4 WiFi
Network connected!
IP address: 192.168.0.2
HTTP server started on port 80
Configuring WebSocket server callbacks...
WebSocket server started on port 81
WebSocket URL: ws://192.168.0.2:81
WebSocket server started on port 81
==========================================
DIYables WebApp Ready!
==========================================
📱 Web Interface: http://192.168.0.2
🔗 WebSocket: ws://192.168.0.2:81
📋 Available Applications:
🏠 Home Page: http://192.168.0.2/
📊 Web Monitor: http://192.168.0.2/web-monitor
🎚️ Web Slider: http://192.168.0.2/web-slider
🕹️ Web Joystick: http://192.168.0.2/web-joystick
🔄 Web Rotator: http://192.168.0.2/web-rotator
⏲️ Web Analog Gauge: http://192.168.0.2/web-gauge
📊 Web Table: http://192.168.0.2/web-table
==========================================
Si no ve nada, reinicie la placa Arduino.
Tenga en cuenta la dirección IP mostrada y escriba esta dirección en la barra de direcciones de un navegador web en su teléfono inteligente o PC.
Ejemplo: http://192.168.0.2
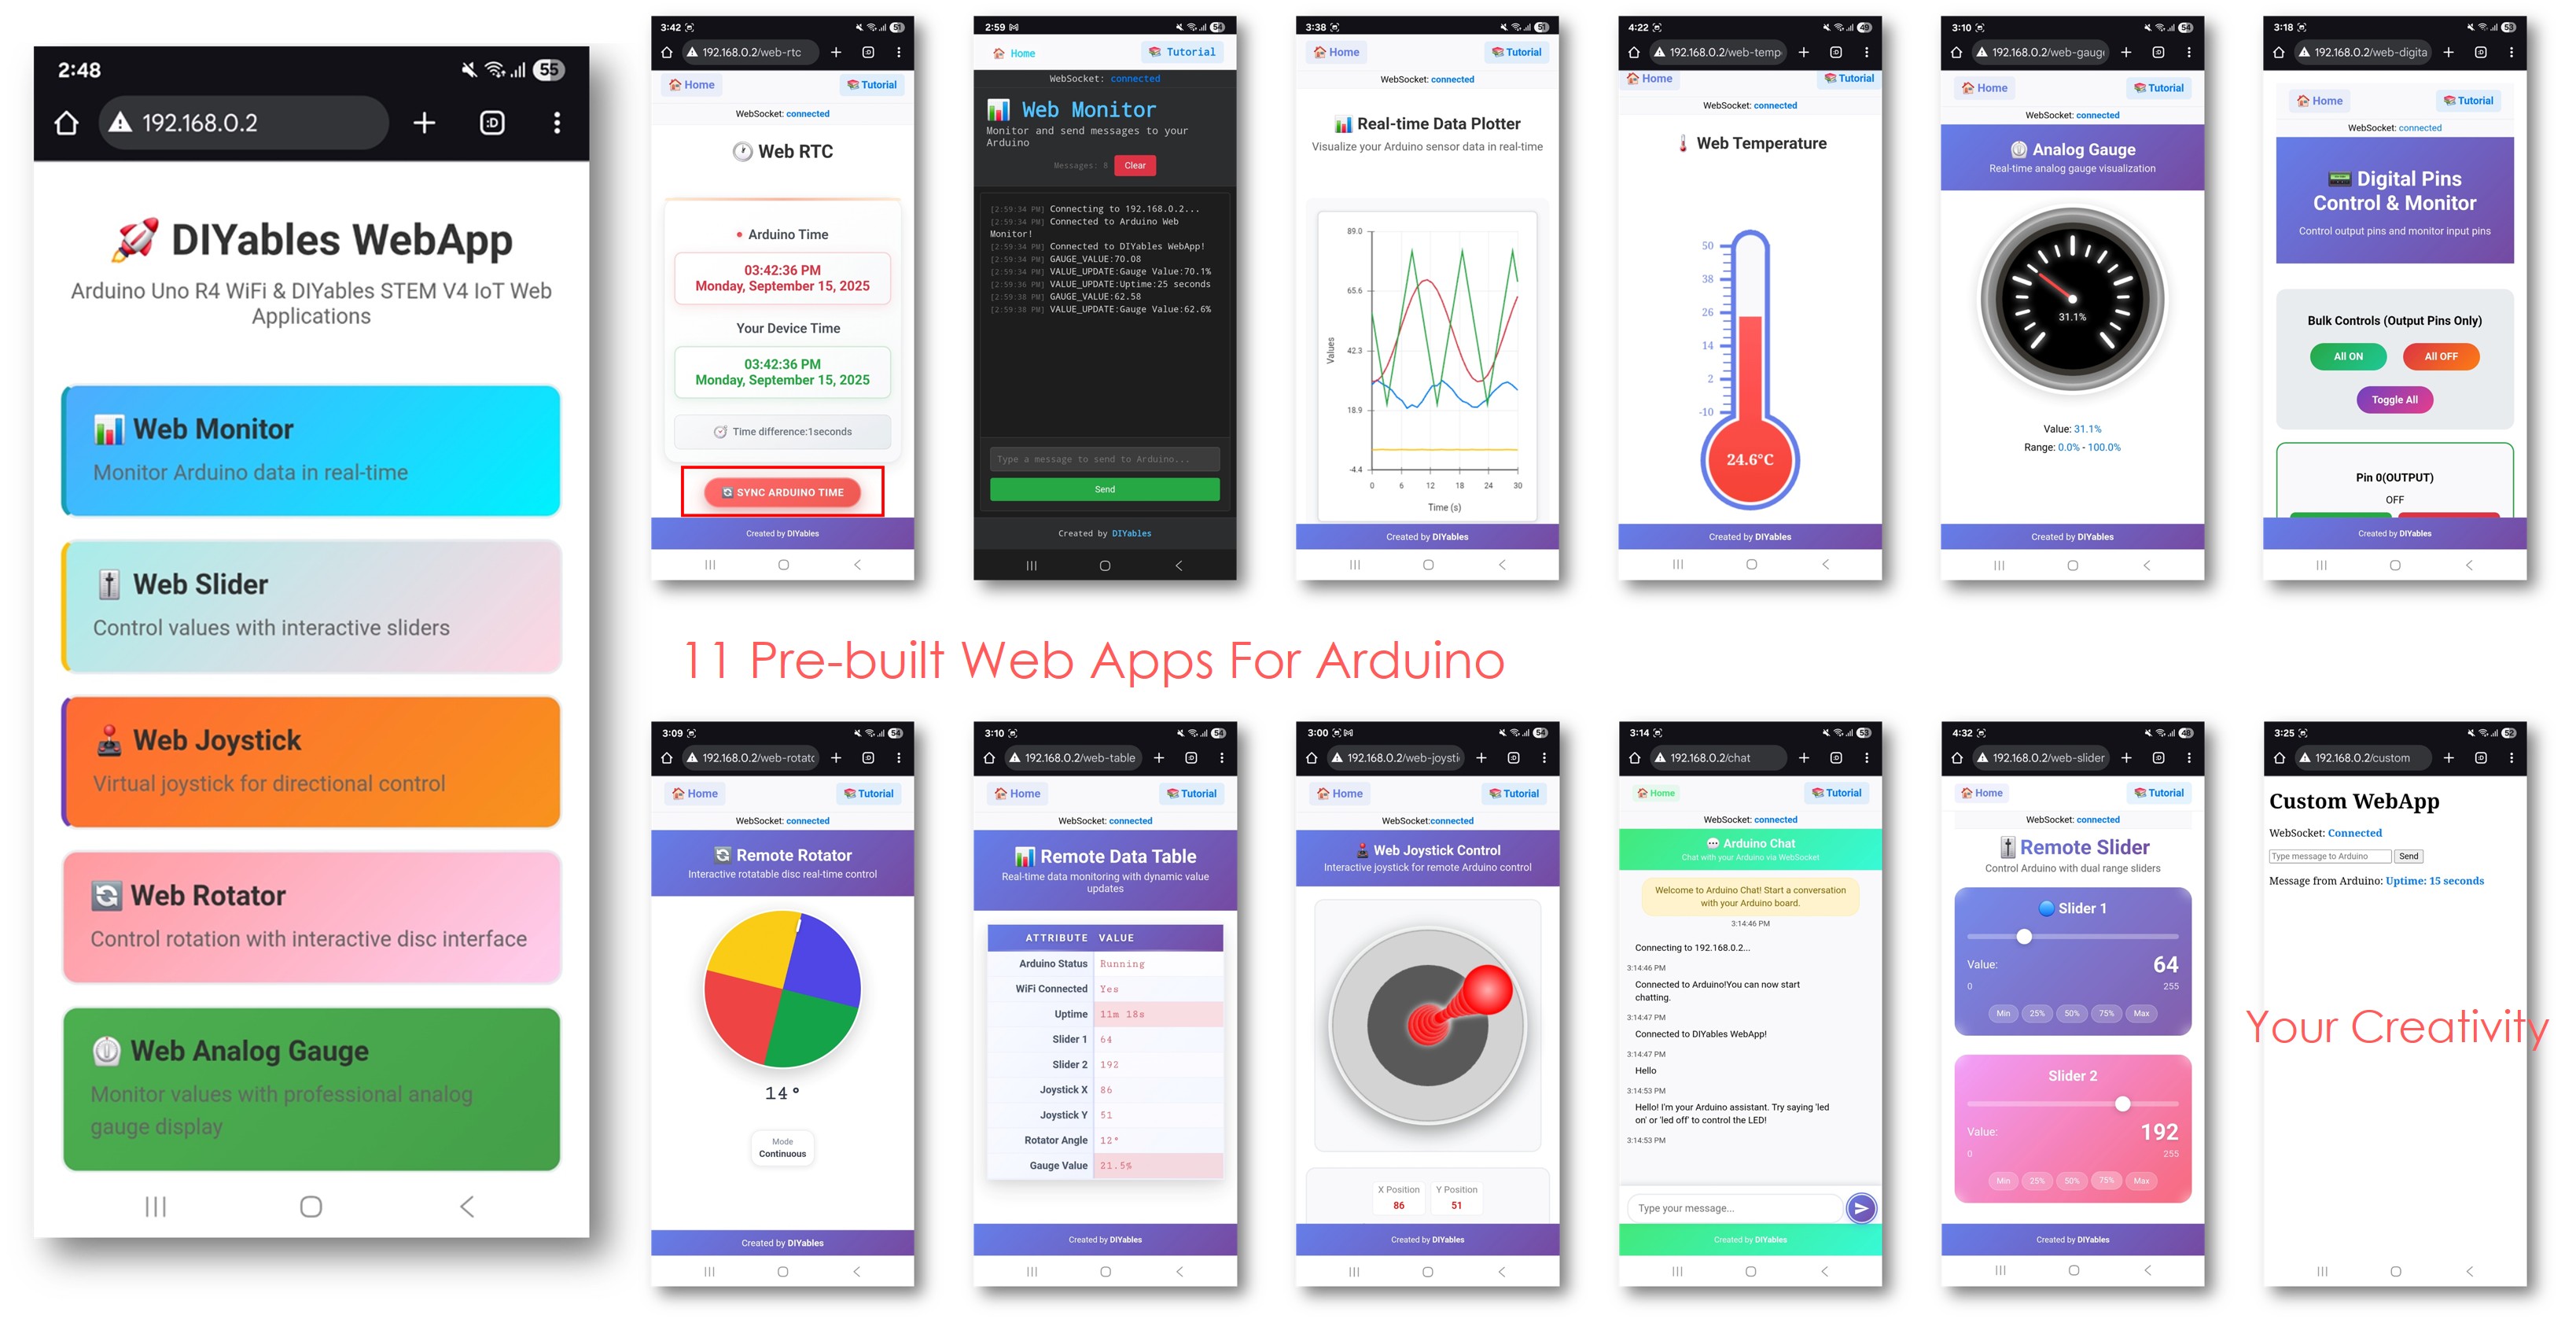
Verá la página de inicio con todas las aplicaciones web como se muestra en la imagen a continuación:
Haz clic en cualquier enlace de la aplicación web (Chat, Monitor Web, Pines digitales Web, Deslizadores Web, Joystick Web, etc.). Verás la interfaz de usuario de la aplicación web correspondiente.
O también puedes acceder a cada página directamente mediante la dirección IP seguida de la ruta de la aplicación. Por ejemplo: http://192.168.0.2/chat, http://192.168.0.2/web-monitor, etc.
Explora todas las aplicaciones web: prueba chatear con Arduino, monitorea la salida de serie, controla los pines digitales, ajusta los deslizadores y usa el joystick virtual para experimentar las capacidades completas de la interfaz web integrada.
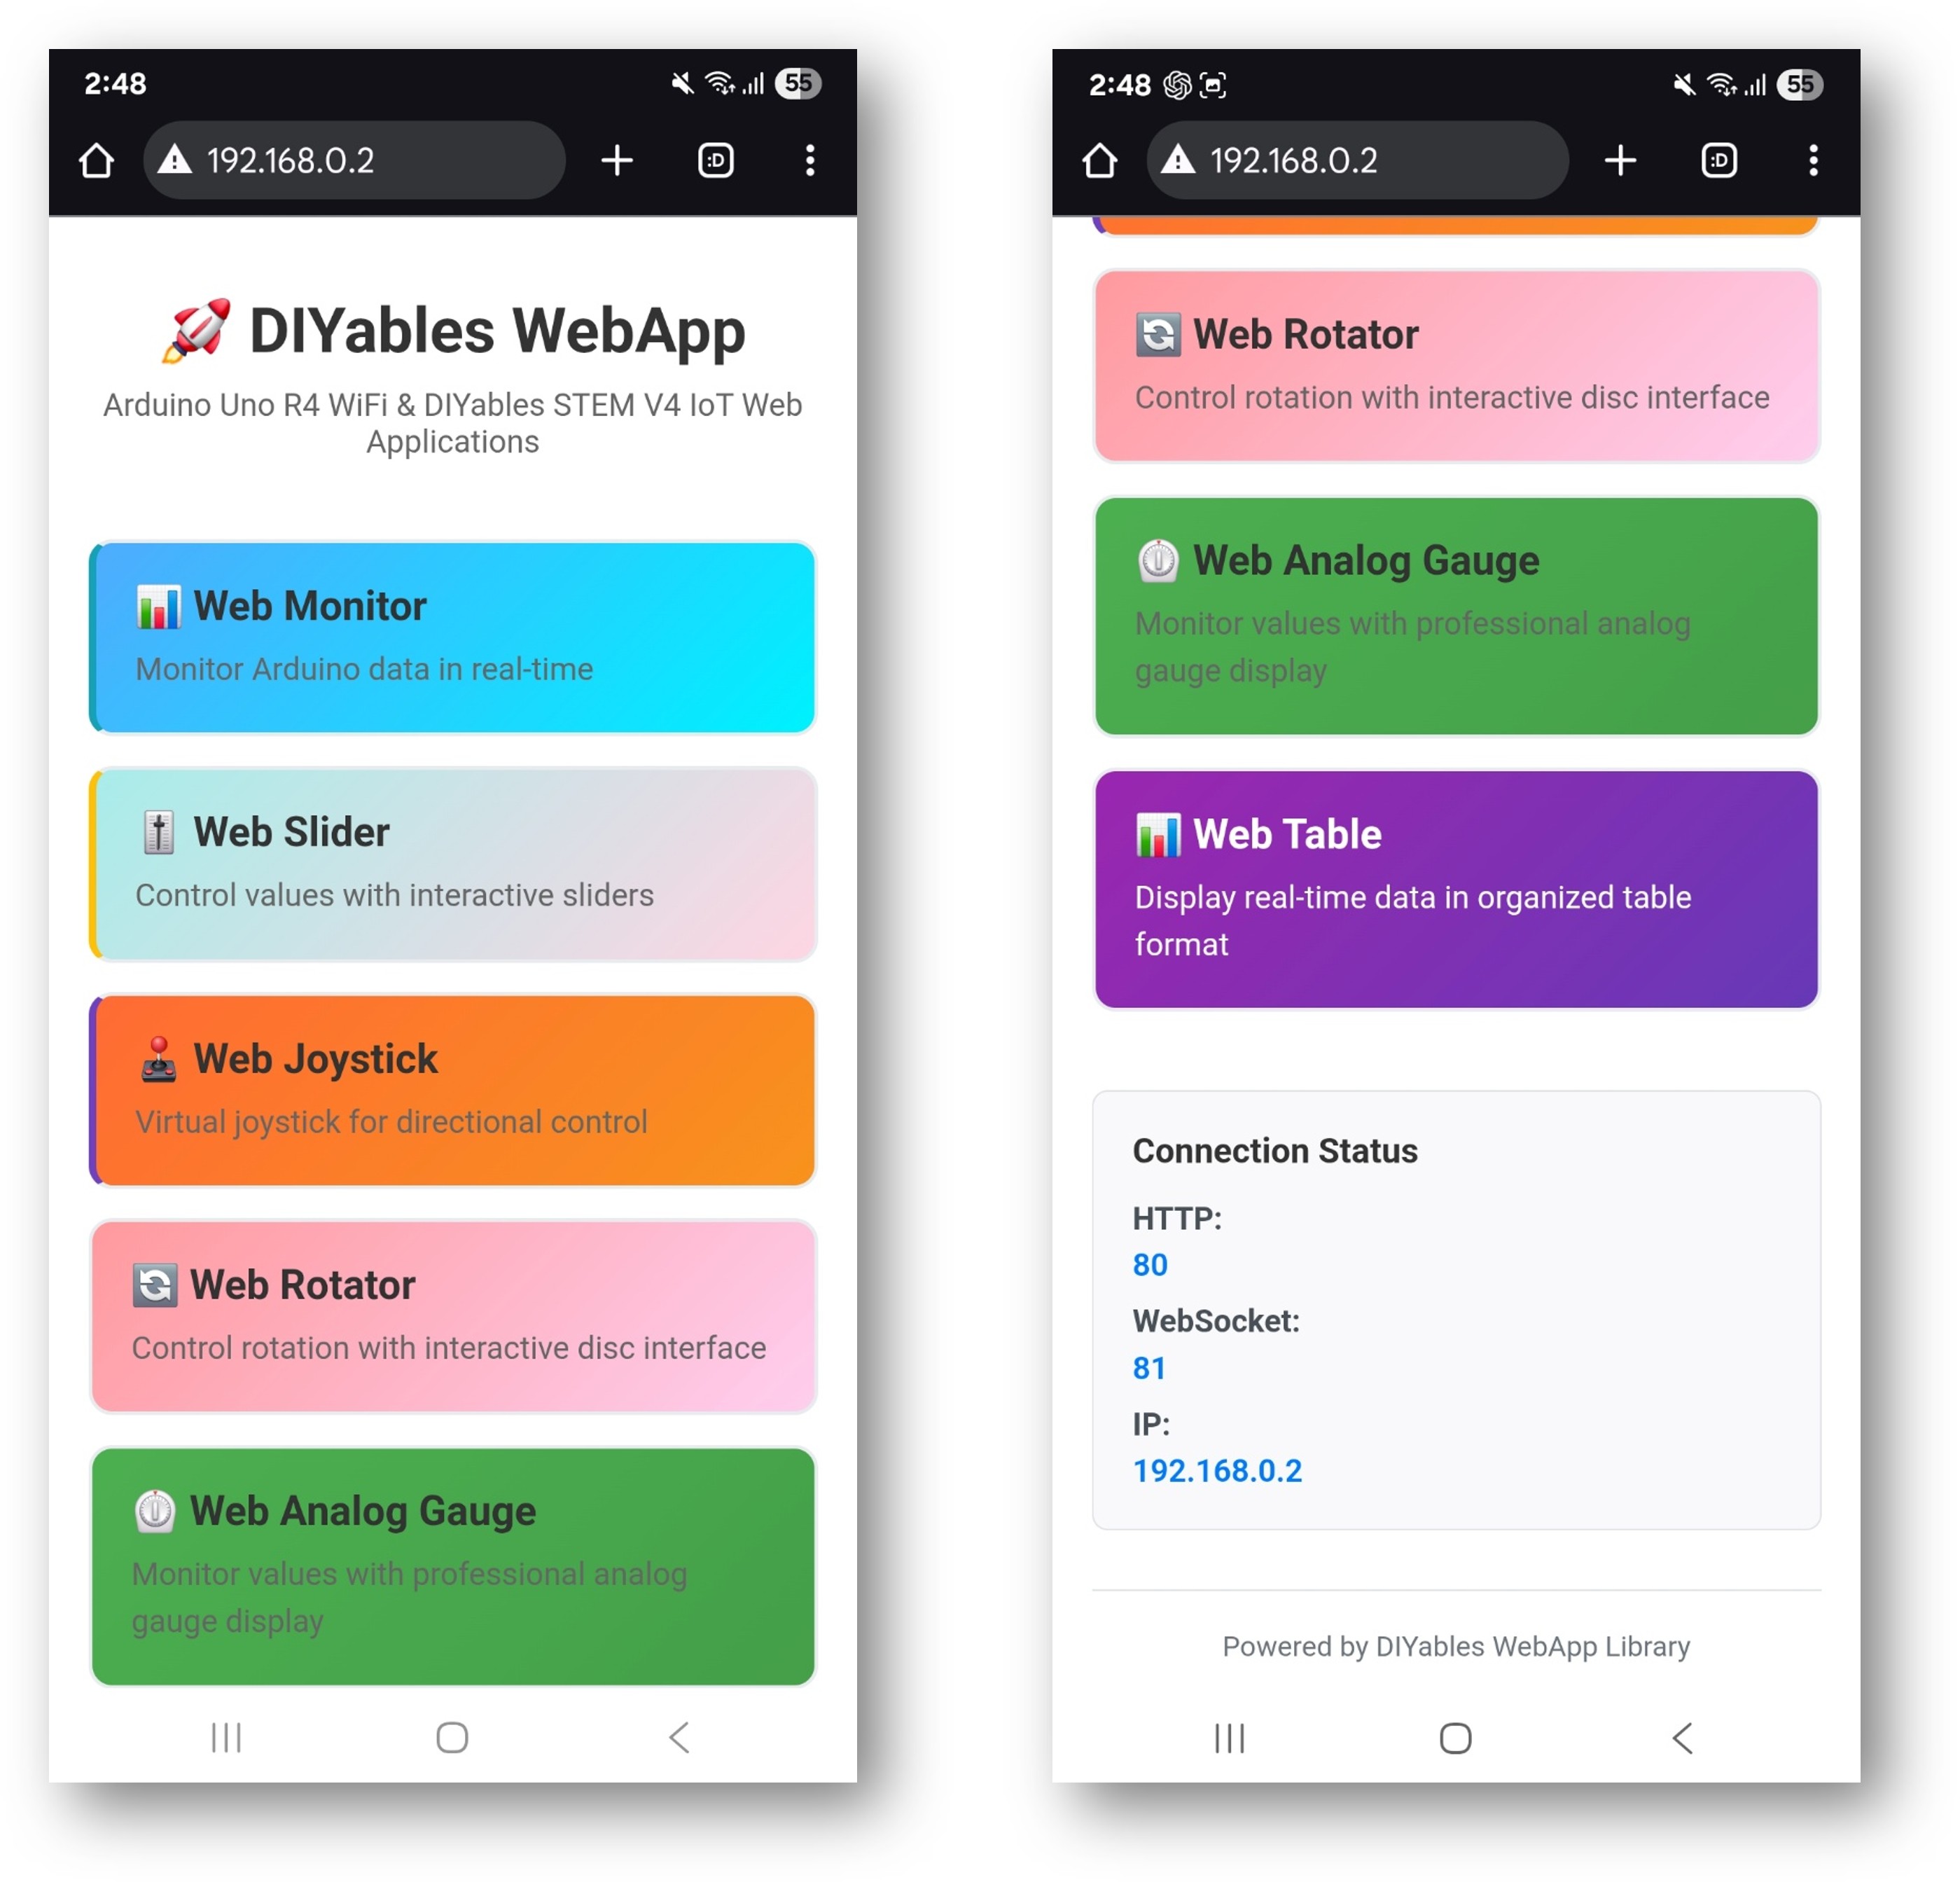
La página de inicio sirve como tu centro de control con enlaces a todas las aplicaciones:
Monitor Web: /webmonitor - Interfaz de comunicación en serie
Chat: /chat - Mensajería interactiva con Arduino
Pines digitales: /digital-pins - Control y monitoreo de pines
Deslizador Web: /webslider - Dos deslizadores de control analógico
Joystick Web: /webjoystick - Interfaz de control de posición 2D
Acceda a cada interfaz directamente:
http://[ARDUINO_IP]/ # Home page
http://[ARDUINO_IP]/webmonitor # Serial monitor interface
http://[ARDUINO_IP]/chat # Chat interface
http://[ARDUINO_IP]/digital-pins # Pin control
http://[ARDUINO_IP]/webslider # Slider controls
http://[ARDUINO_IP]/webjoystick # Joystick control
Este ejemplo completo brinda una base para tus proyectos creativos. Modifica y adapta las configuraciones a continuación para crear increíbles aplicaciones de IoT que se ajusten a tu visión única.
El ejemplo preconfigura pines específicos para diferentes propósitos:
webDigitalPinsPage.enablePin(2, WEB_PIN_OUTPUT);
webDigitalPinsPage.enablePin(3, WEB_PIN_OUTPUT);
webDigitalPinsPage.enablePin(4, WEB_PIN_OUTPUT);
webDigitalPinsPage.enablePin(13, WEB_PIN_OUTPUT);
webDigitalPinsPage.enablePin(8, WEB_PIN_INPUT);
webDigitalPinsPage.enablePin(9, WEB_PIN_INPUT);
DIYablesWebJoystickPage webJoystickPage(false, 5);
El ejemplo mantiene un estado sincronizado entre todas las interfaces:
int pinStates[16] = { LOW };
int currentSlider1 = 64;
int currentSlider2 = 128;
int currentJoystickX = 0;
int currentJoystickY = 0;
La interfaz de chat incluye varios comandos preprogramados:
hola - Respuesta de saludo amistoso
tiempo - Muestra el tiempo de actividad de Arduino en segundos
estado - Informa sobre el estado de Arduino y del LED
ayuda - Enumera los comandos disponibles
User: hello
Arduino: Hello! I'm your Arduino. How can I help you?
User: led on
Arduino: Built-in LED is now ON!
User: time
Arduino: I've been running for 1245 seconds.
User: status
Arduino: Status: Running smoothly! LED is ON
#include <Servo.h>
const int MOTOR_LEFT_PWM = 9;
const int MOTOR_RIGHT_PWM = 10;
const int SERVO_PAN = 11;
const int SERVO_TILT = 12;
const int LED_STRIP_PIN = 6;
Servo panServo, tiltServo;
void setup() {
panServo.attach(SERVO_PAN);
tiltServo.attach(SERVO_TILT);
pinMode(MOTOR_LEFT_PWM, OUTPUT);
pinMode(MOTOR_RIGHT_PWM, OUTPUT);
setupRobotCallbacks();
}
void setupRobotCallbacks() {
webJoystickPage.onJoystickValueFromWeb([](int x, int y) {
int leftSpeed = y + (x / 2);
int rightSpeed = y - (x / 2);
leftSpeed = constrain(leftSpeed, -100, 100);
rightSpeed = constrain(rightSpeed, -100, 100);
leftSpeed = map(leftSpeed, -100, 100, -currentSlider1, currentSlider1);
rightSpeed = map(rightSpeed, -100, 100, -currentSlider1, currentSlider1);
analogWrite(MOTOR_LEFT_PWM, abs(leftSpeed));
analogWrite(MOTOR_RIGHT_PWM, abs(rightSpeed));
Serial.println("Robot - Left: " + String(leftSpeed) + ", Right: " + String(rightSpeed));
});
webSliderPage.onSliderValueFromWeb([](int slider1, int slider2) {
int panAngle = map(currentJoystickX, -100, 100, 0, 180);
int tiltAngle = map(slider2, 0, 255, 0, 180);
panServo.write(panAngle);
tiltServo.write(tiltAngle);
Serial.println("Camera - Pan: " + String(panAngle) + "°, Tilt: " + String(tiltAngle) + "°");
});
webDigitalPinsPage.onPinWrite([](int pin, int state) {
switch (pin) {
case 2:
digitalWrite(pin, state);
Serial.println("Headlights " + String(state ? "ON" : "OFF"));
break;
case 3:
if (state) {
digitalWrite(pin, HIGH);
delay(200);
digitalWrite(pin, LOW);
}
break;
case 4:
if (state) {
analogWrite(MOTOR_LEFT_PWM, 0);
analogWrite(MOTOR_RIGHT_PWM, 0);
Serial.println("EMERGENCY STOP ACTIVATED");
}
break;
}
});
chatPage.onChatMessage([](const String& message) {
String msg = message;
msg.toLowerCase();
if (msg.indexOf("stop") >= 0) {
analogWrite(MOTOR_LEFT_PWM, 0);
analogWrite(MOTOR_RIGHT_PWM, 0);
chatPage.sendToChat("Robot stopped!");
return;
}
if (msg.indexOf("center camera") >= 0) {
panServo.write(90);
tiltServo.write(90);
chatPage.sendToChat("Camera centered!");
return;
}
if (msg.indexOf("speed") >= 0) {
String response = "Current max speed: " + String(map(currentSlider1, 0, 255, 0, 100)) + "%";
chatPage.sendToChat(response);
return;
}
chatPage.sendToChat("Robot commands: stop, center camera, speed");
});
}
const int LIVING_ROOM_LIGHTS = 2;
const int BEDROOM_LIGHTS = 3;
const int KITCHEN_LIGHTS = 4;
const int FAN_CONTROL = 9;
const int AC_CONTROL = 10;
const int MOTION_SENSOR = 8;
const int DOOR_SENSOR = 9;
void setupHomeAutomation() {
pinMode(LIVING_ROOM_LIGHTS, OUTPUT);
pinMode(BEDROOM_LIGHTS, OUTPUT);
pinMode(KITCHEN_LIGHTS, OUTPUT);
pinMode(FAN_CONTROL, OUTPUT);
pinMode(AC_CONTROL, OUTPUT);
pinMode(MOTION_SENSOR, INPUT);
pinMode(DOOR_SENSOR, INPUT_PULLUP);
webDigitalPinsPage.onPinWrite([](int pin, int state) {
digitalWrite(pin, state);
String room;
switch (pin) {
case 2: room = "Living Room"; break;
case 3: room = "Bedroom"; break;
case 4: room = "Kitchen"; break;
default: room = "Pin " + String(pin); break;
}
Serial.println(room + " lights " + String(state ? "ON" : "OFF"));
String message = room + " lights turned " + String(state ? "ON" : "OFF");
chatPage.sendToChat(message);
});
webSliderPage.onSliderValueFromWeb([](int slider1, int slider2) {
analogWrite(FAN_CONTROL, slider1);
analogWrite(AC_CONTROL, slider2);
Serial.println("Fan: " + String(map(slider1, 0, 255, 0, 100)) + "%, " +
"AC: " + String(map(slider2, 0, 255, 0, 100)) + "%");
});
chatPage.onChatMessage([](const String& message) {
String msg = message;
msg.toLowerCase();
if (msg.indexOf("all lights on") >= 0) {
digitalWrite(LIVING_ROOM_LIGHTS, HIGH);
digitalWrite(BEDROOM_LIGHTS, HIGH);
digitalWrite(KITCHEN_LIGHTS, HIGH);
chatPage.sendToChat("All lights turned ON!");
return;
}
if (msg.indexOf("all lights off") >= 0) {
digitalWrite(LIVING_ROOM_LIGHTS, LOW);
digitalWrite(BEDROOM_LIGHTS, LOW);
digitalWrite(KITCHEN_LIGHTS, LOW);
chatPage.sendToChat("All lights turned OFF!");
return;
}
if (msg.indexOf("temperature") >= 0) {
String response = "Fan: " + String(map(currentSlider1, 0, 255, 0, 100)) + "%, " +
"AC: " + String(map(currentSlider2, 0, 255, 0, 100)) + "%";
chatPage.sendToChat(response);
return;
}
if (msg.indexOf("security") >= 0) {
bool motion = digitalRead(MOTION_SENSOR);
bool door = digitalRead(DOOR_SENSOR);
String status = "Motion: " + String(motion ? "DETECTED" : "CLEAR") +
", Door: " + String(door ? "CLOSED" : "OPEN");
chatPage.sendToChat(status);
return;
}
chatPage.sendToChat("Home commands: all lights on/off, temperature, security");
});
}
void loop() {
server.loop();
static bool lastMotion = false;
static bool lastDoor = false;
bool currentMotion = digitalRead(MOTION_SENSOR);
bool currentDoor = digitalRead(DOOR_SENSOR);
if (currentMotion != lastMotion) {
if (currentMotion) {
chatPage.sendToChat("🚨 MOTION DETECTED!");
webMonitorPage.sendToWebMonitor("Security Alert: Motion detected");
}
lastMotion = currentMotion;
}
if (currentDoor != lastDoor) {
String status = currentDoor ? "CLOSED" : "OPENED";
chatPage.sendToChat("🚪 Door " + status);
webMonitorPage.sendToWebMonitor("Security: Door " + status);
lastDoor = currentDoor;
}
delay(10);
}
const int HEATING_ELEMENT = 9;
const int COOLING_FAN = 10;
const int STIRRER_MOTOR = 11;
const int TEMP_SENSOR_PIN = A0;
const int PH_SENSOR_PIN = A1;
void setupScienceExperiment() {
webSliderPage.onSliderValueFromWeb([](int slider1, int slider2) {
int targetTemp = map(slider1, 0, 255, 20, 80);
analogWrite(STIRRER_MOTOR, slider2);
int currentTemp = readTemperature();
if (currentTemp < targetTemp) {
analogWrite(HEATING_ELEMENT, 200);
analogWrite(COOLING_FAN, 0);
} else if (currentTemp > targetTemp + 2) {
analogWrite(HEATING_ELEMENT, 0);
analogWrite(COOLING_FAN, 255);
} else {
analogWrite(HEATING_ELEMENT, 0);
analogWrite(COOLING_FAN, 0);
}
Serial.println("Target: " + String(targetTemp) + "°C, Current: " + String(currentTemp) + "°C");
});
chatPage.onChatMessage([](const String& message) {
String msg = message;
msg.toLowerCase();
if (msg.indexOf("data") >= 0) {
int temp = readTemperature();
float ph = readPH();
String data = "Temperature: " + String(temp) + "°C, pH: " + String(ph, 2);
chatPage.sendToChat(data);
return;
}
if (msg.indexOf("start") >= 0) {
chatPage.sendToChat("🔬 Experiment started! Monitoring conditions...");
return;
}
if (msg.indexOf("stop") >= 0) {
analogWrite(HEATING_ELEMENT, 0);
analogWrite(COOLING_FAN, 0);
analogWrite(STIRRER_MOTOR, 0);
chatPage.sendToChat("⚠️ Experiment stopped - all systems OFF");
return;
}
chatPage.sendToChat("Science commands: data, start, stop");
});
webMonitorPage.onWebMonitorMessage([](const String& message) {
if (message == "log") {
int temp = readTemperature();
float ph = readPH();
String logEntry = String(millis()) + "," + String(temp) + "," + String(ph, 2);
webMonitorPage.sendToWebMonitor(logEntry);
}
});
}
int readTemperature() {
int sensorValue = analogRead(TEMP_SENSOR_PIN);
return map(sensorValue, 0, 1023, 0, 100);
}
float readPH() {
int sensorValue = analogRead(PH_SENSOR_PIN);
return map(sensorValue, 0, 1023, 0, 14) / 10.0;
}
void synchronizeAllStates() {
webSliderPage.sendToWebSlider(currentSlider1, currentSlider2);
webJoystickPage.sendToWebJoystick(currentJoystickX, currentJoystickY);
for (int pin = 0; pin <= 13; pin++) {
if (webDigitalPinsPage.isPinEnabled(pin)) {
webDigitalPinsPage.updatePinState(pin, pinStates[pin]);
}
}
Serial.println("All interface states synchronized");
}
void setupCrossInterfaceCommunication() {
webJoystickPage.onJoystickValueFromWeb([](int x, int y) {
float distance = sqrt(x*x + y*y);
if (distance > 50) {
int maxValue = map(distance, 50, 100, 255, 128);
}
});
webDigitalPinsPage.onPinWrite([](int pin, int state) {
if (pin == 2 && state == HIGH) {
chatPage.sendToChat("📢 System armed - additional commands available");
} else if (pin == 2 && state == LOW) {
chatPage.sendToChat("📢 System disarmed - limited commands only");
}
});
}
1. Algunas interfaces no cargan
Verificar que todas las aplicaciones estén agregadas al servidor en setup()
Verificar las conexiones WebSocket en la consola del navegador
Asegurar suficiente memoria para todas las interfaces
2. Indica las inconsistencias entre interfaces
Implementar funciones de devolución de llamada para la sincronización del estado
Usar variables globales compartidas para el seguimiento del estado
Llamar a las funciones de sincronización después de cambios importantes en el estado
3. Problemas de rendimiento con múltiples interfaces
Reducir las frecuencias de actualización de interfaces no críticas
Implementar actualizaciones selectivas basadas en la interfaz activa
Considerar deshabilitar interfaces no utilizadas para proyectos específicos
4. Limitaciones de memoria
Monitorear la memoria disponible con Serial.print(freeMemory())
Desactiva las interfaces no utilizadas si la memoria es limitada
Optimiza las funciones de callback para minimizar el uso de memoria
void debugSystemState() {
Serial.println("=== System State Debug ===");
Serial.println("Free Memory: " + String(freeMemory()) + " bytes");
Serial.println("Digital Pins:");
for (int pin = 0; pin <= 13; pin++) {
if (webDigitalPinsPage.isPinEnabled(pin)) {
Serial.println(" Pin " + String(pin) + ": " + String(pinStates[pin] ? "HIGH" : "LOW"));
}
}
Serial.println("Sliders: " + String(currentSlider1) + ", " + String(currentSlider2));
Serial.println("Joystick: X=" + String(currentJoystickX) + ", Y=" + String(currentJoystickY));
Serial.println("========================");
}
void optimizeMemoryUsage() {
}
void controlUpdateFrequency() {
static unsigned long lastSlowUpdate = 0;
static unsigned long lastFastUpdate = 0;
if (millis() - lastFastUpdate > 10) {
lastFastUpdate = millis();
}
if (millis() - lastSlowUpdate > 1000) {
lastSlowUpdate = millis();
}
}
Después de dominar el ejemplo de MultipleWebApps:
Personaliza para tu proyecto: Elimina interfaces no utilizadas y agrega lógica específica del proyecto
Agregar sensores: Integra lecturas reales de sensores para el monitoreo de entrada
Implementar seguridad: Agrega paradas de emergencia y interbloqueos de seguridad
Crear comandos personalizados: Extiende la interfaz de chat con comandos específicos del proyecto
Agregar registro de datos: Utiliza monitor web para almacenamiento permanente de datos
Optimización móvil: Prueba y optimiza para el uso en dispositivos móviles
Para ayuda adicional:
Revisa la documentación de los ejemplos individuales (Chat_Example.txt, WebMonitor_Example.txt, etc.)
Revisa la documentación de la API
Visita los tutoriales de DIYables: https://newbiely.com/tutorials/arduino-uno-r4/arduino-uno-r4-diyables-webapps
Foros de la comunidad de Arduino
Este ejemplo completo proporciona la base para prácticamente cualquier proyecto de Arduino controlado por la web. ¡Comienza con esta plantilla y personalízala para tus necesidades específicas!