Arduino UNO R4 - OLED 128x32

Este tutorial te mostrará cómo usar un Arduino UNO R4 con una pantalla OLED 128x32 I2C. Aprenderás:

Pantalla OLED I2C para Arduino UNO R4

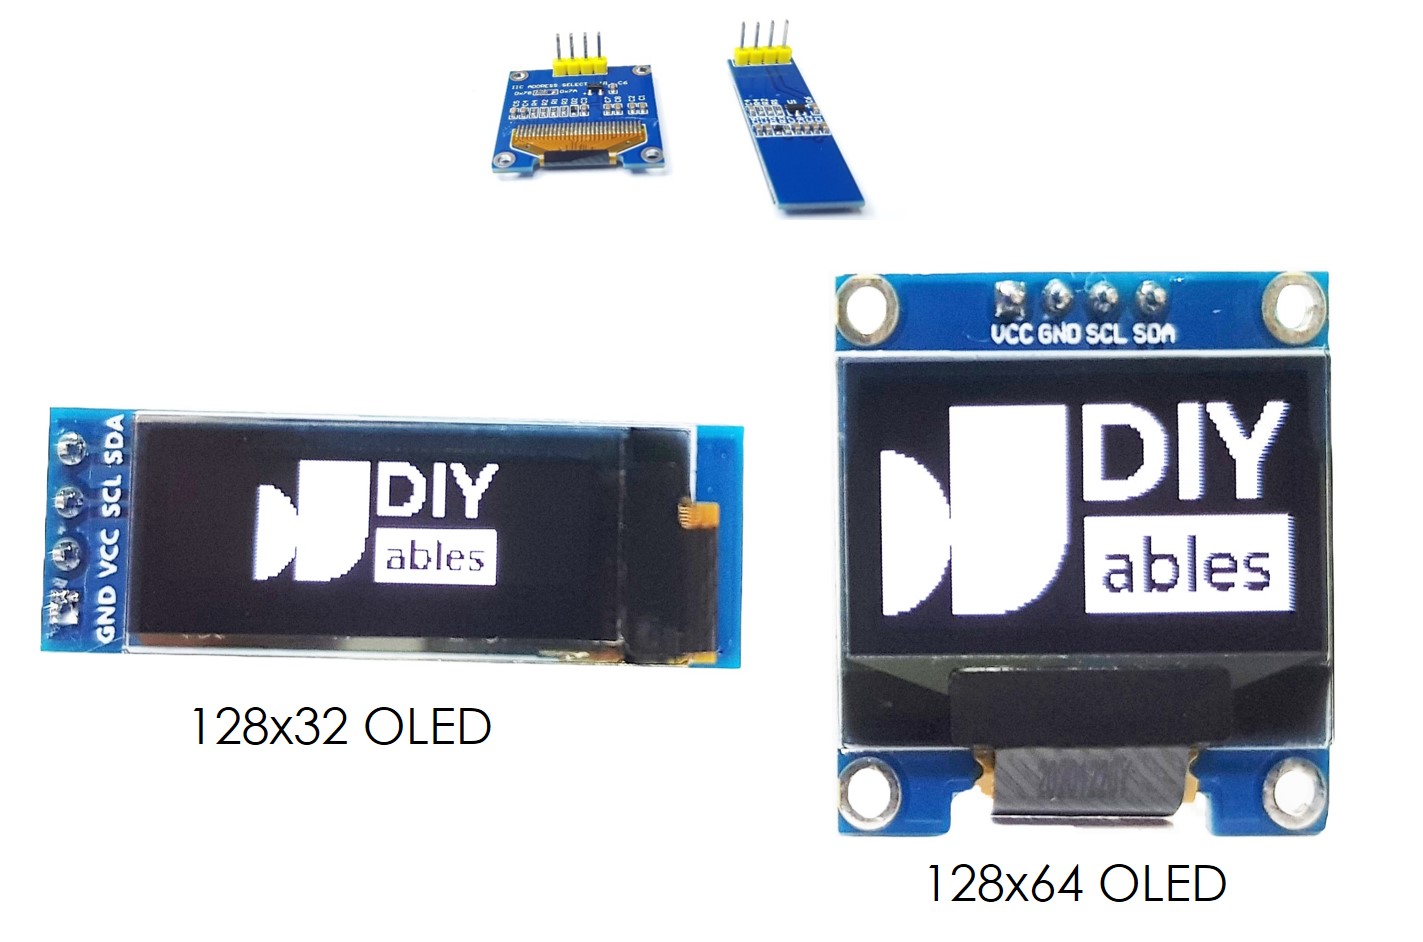
Acerca de la Pantalla OLED

Pinout de la pantalla OLED I2C

  • Pin GND: debe conectarse a la masa del Arduino UNO R4
  • Pin VCC: es la fuente de alimentación para la pantalla, a la que conectamos el pin de 5 voltios del Arduino UNO R4.
  • Pin SCL: es un pin de reloj serial para la interfaz I2C.
  • Pin SDA: es un pin de datos serial para la interfaz I2C.
Diagrama de pines OLED

※ Nota:

La disposición de los pines en un módulo OLED puede diferir según el fabricante y el modelo del módulo. Siempre verifique y siga las etiquetas en el módulo OLED. ¡Esté atento!

Esta guía es para una pantalla OLED que utiliza el controlador I2C SSD1306. La probamos con una pantalla OLED de DIYables. Funciona perfectamente sin ningún problema.

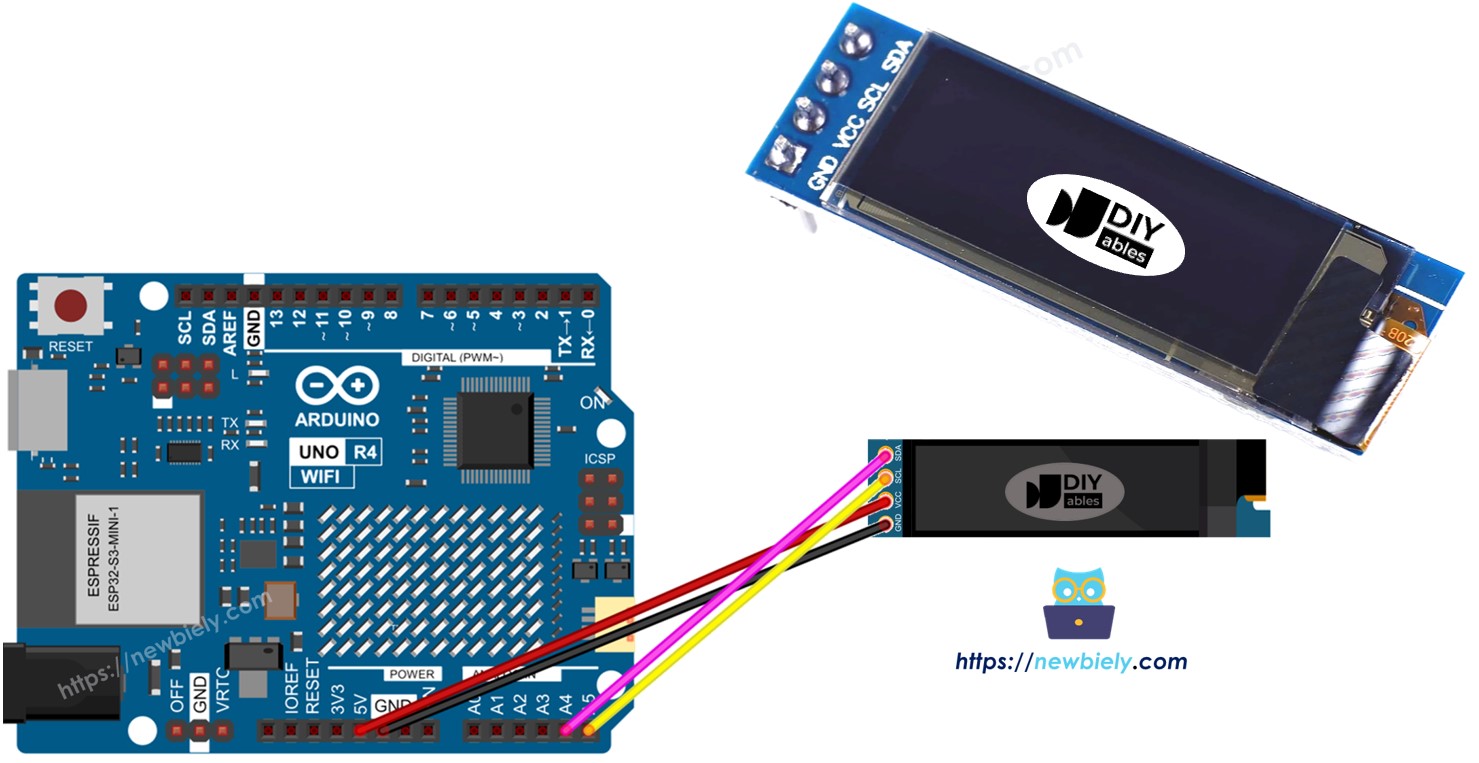
Diagrama de Cableado

Diagrama de cableado de Arduino UNO R4 OLED 128x32

This image is created using Fritzing. Click to enlarge image

Ver La mejor forma de alimentar Arduino Uno R4 y otros componentes.

Si utilizas un tipo diferente de Arduino UNO R4, la distribución de pines no será la misma que la del Arduino UNO. Consulta la tabla a continuación para obtener información sobre otros modelos de Arduino UNO R4.

128x32 OLED Module Arduino UNO R4
Vin 5V
GND GND
SDA A4
SCL A5

Cómo usar OLED con Arduino UNO R4

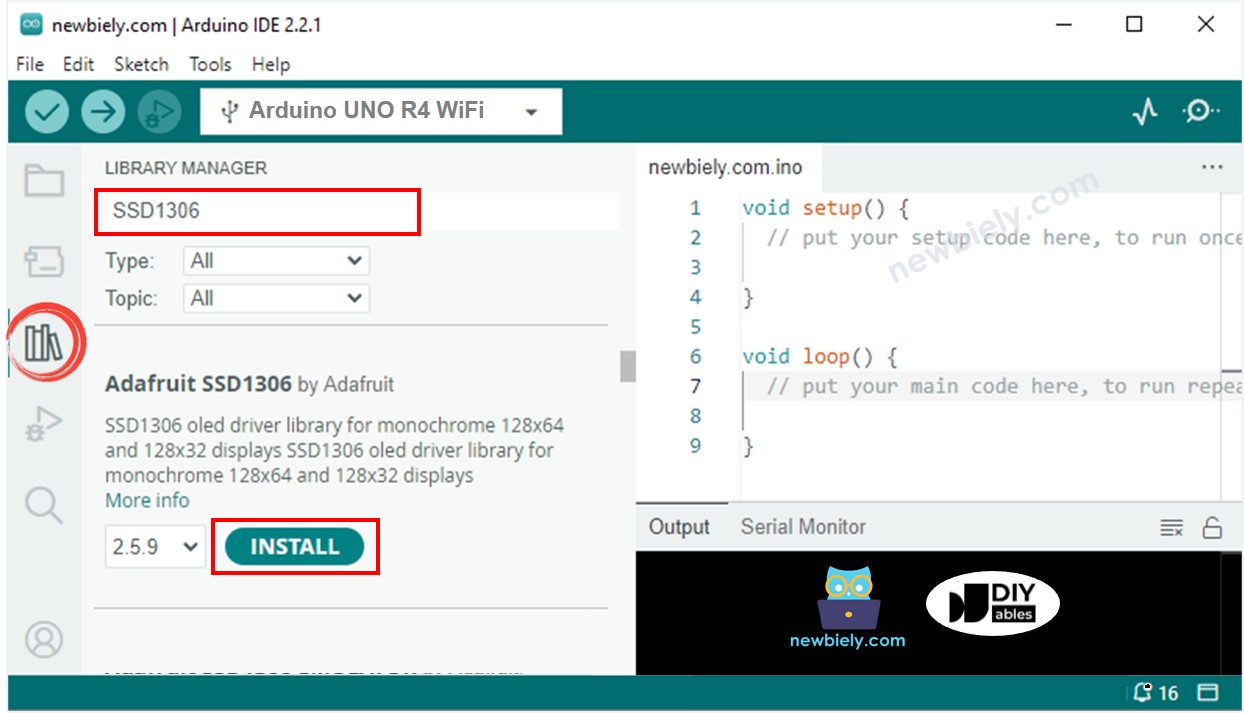
Instalar la biblioteca OLED SSD1306

  • Ve al icono de Bibliotecas en el lado izquierdo del IDE de Arduino.
  • Escribe "SSD1306" en el cuadro de búsqueda y busca la biblioteca SSD1306 creada por Adafruit.
  • Pulsa el botón Instalar para añadir la biblioteca.
Biblioteca OLED para Arduino UNO R4
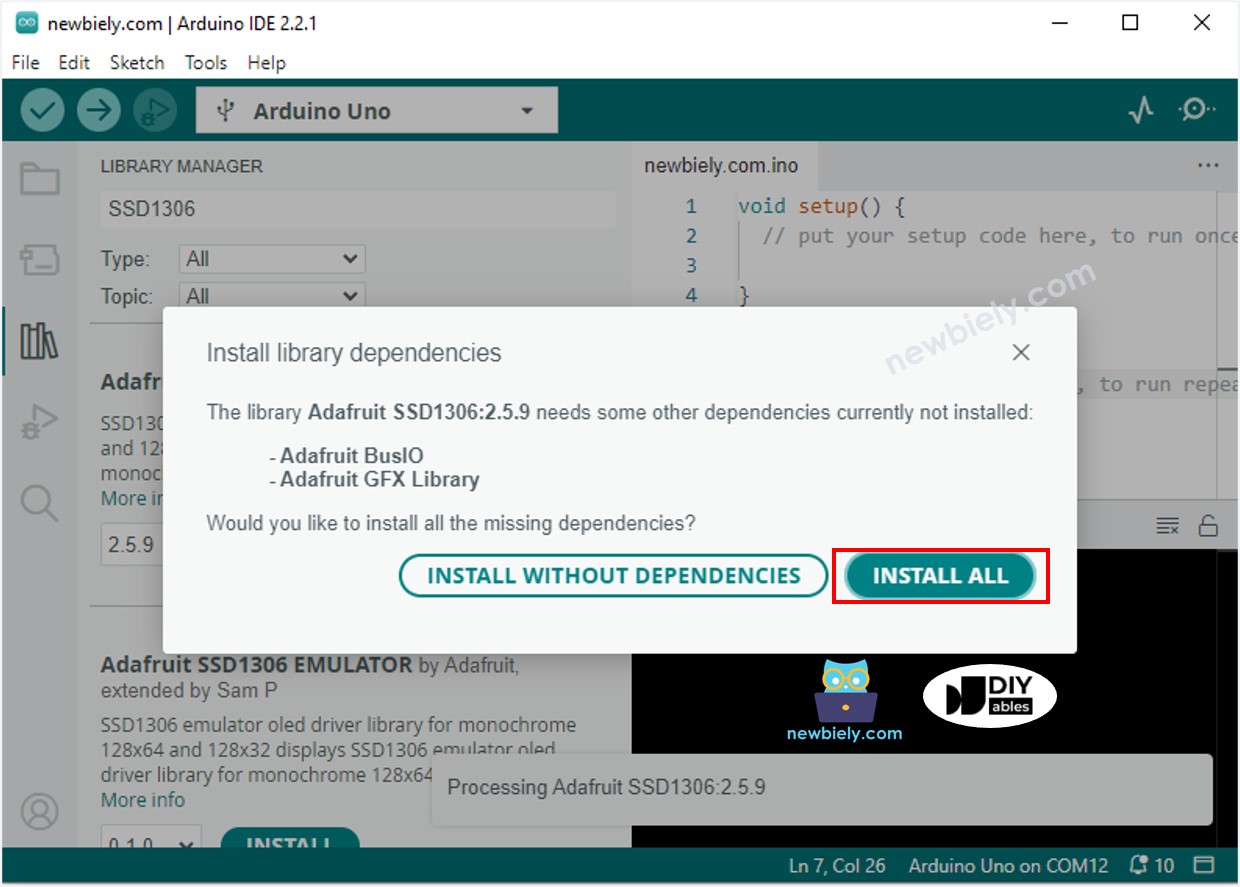
  • Necesitarás instalar algunas bibliotecas adicionales.
  • Haz clic en el botón Instalar Todo para instalar todas las bibliotecas necesarias.
Biblioteca de sensores Adafruit GFX para Arduino UNO R4

Cómo programar para OLED

  • Incluye una biblioteca.
#include <Wire.h> #include <Adafruit_GFX.h> #include <Adafruit_SSD1306.h>
  • Establece el tamaño de la pantalla a OLED 123x32.
#define SCREEN_WIDTH 128 // Defines the width of the OLED display in pixels #define SCREEN_HEIGHT 32 // Defines the height of the OLED display in pixels
  • Crea un elemento OLED SSD1306.
// Initialize an Adafruit SSD1306 display object for I2C communication Adafruit_SSD1306 oled(SCREEN_WIDTH, SCREEN_HEIGHT, &Wire, -1);
  • En la función setup(), configura la pantalla OLED.
// Start OLED display with specific I2C address (0x3C) for 128x32 resolution if (!oled.begin(SSD1306_SWITCHCAPVCC, 0x3C)) { Serial.println(F("SSD1306 allocation failed")); // Print error message if initialization fails while (true); // Enter an infinite loop to halt further execution }
  • Entonces puedes mostrar texto, imágenes y dibujar líneas.

Arduino UNO R4 Código - Mostrar texto en OLED

/* * Este código de Arduino UNO R4 fue desarrollado por es.newbiely.com * Este código de Arduino UNO R4 se proporciona al público sin ninguna restricción. * Para tutoriales completos y diagramas de cableado, visite: * https://es.newbiely.com/tutorials/arduino-uno-r4/arduino-uno-r4-oled-128x32 */ #include <Wire.h> #include <Adafruit_GFX.h> #include <Adafruit_SSD1306.h> #define SCREEN_WIDTH 128 // OLED display width, in pixels #define SCREEN_HEIGHT 32 // OLED display height, in pixels // declare an SSD1306 display object connected to I2C Adafruit_SSD1306 oled(SCREEN_WIDTH, SCREEN_HEIGHT, &Wire, -1); void setup() { Serial.begin(9600); // initialize OLED display with address 0x3C for 128x32 if (!oled.begin(SSD1306_SWITCHCAPVCC, 0x3C)) { Serial.println(F("SSD1306 allocation failed")); while (true); } delay(2000); // wait for initializing oled.clearDisplay(); // clear display oled.setTextSize(1); // text size oled.setTextColor(WHITE); // text color oled.setCursor(0, 10); // position to display oled.println("Hello World!"); // text to display oled.display(); // show on OLED } void loop() { }

Aquí hay algunas funciones que puedes usar para mostrar texto en la OLED:

  • oled.clearDisplay(): apaga todos los píxeles.
  • oled.drawPixel(x, y, color): dibuja un píxel en las coordenadas x, y.
  • oled.setTextSize(n): cambia el tamaño de texto, con opciones de 1 a 8.
  • oled.setCursor(x, y): establece el punto de inicio para el texto.
  • oled.setTextColor(WHITE): pone el color del texto en blanco.
  • oled.setTextColor(BLACK, WHITE): pone el color del texto negro y el fondo blanco.
  • oled.println("message"): muestra el texto.
  • oled.println(number): muestra un número.
  • oled.println(number, HEX): muestra un número en formato hexadecimal.
  • oled.display(): actualiza la pantalla con los cambios.
  • oled.startscrollright(start, stop): mueve el texto de izquierda a derecha.
  • oled.startscrollleft(start, stop): mueve el texto de derecha a izquierda.
  • oled.startscrolldiagright(start, stop): mueve el texto en diagonal desde la esquina inferior izquierda hasta la esquina superior derecha.
  • oled.startscrolldiagleft(start, stop): mueve el texto en diagonal desde la esquina inferior derecha hasta la esquina superior izquierda.
  • oled.stopscroll(): detiene cualquier texto con desplazamiento.

Código de Arduino UNO R4 - Dibujo en OLED

/* * Este código de Arduino UNO R4 fue desarrollado por es.newbiely.com * Este código de Arduino UNO R4 se proporciona al público sin ninguna restricción. * Para tutoriales completos y diagramas de cableado, visite: * https://es.newbiely.com/tutorials/arduino-uno-r4/arduino-uno-r4-oled-128x32 */ #include <Wire.h> #include <Adafruit_GFX.h> #include <Adafruit_SSD1306.h> #define SCREEN_WIDTH 128 // OLED display width, in pixels #define SCREEN_HEIGHT 32 // OLED display height, in pixels // declare an SSD1306 display object connected to I2C Adafruit_SSD1306 oled(SCREEN_WIDTH, SCREEN_HEIGHT, &Wire, -1); void setup() { Serial.begin(9600); // initialize OLED display with address 0x3C for 128x32 if (!oled.begin(SSD1306_SWITCHCAPVCC, 0x3C)) { Serial.println(F("SSD1306 allocation failed")); while (true); } delay(2000); // wait for initializing oled.setCursor(0, 0); } void loop() { // draw rectangle oled.clearDisplay(); oled.drawRect(0, 15, 60, 40, WHITE); oled.display(); delay(2000); // fill rectangle oled.clearDisplay(); oled.fillRect(0, 15, 60, 40, WHITE); oled.display(); delay(2000); // draw the round rectangle oled.clearDisplay(); oled.drawRoundRect(0, 15, 60, 40, 8, WHITE); oled.display(); delay(2000); // fill the round rectangle oled.clearDisplay(); oled.fillRoundRect(0, 15, 60, 40, 8, WHITE); oled.display(); delay(2000); // draw circle oled.clearDisplay(); oled.drawCircle(20, 35, 20, WHITE); oled.display(); delay(2000); // fill circle oled.clearDisplay(); oled.fillCircle(20, 35, 20, WHITE); oled.display(); delay(2000); // draw triangle oled.clearDisplay(); oled.drawTriangle(30, 15, 0, 60, 60, 60, WHITE); oled.display(); delay(2000); // fill triangle oled.clearDisplay(); oled.fillTriangle(30, 15, 0, 60, 60, 60, WHITE); oled.display(); delay(2000); }

Código Arduino UNO R4 – Mostrar imagen

Para mostrar una imagen en una pantalla OLED, primero convierte la imagen (de cualquier formato) en un arreglo de mapa de bits. Puedes usar esta herramienta en línea para convertirla. Mira la imagen que se muestra abajo para ver cómo convertir una imagen en un arreglo de mapa de bits. Cambié el icono de Arduino a un arreglo de mapa de bits.

imagen a arreglo de mapas de bits

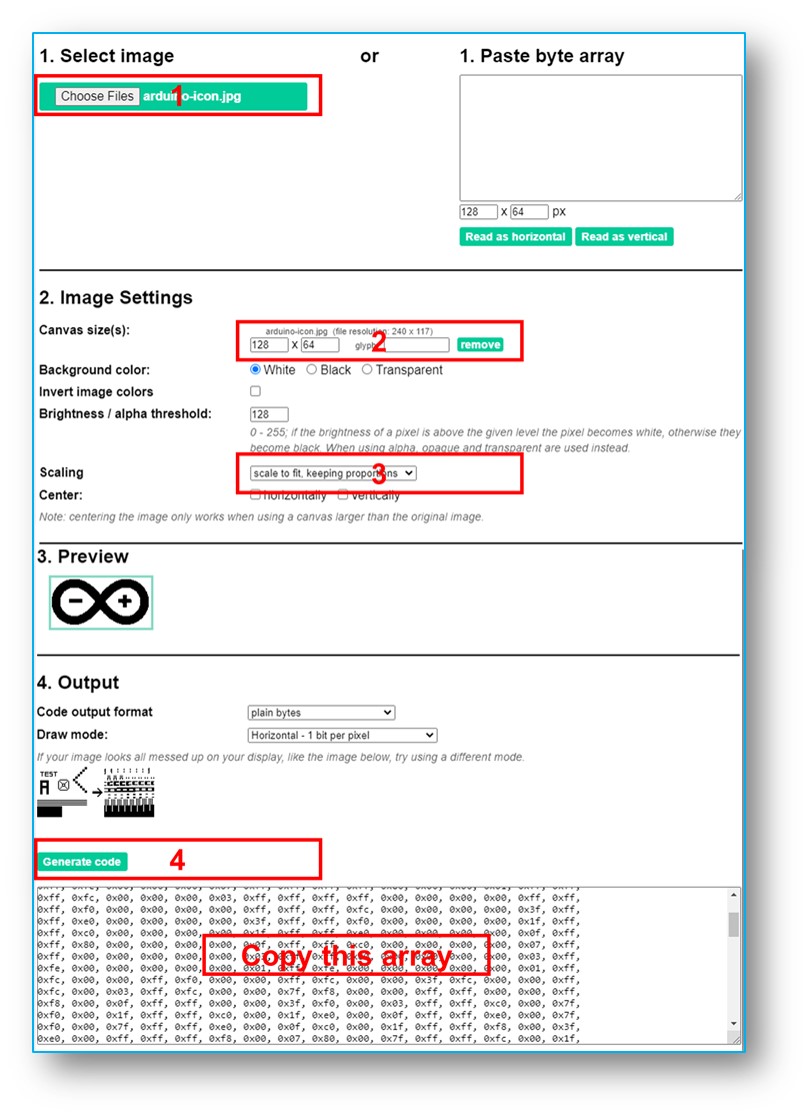
Copie el código del nuevo arreglo y actualícelo en el arreglo de íconos de Arduino en el código que se muestra a continuación.

El video de abajo muestra cómo hacerlo con una pantalla OLED 128x64, Arduino Uno y el ícono de Arduino.

Podemos hacer lo mismo para que funcione con Arduino Uno R4 y OLED 128x32. El código a continuación muestra el icono de DIYables en el OLED 128x32.

/* * Este código de Arduino UNO R4 fue desarrollado por es.newbiely.com * Este código de Arduino UNO R4 se proporciona al público sin ninguna restricción. * Para tutoriales completos y diagramas de cableado, visite: * https://es.newbiely.com/tutorials/arduino-uno-r4/arduino-uno-r4-oled-128x32 */ #include <Wire.h> #include <Adafruit_GFX.h> #include <Adafruit_SSD1306.h> #define SCREEN_WIDTH 128 // OLED display width, in pixels #define SCREEN_HEIGHT 32 // OLED display height, in pixels // declare an SSD1306 display object connected to I2C Adafruit_SSD1306 oled(SCREEN_WIDTH, SCREEN_HEIGHT, &Wire, -1); // bitmap of DIYable-icon image int bitmap_width = 72; // MUST match to bitmap image size int bitmap_height = 32; // MUST match to bitmap image size const unsigned char bitmap_DIYables [] PROGMEM = { // 'DIYables Icon', 72x32 0x00, 0x0f, 0xff, 0xff, 0x8f, 0xf8, 0x07, 0x38, 0x07, 0x00, 0x0f, 0xff, 0xff, 0x8f, 0xfe, 0x07, 0x1c, 0x0e, 0x00, 0x0f, 0xff, 0xff, 0x8f, 0xff, 0x07, 0x1c, 0x1c, 0x00, 0x0f, 0xff, 0xff, 0x8e, 0x07, 0x87, 0x0e, 0x1c, 0x00, 0x0f, 0xff, 0xff, 0x8e, 0x03, 0xc7, 0x0f, 0x38, 0x00, 0x0f, 0xff, 0xff, 0x8e, 0x01, 0xc7, 0x07, 0x38, 0x00, 0x0f, 0xff, 0xff, 0x8e, 0x01, 0xc7, 0x03, 0xf0, 0xf0, 0x0f, 0xff, 0xff, 0x8e, 0x01, 0xc7, 0x03, 0xe0, 0xfc, 0x0f, 0xff, 0xff, 0x8e, 0x01, 0xc7, 0x01, 0xe0, 0xfe, 0x0f, 0xff, 0xff, 0x8e, 0x03, 0xc7, 0x01, 0xc0, 0xff, 0x8f, 0xff, 0xff, 0x8e, 0x03, 0x87, 0x01, 0xc0, 0xff, 0x8f, 0xff, 0xff, 0x8e, 0x0f, 0x87, 0x01, 0xc0, 0xff, 0xcf, 0xff, 0xff, 0x8f, 0xff, 0x07, 0x01, 0xc0, 0xff, 0xef, 0xff, 0xff, 0x8f, 0xfc, 0x07, 0x01, 0xc0, 0xff, 0xef, 0xff, 0xff, 0x80, 0x00, 0x00, 0x00, 0x00, 0xff, 0xff, 0xff, 0xff, 0x80, 0x00, 0x00, 0x00, 0x00, 0xff, 0xff, 0xff, 0xff, 0x80, 0x00, 0x00, 0x00, 0x00, 0xff, 0xff, 0xff, 0xff, 0x80, 0x00, 0x00, 0x00, 0x00, 0xff, 0xff, 0xff, 0xff, 0x8f, 0xff, 0xff, 0xff, 0xff, 0xff, 0xff, 0xff, 0xff, 0x8f, 0xff, 0xff, 0xff, 0xff, 0xff, 0xff, 0xff, 0xff, 0x0f, 0xfc, 0xfd, 0xff, 0xff, 0xff, 0xff, 0xff, 0xff, 0x0f, 0xfc, 0xfc, 0xff, 0xff, 0xff, 0xff, 0xff, 0xff, 0x0f, 0xfc, 0xfc, 0xff, 0xff, 0xff, 0xef, 0xff, 0xff, 0x0e, 0x0c, 0x0c, 0xc3, 0x07, 0xff, 0xef, 0xff, 0xfe, 0x0f, 0xec, 0xec, 0x99, 0x7f, 0xff, 0xef, 0xff, 0xfe, 0x0f, 0x04, 0xe4, 0x81, 0x0f, 0xff, 0xcf, 0xff, 0xfc, 0x0e, 0x32, 0xe4, 0x9f, 0xc7, 0xff, 0x8f, 0xff, 0xf8, 0x0e, 0x32, 0x4c, 0x9b, 0x67, 0xff, 0x0f, 0xff, 0xf0, 0x0e, 0x04, 0x0c, 0xc3, 0x0f, 0xfe, 0x0f, 0xff, 0xe0, 0x0f, 0xff, 0xff, 0xff, 0xff, 0xfc, 0x0f, 0xff, 0x80, 0x0f, 0xff, 0xff, 0xff, 0xff, 0xe0, 0x0f, 0xfc, 0x00, 0x0f, 0xff, 0xff, 0xff, 0xff }; void setup() { Serial.begin(9600); // initialize OLED display with address 0x3C for 128x32 if (!oled.begin(SSD1306_SWITCHCAPVCC, 0x3C)) { Serial.println(F("SSD1306 allocation failed")); while (true); } delay(2000); // wait for initializing } void loop() { oled.clearDisplay(); // display bitmap to the center int x = (SCREEN_WIDTH - bitmap_width) / 2; int y = (SCREEN_HEIGHT - bitmap_height) / 2; oled.drawBitmap(x, y, bitmap_DIYables, bitmap_width, bitmap_height, WHITE); oled.display(); delay(2000); }

※ Nota:

  • El tamaño de la imagen debe ser igual o menor que el tamaño de la pantalla.
  • Para usar el código dado para un OLED de 128x32, debes redimensionar la imagen y ajustar el ancho y la altura en la función oled.drawBitmap();.

Cómo centrar vertical y horizontalmente el texto o número en OLED

/* * Este código de Arduino UNO R4 fue desarrollado por es.newbiely.com * Este código de Arduino UNO R4 se proporciona al público sin ninguna restricción. * Para tutoriales completos y diagramas de cableado, visite: * https://es.newbiely.com/tutorials/arduino-uno-r4/arduino-uno-r4-oled-128x32 */ #include <Wire.h> #include <Adafruit_GFX.h> #include <Adafruit_SSD1306.h> #define SCREEN_WIDTH 128 // OLED display width, in pixels #define SCREEN_HEIGHT 32 // OLED display height, in pixels Adafruit_SSD1306 oled(SCREEN_WIDTH, SCREEN_HEIGHT, &Wire, -1); // // create SSD1306 display object connected to I2C void setup() { Serial.begin(9600); // initialize OLED display with address 0x3C for 128x32 if (!oled.begin(SSD1306_SWITCHCAPVCC, 0x3C)) { Serial.println(F("SSD1306 allocation failed")); while (true); } delay(2000); // wait for initializing oled.clearDisplay(); // clear display oled.setTextSize(2); // text size oled.setTextColor(WHITE); // text color oled.setCursor(0, 10); // position to display } void loop() { // display string String text = "DIYables"; oledDisplayCenter(text); delay(2000); // display number int number = 21; String str = String(number); oledDisplayCenter(str); delay(2000); } void oledDisplayCenter(String text) { int16_t x1; int16_t y1; uint16_t width; uint16_t height; oled.getTextBounds(text, 0, 0, &x1, &y1, &width, &height); // display on horizontal and vertical center oled.clearDisplay(); // clear display oled.setCursor((SCREEN_WIDTH - width) / 2, (SCREEN_HEIGHT - height) / 2); oled.println(text); // text to display oled.display(); }

Solución de problemas de OLED

Si la pantalla OLED no muestra nada, por favor siga estos pasos:

  • Asegúrate de que el cableado esté bien hecho.
  • Confirma que tu OLED I2C esté equipado con un controlador SSD1306.
  • Verifica la dirección I2C de tu OLED utilizando el siguiente código de escáner de direcciones I2C en Arduino UNO R4.
// I2C address scanner program #include <Wire.h> void setup() { Wire.begin(); Serial.begin(9600); Serial.println("I2C Scanner"); } void loop() { byte error, address; int nDevices; Serial.println("Scanning..."); nDevices = 0; for(address = 1; address < 127; address++ ) { Wire.beginTransmission(address); error = Wire.endTransmission(); if (error == 0) { Serial.print("I2C device found at address 0x"); if (address < 16) Serial.print("0"); Serial.print(address,HEX); Serial.println(" !"); nDevices++; } else if (error==4) { Serial.print("Unknown error at address 0x"); if (address < 16) Serial.print("0"); Serial.println(address,HEX); } } if (nDevices == 0) Serial.println("No I2C devices found"); else Serial.println("done"); delay(5000); // wait 5 seconds for next scan }

La salida en el Monitor Serial:

COM6
Send
Scanning... I2C device found at address 0x3C ! done Scanning... I2C device found at address 0x3C ! done
Autoscroll Show timestamp
Clear output
9600 baud  
Newline  

※ NUESTROS MENSAJES

  • No dude en compartir el enlace de este tutorial. Sin embargo, por favor no use nuestro contenido en otros sitios web. Hemos invertido mucho esfuerzo y tiempo en crear el contenido, ¡por favor respete nuestro trabajo!