Arduino UNO R4 - Botón - Antirrebote

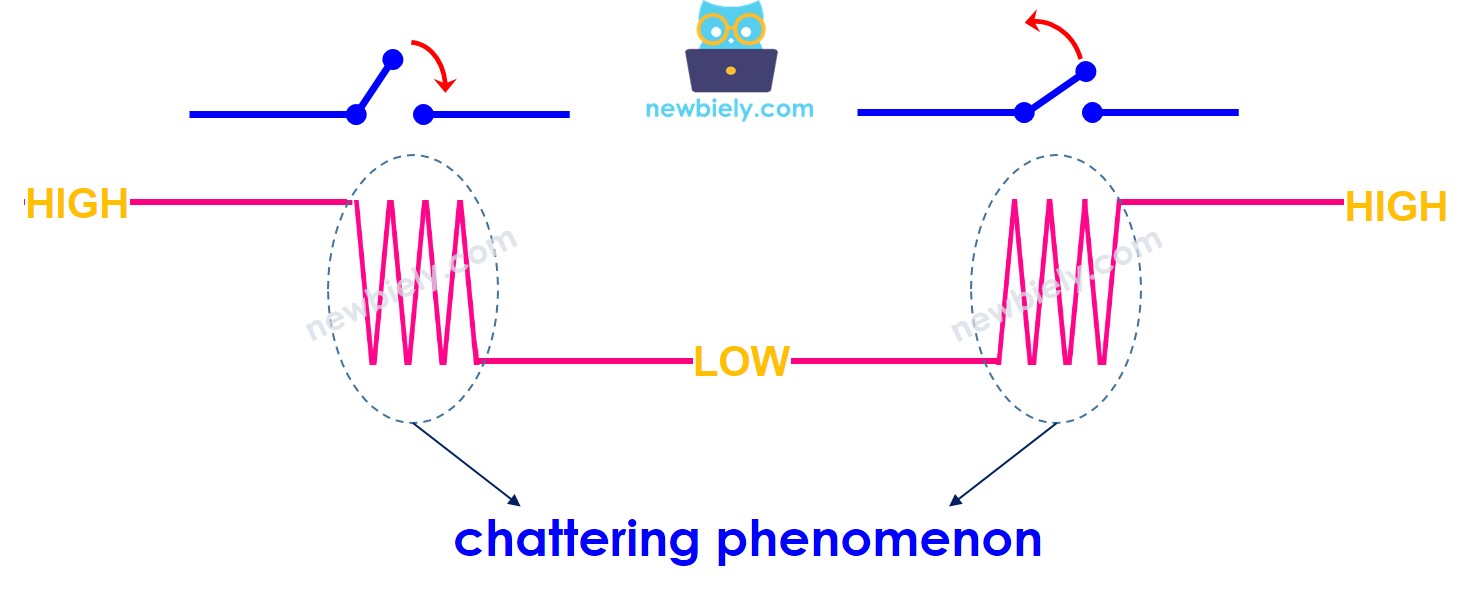
Al programar el Arduino Uno R4 para detectar un evento de pulsación de un botón, puede ocurrir que una única pulsación se detecte varias veces. Esto sucede porque, debido a factores mecánicos, el botón o interruptor puede cambiar rápidamente entre BAJO y ALTO varias veces. A esto se le llama "rebote". El rebote puede hacer que una pulsación de botón se detecte como múltiples pulsaciones, lo que puede causar errores en algunas aplicaciones. Este tutorial explica cómo corregir este problema, un proceso conocido como el filtrado de rebotes del botón.

Fenómeno de traqueteo del Arduino UNO R4

Acerca del Botón

Aprende sobre los botones (disposición de pines, funcionamiento, programación) en los siguientes tutoriales si no estás familiarizado con ellos:

Diagrama de Cableado

Diagrama de cableado del botón Arduino UNO R4

This image is created using Fritzing. Click to enlarge image

Examinemos y comparemos el código del Arduino UNO R4 sin y con anti-rebote, y observemos sus comportamientos.

Arduino Uno R4 - Botón sin rebote

Antes de aprender sobre la técnica de debouncing, echemos un vistazo al código sin ella y veamos cómo se comporta.

/* * Este código de Arduino UNO R4 fue desarrollado por es.newbiely.com * Este código de Arduino UNO R4 se proporciona al público sin ninguna restricción. * Para tutoriales completos y diagramas de cableado, visite: * https://es.newbiely.com/tutorials/arduino-uno-r4/arduino-uno-r4-button-debounce */ #define BUTTON_PIN 7 // The Arduino UNO R4 pin connected to the button int button_state; // the current state of button int prev_button_state = LOW; // the previous state of button void setup() { // initialize serial communication at 9600 bits per second: Serial.begin(9600); // initialize the pushbutton pin as a pull-up input pinMode(BUTTON_PIN, INPUT_PULLUP); } void loop() { // read the state of the switch/button: button_state = digitalRead(BUTTON_PIN); if (prev_button_state == HIGH && button_state == LOW) Serial.println("The button is pressed"); else if (prev_button_state == LOW && button_state == HIGH) Serial.println("The button is released"); // save the last state prev_button_state = button_state; }

Pasos R\u00e1pidos

Sigue estas instrucciones paso a paso:

  • Si esta es la primera vez que usas Arduino Uno R4 WiFi/Minima, consulta el tutorial sobre configurar el entorno para Arduino Uno R4 WiFi/Minima en el IDE de Arduino.
  • Conecte los componentes de acuerdo con el diagrama proporcionado.
  • Conecte la placa Arduino Uno R4 a su computadora usando un cable USB.
  • Inicie el IDE de Arduino en su computadora.
  • Seleccione la placa Arduino Uno R4 adecuada (p. ej., Arduino Uno R4 WiFi) y el puerto COM.
  • Copie el código anterior y ábralo en el IDE de Arduino.
  • Haga clic en el botón Subir en el IDE de Arduino para enviar el código a Arduino UNO R4.
Subir código al IDE de Arduino
  • Abre el Monitor Serial.
  • Mantén presionado el botón durante unos segundos y suéltalo.
  • Revisa el Monitor Serial para ver el resultado.
COM6
Send
The button is pressed The button is pressed The button is pressed The button is released The button is released
Autoscroll Show timestamp
Clear output
9600 baud  
Newline  

Como puedes ver, presionaste y soltaste el botón solo una vez. Sin embargo, Arduino lo reconoce como varias pulsaciones y liberaciones.

※ Nota:

El valor de DEBOUNCE_TIME varía según las diferentes aplicaciones. Cada aplicación podría usar un valor único.

Arduino Uno R4 - Botón con antirrebote

/* * Este código de Arduino UNO R4 fue desarrollado por es.newbiely.com * Este código de Arduino UNO R4 se proporciona al público sin ninguna restricción. * Para tutoriales completos y diagramas de cableado, visite: * https://es.newbiely.com/tutorials/arduino-uno-r4/arduino-uno-r4-button-debounce */ #define BUTTON_PIN 7 // The Arduino UNO R4 pin connected to the button #define DEBOUNCE_TIME 50 // The debounce time; increase if the output flickers int last_steady_state = LOW; // the previous steady state from the input pin int last_flickerable_state = LOW; // the previous flickerable state from the input pin int current_state; // the current reading from the input pin unsigned long last_debounce_time = 0; // the last time the output pin was toggled void setup() { // initialize serial communication at 9600 bits per second: Serial.begin(9600); // initialize the pushbutton pin as a pull-up input pinMode(BUTTON_PIN, INPUT_PULLUP); } void loop() { // read the state of the switch/button: current_state = digitalRead(BUTTON_PIN); // If the switch/button changed, due to noise or pressing: if (current_state != last_flickerable_state) { // reset the debouncing timer last_debounce_time = millis(); // save the the last flickerable state last_flickerable_state = current_state; } if ((millis() - last_debounce_time) > DEBOUNCE_TIME) { // if the button state has changed: if (last_steady_state == HIGH && current_state == LOW) Serial.println("The button is pressed"); else if (last_steady_state == LOW && current_state == HIGH) Serial.println("The button is released"); // save the the last steady state last_steady_state = current_state; } }

Pasos R\u00e1pidos

  • Copia el código anterior y ábrelo con el IDE de Arduino.
  • Pulsa el botón Subir en el IDE de Arduino para enviar el código al Arduino UNO R4.
  • Abre el Monitor serie.
  • Mantén pulsado el botón durante unos segundos antes de soltarlo.
  • Revisa el Monitor serie.
COM6
Send
The button is pressed The button is released
Autoscroll Show timestamp
Clear output
9600 baud  
Newline  

Como se puede ver, pulsaste y soltaste el botón una vez. El Arduino lo detecta correctamente como una única pulsación y liberación, eliminando cualquier rebote.

Lo Hicimos Sencillo: Código de Debounce de Botón para Arduino UNO R4 Usando una Biblioteca

Creamos una forma más simple para los principiantes que usan muchos botones al crear una biblioteca llamada ezButton. Puedes obtener más información sobre la biblioteca ezButton aquí.

Veamos algunos códigos de ejemplo.

Código de anti-rebote de botón para Arduino UNO R4 para un solo botón

/* * Created by ArduinoGetStarted.com * * This example code is in the public domain * * Tutorial page: https://arduinogetstarted.com/tutorials/arduino-button-library * * This example reads the state of a button with debounce and print it to Serial Monitor. */ #include <ezButton.h> ezButton button(7); // create ezButton object that attach to pin 7; void setup() { Serial.begin(9600); button.setDebounceTime(50); // set debounce time to 50 milliseconds } void loop() { button.loop(); // MUST call the loop() function first if(button.isPressed()) Serial.println("The button is pressed"); if(button.isReleased()) Serial.println("The button is released"); }

Código antirrebote de botones para Arduino UNO R4

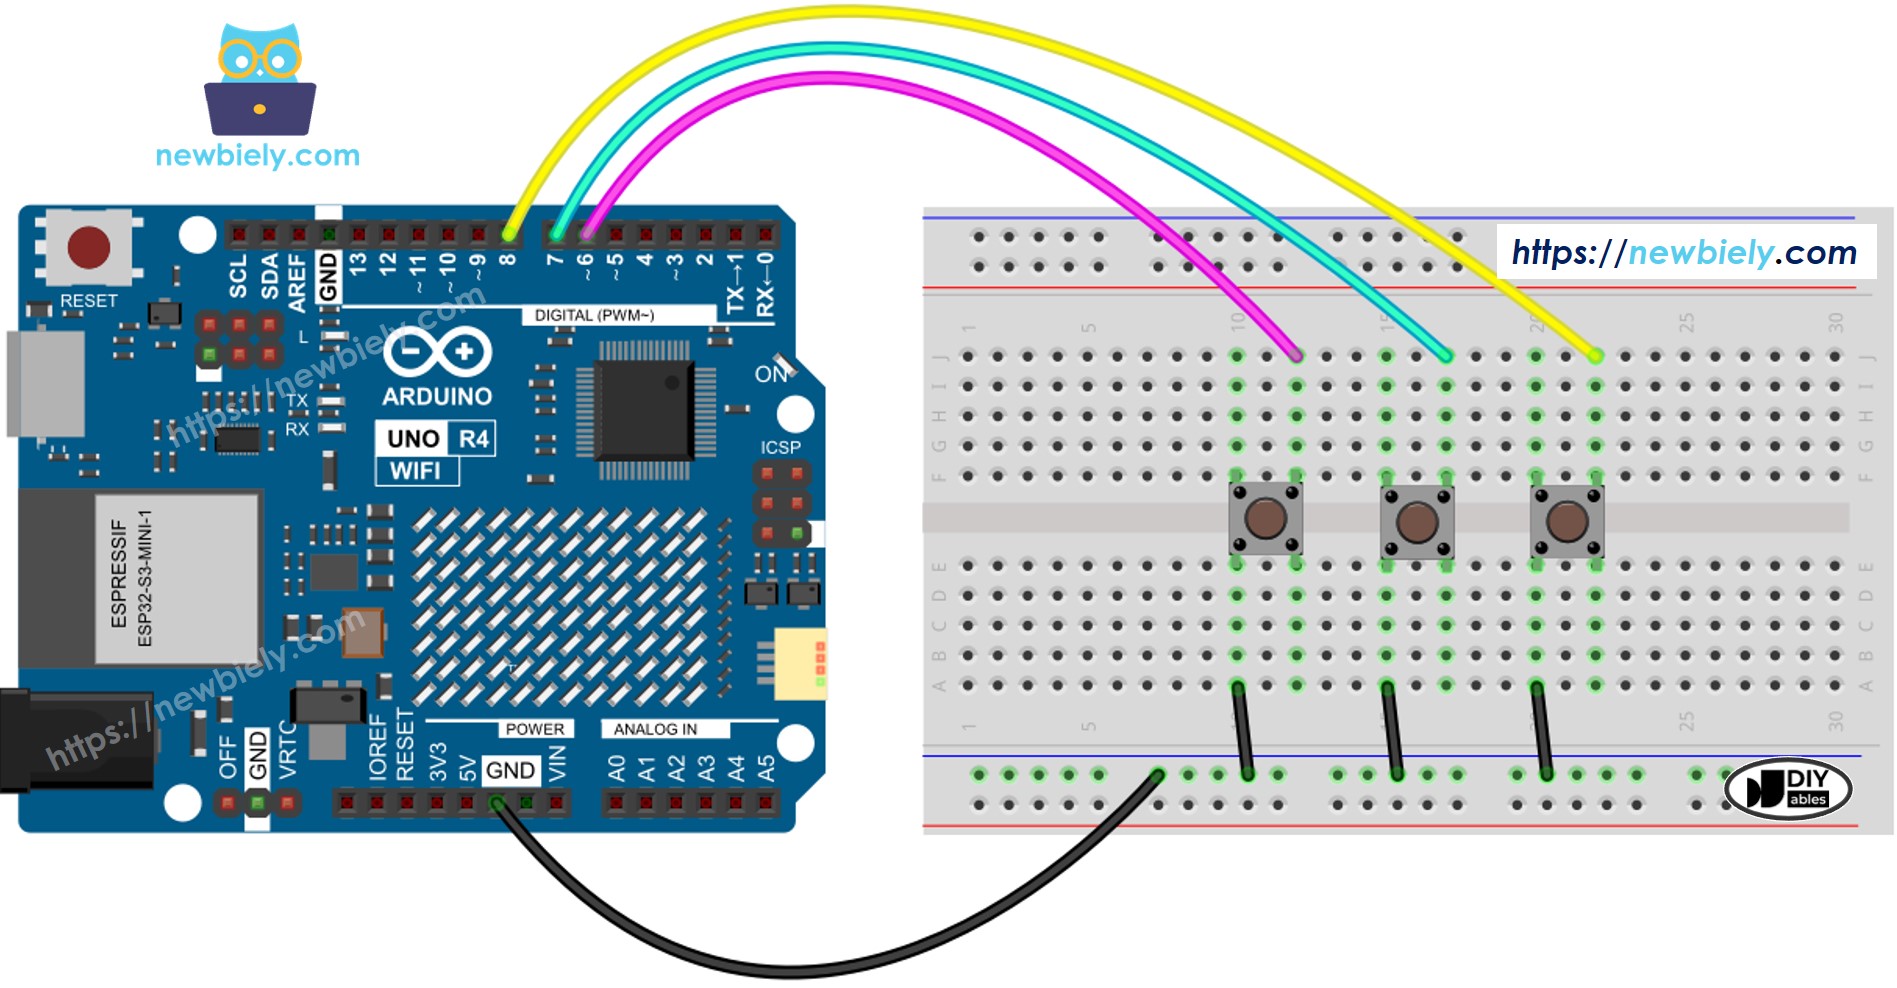
Vamos a implementar antirrebote para 3 botones. Aquí está el diagrama de cableado entre Arduino UNO R4 y tres botones:

Diagrama de cableado de la biblioteca de botones de Arduino UNO R4

This image is created using Fritzing. Click to enlarge image

Ver La mejor forma de alimentar Arduino Uno R4 y otros componentes.

/* * Este código de Arduino UNO R4 fue desarrollado por es.newbiely.com * Este código de Arduino UNO R4 se proporciona al público sin ninguna restricción. * Para tutoriales completos y diagramas de cableado, visite: * https://es.newbiely.com/tutorials/arduino-uno-r4/arduino-uno-r4-button-debounce */ #include <ezButton.h> ezButton button_1(6); // initialize ezButton object connected to pin 6 ezButton button_2(7); // initialize ezButton object connected to pin 7 ezButton button_3(8); // initialize ezButton object connected to pin 8 void setup() { Serial.begin(9600); button_1.setDebounceTime(50); // configure debounce time for button_1 to 50ms button_2.setDebounceTime(50); // configure debounce time for button_2 to 50ms button_3.setDebounceTime(50); // configure debounce time for button_3 to 50ms } void loop() { button_1.loop(); // update button_1 state button_2.loop(); // update button_2 state button_3.loop(); // update button_3 state if(button_1.isPressed()) Serial.println("The button 1 is pressed"); if(button_1.isReleased()) Serial.println("The button 1 is released"); if(button_2.isPressed()) Serial.println("The button 2 is pressed"); if(button_2.isReleased()) Serial.println("The button 2 is released"); if(button_3.isPressed()) Serial.println("The button 3 is pressed"); if(button_3.isReleased()) Serial.println("The button 3 is released"); }

Video Tutorial

Estamos considerando crear tutoriales en video. Si considera que los tutoriales en video son importantes, suscríbase a nuestro canal de YouTube para motivarnos a crear los videos.

※ NUESTROS MENSAJES

  • No dude en compartir el enlace de este tutorial. Sin embargo, por favor no use nuestro contenido en otros sitios web. Hemos invertido mucho esfuerzo y tiempo en crear el contenido, ¡por favor respete nuestro trabajo!