Arduino Nano ESP32 - Ethernet
Esta guía te muestra cómo conectar Arduino Nano ESP32 a Internet o a tu red local utilizando el módulo Ethernet W55010. Aprenderás lo siguiente:
- Cómo conectar Arduino Nano ESP32 al módulo Ethernet W5500
- Cómo programar Arduino Nano ESP32 para solicitudes HTTP a través de Ethernet
- Cómo crear un servidor web simple en Arduino Nano ESP32 con Ethernet
Hardware Requerido
Or you can buy the following kits:
| 1 | × | DIYables Sensor Kit (30 sensors/displays) | |
| 1 | × | DIYables Sensor Kit (18 sensors/displays) |
Divulgación: Algunos de los enlaces proporcionados en esta sección son enlaces de afiliado de Amazon. Podemos recibir una comisión por las compras realizadas a través de estos enlaces sin costo adicional para usted. Apreciamos su apoyo.
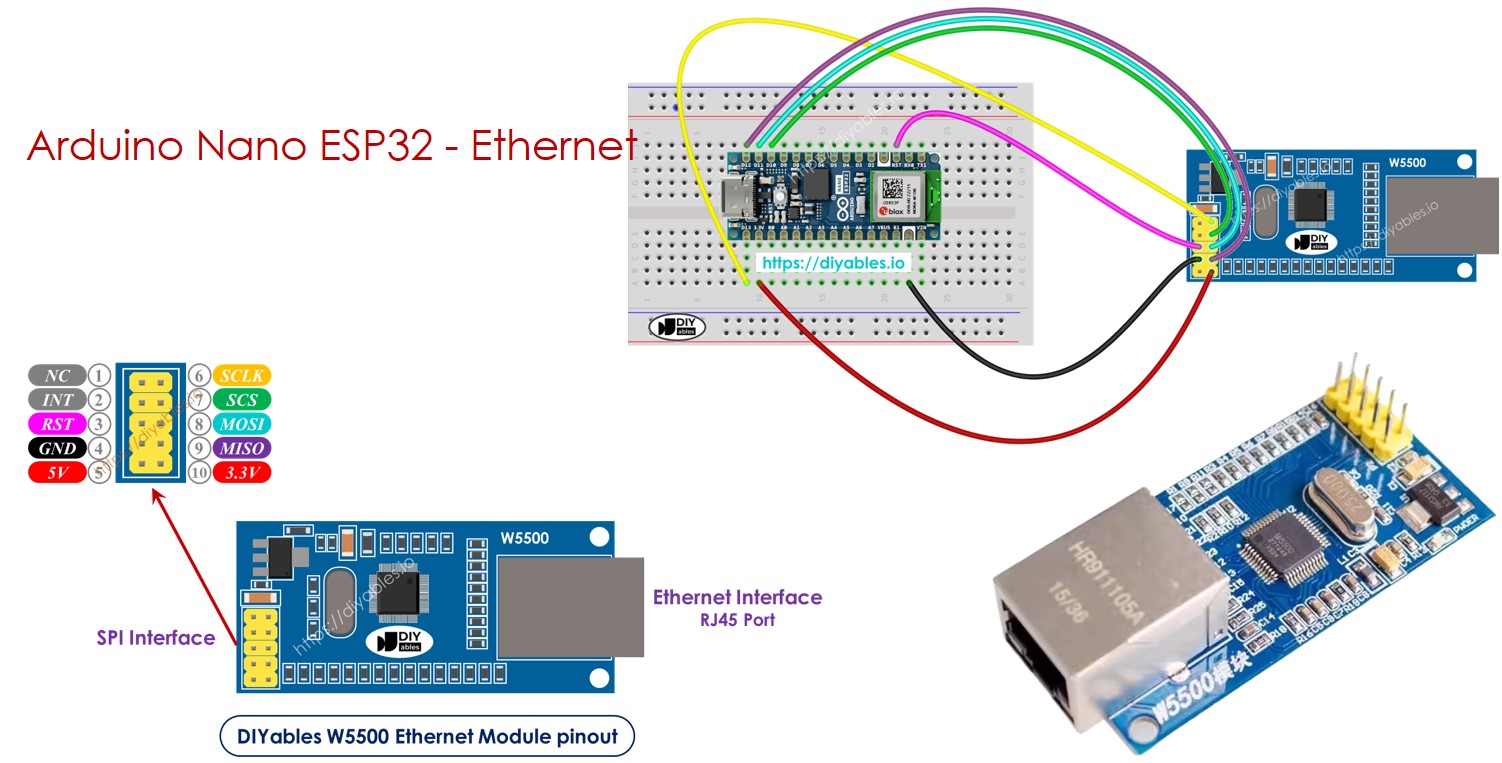
Acerca del módulo Ethernet W5500
El módulo Ethernet W550io tiene dos tipos de conexiones:
- Interfaz RJ45: Conéctalo a un router o switch usando un cable Ethernet.
- Interfaz SPI: Usa esto para conectar a una placa Arduino Nano ESP32. Incluye 10 pines:
- Pin NC: Deja este pin sin conectar.
- Pin INT: Deja este pin sin conectar.
- Pin RST: Este es el pin de reinicio; conéctalo al pin EN de la placa Arduino Nano ESP32.
- Pin GND: Conéctalo al pin GND de la placa Arduino Nano ESP32.
- Pin 5V: No conectes este pin.
- Pin 3.3V: Conéctalo al pin 3.3V de la placa Arduino Nano ESP32.
- Pin MISO: Conéctalo al pin SPI MISO de la placa Arduino Nano ESP32.
- Pin MOSI: Conéctalo al pin SPI MOSI de la placa Arduino Nano ESP32.
- Pin SCS: Conéctalo al pin SPI CS de la placa Arduino Nano ESP32.
- Pin SCLK: Conéctalo al pin SPI SCK de la placa Arduino Nano ESP32.
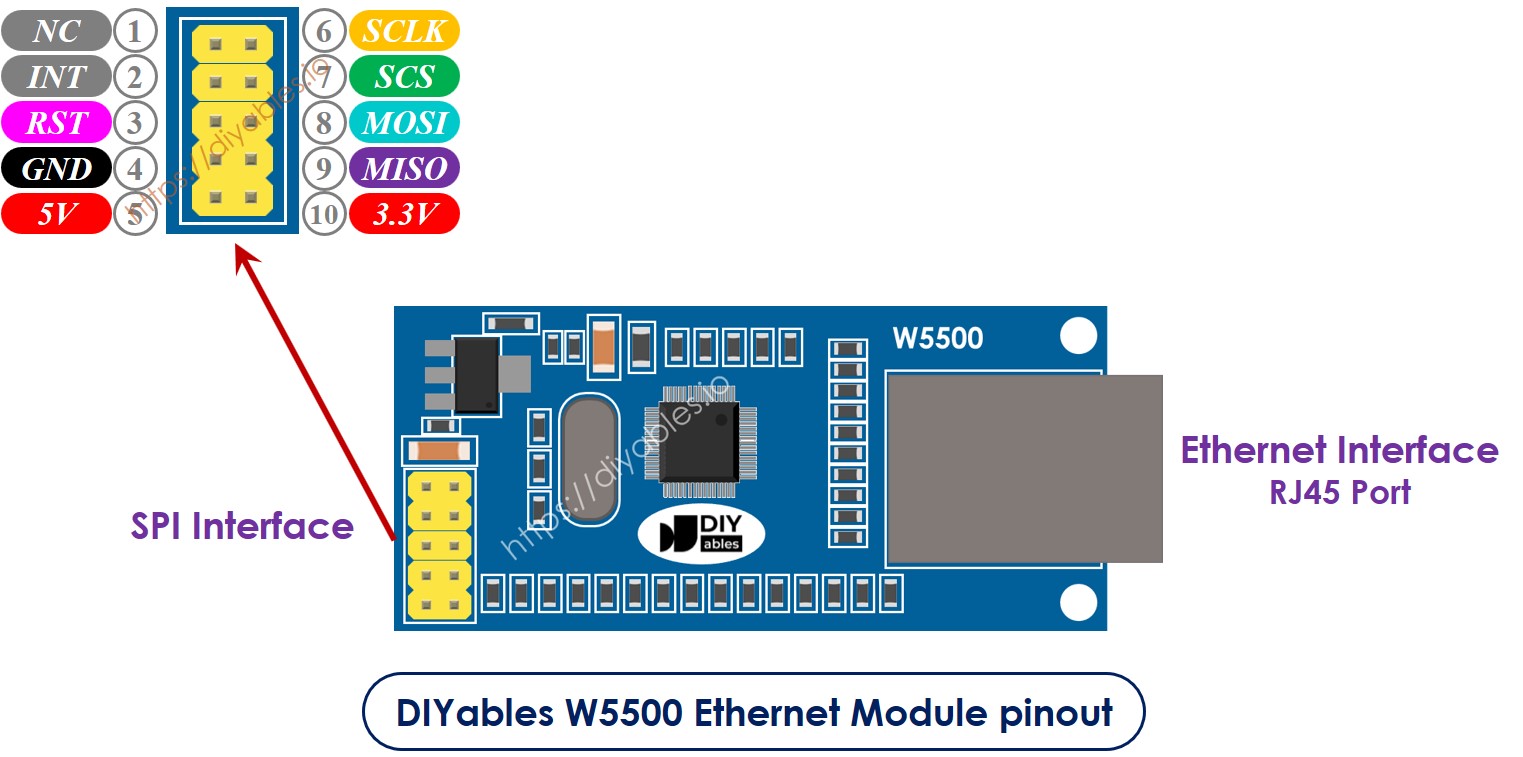
image source: diyables.io
Diagrama de cableado entre Arduino Nano ESP32 y el módulo Ethernet W5500
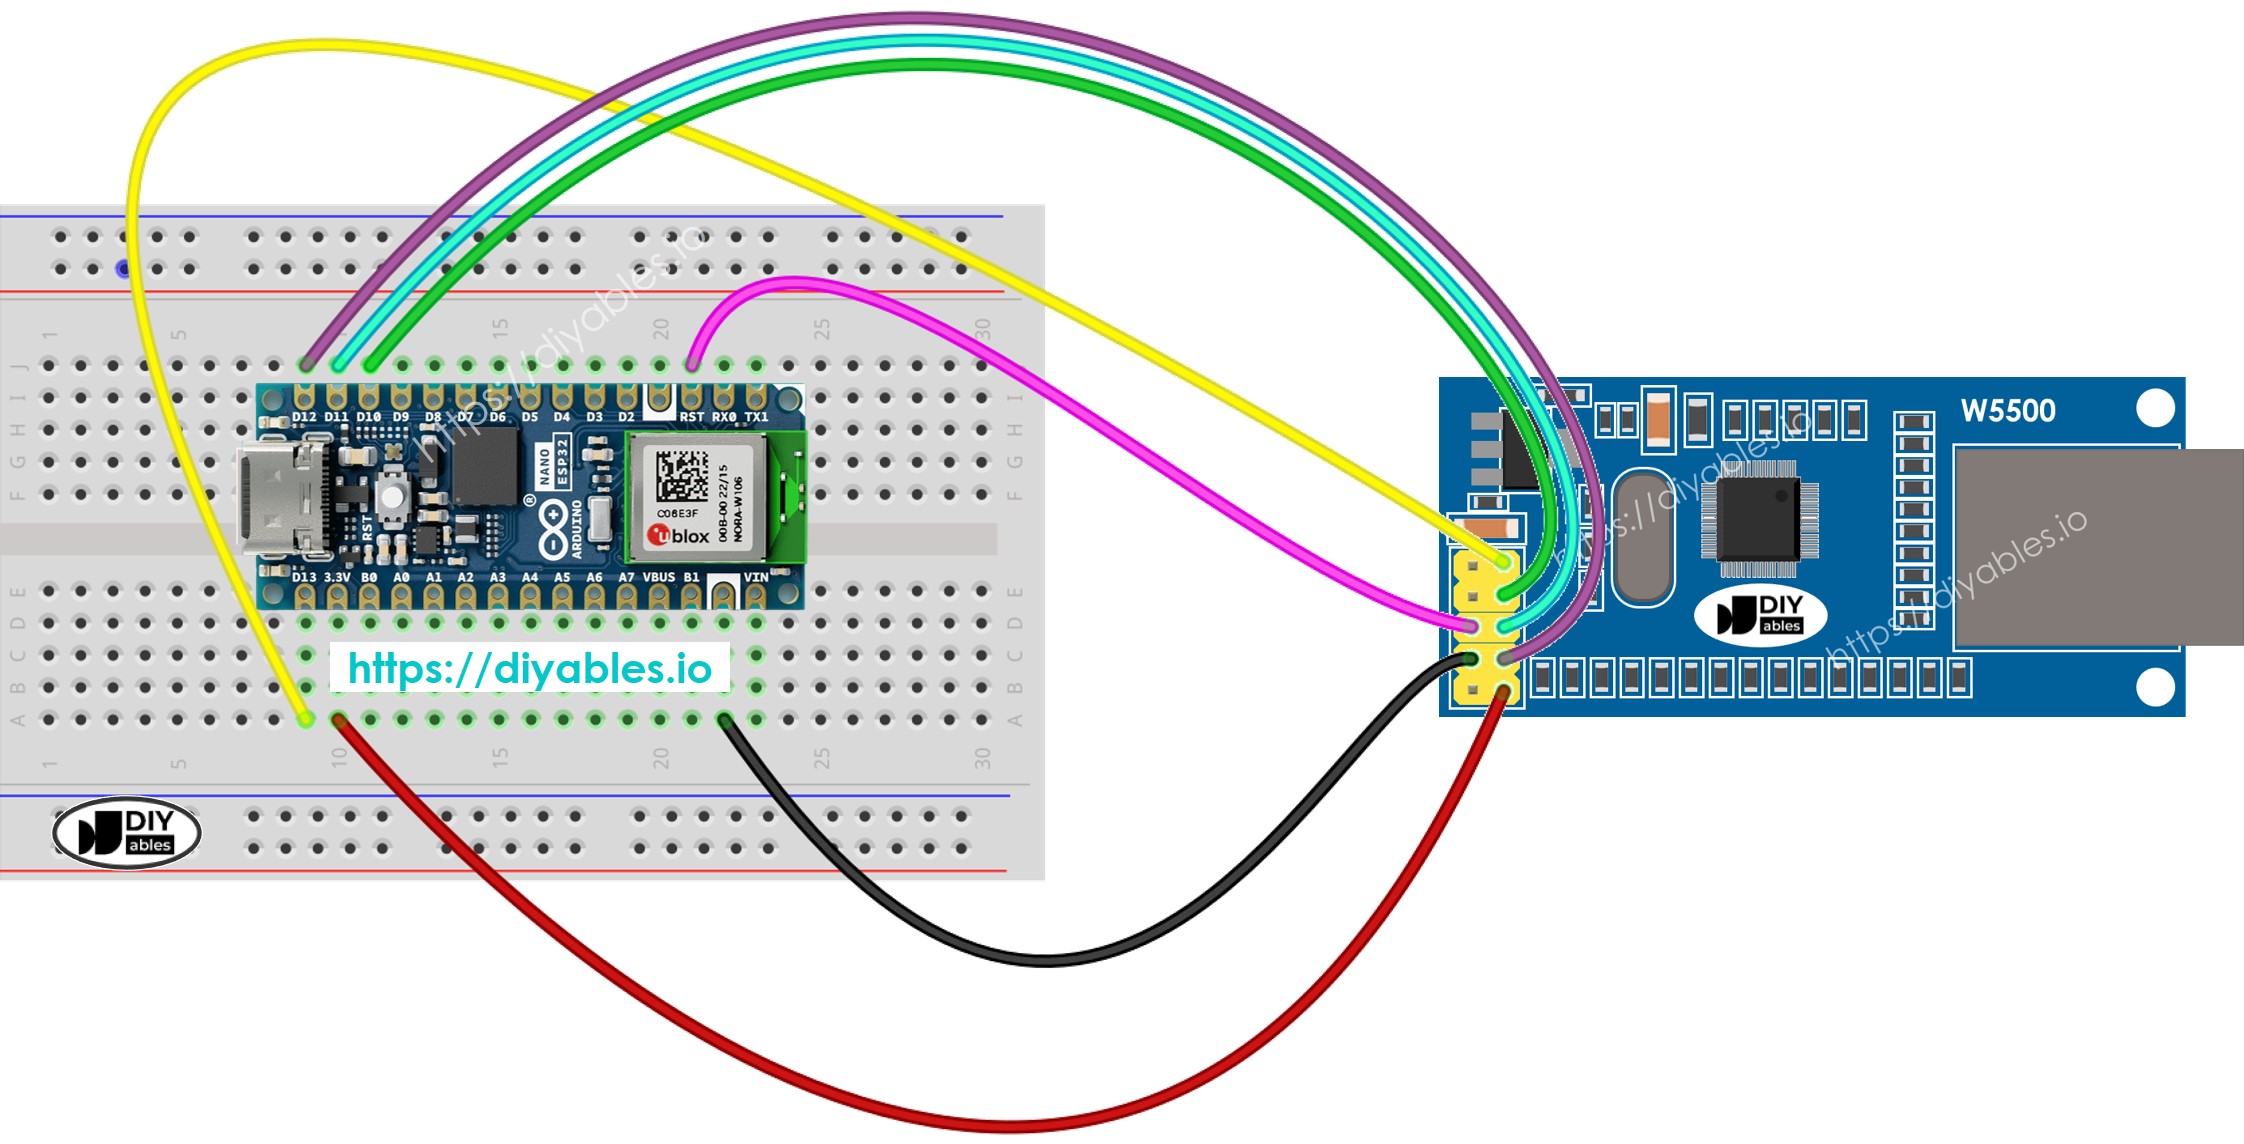
This image is created using Fritzing. Click to enlarge image
image source: diyables.io
Código Arduino Nano ESP32 para el módulo Ethernet - Realizando una solicitud HTTP a través de Ethernet
Este código funciona como un cliente web. Envía solicitudes HTTP al servidor web en http://example.com/.
/*
* Este código de Arduino Nano ESP32 fue desarrollado por es.newbiely.com
* Este código de Arduino Nano ESP32 se proporciona al público sin ninguna restricción.
* Para tutoriales completos y diagramas de cableado, visite:
* https://es.newbiely.com/tutorials/arduino-nano-esp32/arduino-nano-esp32-ethernet
*/
#include <SPI.h>
#include <Ethernet.h>
// replace the MAC address below by the MAC address printed on a sticker on the Arduino Shield 2
byte mac[] = { 0xDE, 0xAD, 0xBE, 0xEF, 0xFE, 0xEF };
EthernetClient client;
int HTTP_PORT = 80;
String HTTP_METHOD = "GET"; // or POST
char HOST_NAME[] = "example.com";
String PATH_NAME = "/";
void setup() {
Serial.begin(9600);
delay(1000);
Serial.println("Arduino Nano ESP32 - Ethernet Tutorial");
// initialize the Ethernet shield using DHCP:
if (Ethernet.begin(mac) == 0) {
Serial.println("Failed to obtaining an IP address");
// check for Ethernet hardware present
if (Ethernet.hardwareStatus() == EthernetNoHardware)
Serial.println("Ethernet shield was not found");
// check for Ethernet cable
if (Ethernet.linkStatus() == LinkOFF)
Serial.println("Ethernet cable is not connected.");
while (true)
;
}
// connect to web server on port 80:
if (client.connect(HOST_NAME, HTTP_PORT)) {
// if connected:
Serial.println("Connected to server");
// make a HTTP request:
// send HTTP header
client.println(HTTP_METHOD + " " + PATH_NAME + " HTTP/1.1");
client.println("Host: " + String(HOST_NAME));
client.println("Connection: close");
client.println(); // end HTTP header
while (client.connected()) {
if (client.available()) {
// read an incoming byte from the server and print it to serial monitor:
char c = client.read();
Serial.print(c);
}
}
// the server's disconnected, stop the client:
client.stop();
Serial.println();
Serial.println("disconnected");
} else { // if not connected:
Serial.println("connection failed");
}
}
void loop() {
}
Pasos R\u00e1pidos
Para empezar con Arduino Nano ESP32, siga estos pasos:
- Si eres nuevo en Arduino Nano ESP32, consulta el tutorial sobre cómo configurar el entorno para Arduino Nano ESP32 en el IDE de Arduino.
- Conecta el Arduino Nano ESP32 al módulo Ethernet de acuerdo con el diagrama proporcionado.
- Conecta el módulo Ethernet a tu router o conmutador usando un cable Ethernet.
- Conecta la placa Arduino Nano ESP32 a tu computadora usando un cable USB.
- Abre el IDE de Arduino en tu computadora.
- Selecciona la Arduino Nano ESP32 placa y su puerto COM correspondiente.
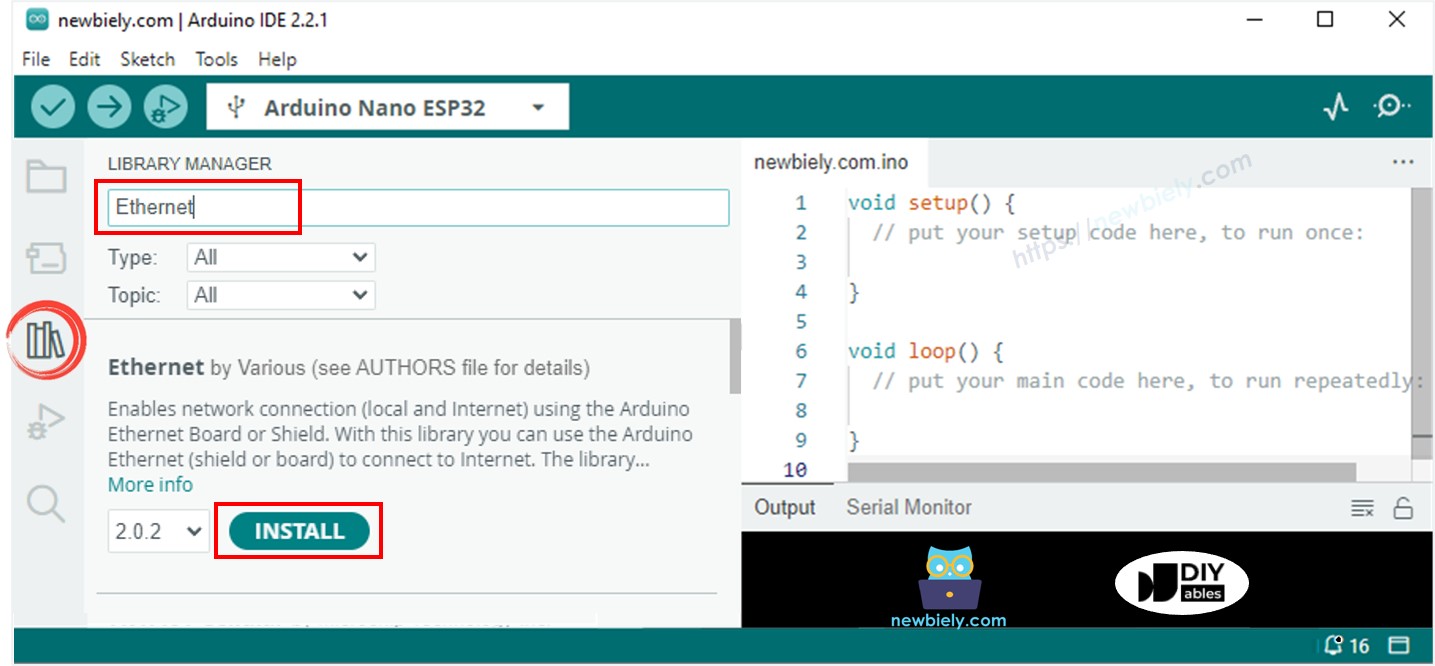
- Haz clic en el icono Bibliotecas en la barra izquierda del IDE de Arduino.
- Busca “Ethernet”, luego encuentra la biblioteca Ethernet por Various
- Haz clic en el botón Instalar para instalar la biblioteca Ethernet.
- Abre el Monitor Serial en el IDE de Arduino.
- Copia el código proporcionado y pégalo en el IDE de Arduino.
- Pulsa el botón Subir en el IDE de Arduino para enviar el código al ESP25.
- Consulta el Monitor Serial, que mostrará la salida como se muestra a continuación.
COM6
Arduino Nano ESP32 - Ethernet Tutorial
Connected to server
HTTP/1.1 200 OK
Accept-Ranges: bytes
Age: 208425
Cache-Control: max-age=604800
Content-Type: text/html; charset=UTF-8
Date: Fri, 12 Jul 2024 07:08:42 GMT
Etag: "3147526947"
Expires: Fri, 19 Jul 2024 07:08:42 GMT
Last-Modified: Thu, 17 Oct 2019 07:18:26 GMT
Server: ECAcc (lac/55B8)
Vary: Accept-Encoding
X-Cache: HIT
Content-Length: 1256
Connection: close
<!doctype html>
<html>
<head>
<title>Example Domain</title>
<meta charset="utf-8" />
<meta http-equiv="Content-type" content="text/html; charset=utf-8" />
<meta name="viewport" content="width=device-width, initial-scale=1" />
</head>
<body>
<div>
<h1>Example Domain</h1>
<p>This domain is for use in illustrative examples in documents. You may use this
domain in literature without prior coordination or asking for permission.</p>
<p><a href="https://www.iana.org/domains/example">More information...</a></p>
</div>
</body>
</html>
disconnected
Autoscroll
Clear output
9600 baud
Newline
※ Nota:
Si otro dispositivo en la misma red tiene la misma dirección MAC, podría causar problemas.
Arduino Nano ESP32 código para el módulo Ethernet - Servidor Web
El código que se muestra a continuación convierte el Arduino Nano ESP32 en un servidor web. Este servidor envía una página web simple a los navegadores web.
/*
* Este código de Arduino Nano ESP32 fue desarrollado por es.newbiely.com
* Este código de Arduino Nano ESP32 se proporciona al público sin ninguna restricción.
* Para tutoriales completos y diagramas de cableado, visite:
* https://es.newbiely.com/tutorials/arduino-nano-esp32/arduino-nano-esp32-ethernet
*/
#include <SPI.h>
#include <Ethernet.h>
// replace the MAC address below by the MAC address printed on a sticker on the Arduino Shield 2
byte mac[] = { 0xDE, 0xAD, 0xBE, 0xEF, 0xFE, 0xEF };
EthernetServer server(80);
void setup() {
Serial.begin(9600);
delay(1000);
Serial.println("Arduino Nano ESP32 - Ethernet Tutorial");
// initialize the Ethernet shield using DHCP:
if (Ethernet.begin(mac) == 0) {
Serial.println("Failed to obtaining an IP address");
// check for Ethernet hardware present
if (Ethernet.hardwareStatus() == EthernetNoHardware)
Serial.println("Ethernet shield was not found");
// check for Ethernet cable
if (Ethernet.linkStatus() == LinkOFF)
Serial.println("Ethernet cable is not connected.");
while (true)
;
}
server.begin();
Serial.print("Arduino Nano ESP32 - Web Server IP Address: ");
Serial.println(Ethernet.localIP());
}
void loop() {
// listen for incoming clients
EthernetClient client = server.available();
if (client) {
Serial.println("new client");
// an HTTP request ends with a blank line
bool currentLineIsBlank = true;
while (client.connected()) {
if (client.available()) {
char c = client.read();
Serial.write(c);
// if you've gotten to the end of the line (received a newline
// character) and the line is blank, the HTTP request has ended,
// so you can send a reply
if (c == '\n' && currentLineIsBlank) {
// send a standard HTTP response header
client.println("HTTP/1.1 200 OK");
client.println("Content-Type: text/html");
client.println("Connection: close"); // the connection will be closed after completion of the response
client.println();
client.println("<!DOCTYPE HTML>");
client.println("<html>");
client.println("<body>");
client.println("<h1>Arduino Nano ESP32 - Web Server with Ethernet</h1>");
client.println("</body>");
client.println("</html>");
break;
}
if (c == '\n') {
// you're starting a new line
currentLineIsBlank = true;
} else if (c != '\r') {
// you've gotten a character on the current line
currentLineIsBlank = false;
}
}
}
// give the web browser time to receive the data
delay(1);
// close the connection:
client.stop();
Serial.println("client disconnected");
}
}
Pasos R\u00e1pidos
- Copia el código proporcionado y pégalo en el IDE de Arduino.
- Haz clic en el botón Subir en el IDE de Arduino para enviar el código a tu placa Arduino Nano ESP32.
- Abre el Monitor Serial para ver los resultados tal como se muestran.
COM6
Arduino Nano ESP32 - Ethernet Tutorial
Arduino Nano ESP32 - Web Server IP Address: 192.168.0.2
Autoscroll
Clear output
9600 baud
Newline
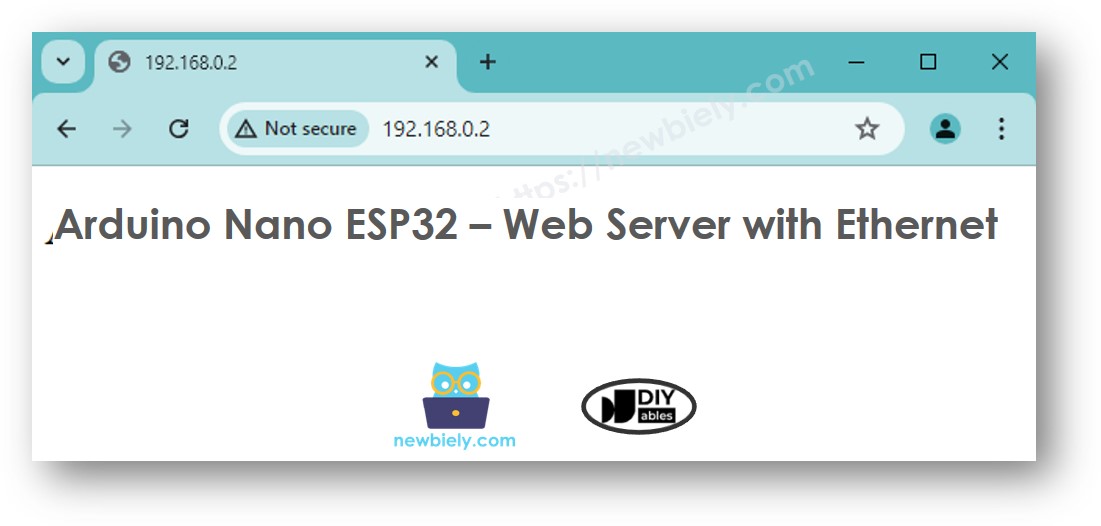
- Ingrese la dirección IP proporcionada en la barra de direcciones de su navegador. Verá una página web simple mostrada por el Arduino Nano ESP32.